Proxmox Beginners Guide
Homelab Web Sever is my previous article on setting up networking and a bare metal Ubuntu Server for hosting a website from my home.
In this article I am going to use virtualisation to let me run many virtual machines on the single bare metal server. To do this I am going to use:
Proxmox VE - Virtual Environment is an open source server management platform for virtualisation which integrates the KVM - Kernel Virtual Machine Hypervisor.
VMWare ESXi is an alternative to Proxmox VE
Why Run a Homelab?
I want to run
- Self hosted Wordpress for a low traffic site (Apache, PHP, MySQL)
- Python test environments to see what dependencies I need
- Potentially the home Plesk server
- Learn about Ansible
https://github.com/awesome-selfhosted/awesome-selfhosted - other great ideas for home server projects
https://www.reddit.com/r/selfhosted/ - discussion on home server / self hosted
Update 29th July 2022 - I’ve been running Proxmox now for 6 months. It has been very stable running
- a wordpress website hoverflylagoons.co.uk
- an API for hatespeech detection https://osr4rightstools.org/
- auto archivers for https://osr4rightstools.org/auto-archiver
I’m using Pfsense as the firewall and NAT and nginx as a reverse proxy. There is a network diagram a the end of the article.
Install Proxmox - Part 1
I’m following along the excellent tutorials from which I’m updating (14th Jan 2022) https://www.dlford.io/how-to-home-lab-part-1/
https://www.proxmox.com/en/downloads/category/iso-images-pve Version: 7.1-2
Update 29th July 2022 - there is a new updater, but a friend used it and found display issues. So went back to 7.1-2 and it worked!
I used balenaEtcher to create a boot USB.
Network setup
FQDN: pve.dave.home
https://news.ycombinator.com/item?id=29917860 according to this a better name may be pve.home.arpa. Or just register a real domain name to make sure it wont conflict.
PVE is Proxmox Virtual Environment
My home subnet from DHCP on the router is: 192.168.1.0/24 ie subnet mask 255.255.255.0 ie 24 bits are used.
The DHCP range is 192.168.1.64 - 192.168.1.253
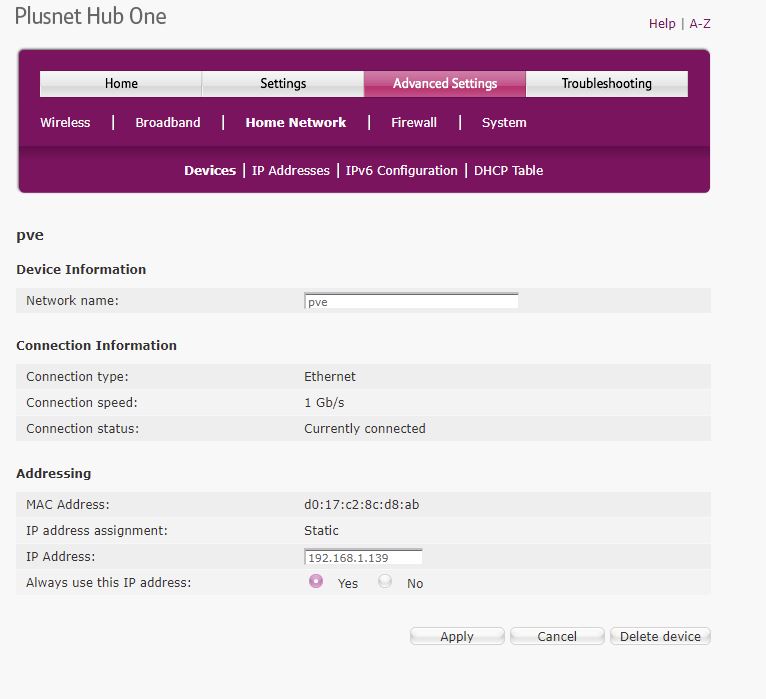
I’ve assigned pve to be on 192.168.1.139 and forced the DHCP table to not assign it to anything else - it is a static IP address now.
Web
https://192.168.1.139:8006/ - PVE Web interface
u: root
Here we are setting up the updates for PVE:
cd /etc/apt/sources.list.d
mv pve-enterprise.list pve-enterprise.list.disabled
# careful of debian version
# Proxmox 7 (7th Dec 2021) runs on Bullseye (Debian 11.2, 18th Dec 2021)
echo 'deb http://download.proxmox.com/debian/pve bullseye pve-no-subscription' > pve-community.list
# version 6
echo 'deb http://download.proxmox.com/debian/pve buster pve-no-subscription' > pve-community.list
apt update
apt -y dist-upgrade
- Proxmox 7 (7th Dec 2021) runs on Bullseye (Debian 11.2, 18th Dec 2021)
- Proxmox 6 runs on Buster (Debian 10)
- Proxmox 5 runs on Stretch (Debian 9 LTS until June 2022)
Proxmox version 5 instead of 6, change “buster” to “stretch” in line three. These are version names for Debian releases, Proxmox versions 5 and 6 run on Debian Stretch and Buster respectively.
Secure Boot Problem
After rebooting from updated above I got a Secure Boot Violation warning from my BIOS
The solution was to go into the BIOS - Boot, then change the order of the boot devices to be the M2 drive and not the UEFI boot loader device.
Create a VM
Upload ISO from workstation
Create VM:
- Name: webserver-test
- OS: Ubuntu (just uploaded)
- Disks: 32GB (Default)
- CPU: 1 Socket, 2 Cores
- Memory: 2048MB (Default)
Start it
It works! However
Got a DHCP address of: 192.168.1.140/24 which is an address gives from the routers DHCP server.
Something which is annoying here is I can’t see the allocated DHCP address on this summary page. I need a guest agent installed - see below qemu-guest-agent
My routers summary page below is fickle too ie displays incomplete information
Ubuntu server install
- server name: webserver-test-ubuntu
- u: dave
put on SSH Server so I can connect from WSL2 on my workstation:
After the Ubuntu server installtion completes (a few minutes), and a reboot, I could access the VM
Interesting information from my router, but not to be trusted. It does get confused. See below when I go to pfSense for DHCP and networking.
ssh 192.168.1.140
# internal DNS works as the router is handling it
ssh webserver-test-ubuntu
Can see the pve hypervisor on .139, and the newly created VM with it’s correct linux servername I gave above when I named the server (not in pve).
sudo apt update -y
sudo apt dist-upgrade -y

sudo apt-get install nginx -y
Updates - Part 2
https://www.dlford.io/managing-proxmox-how-to-home-lab-part-2/#software-updates
For software updates maybe do every week.
For PVE version updates - follow the advice above. Maybe log into the server directly rather than the web interface.
Reboot PVE if Kernel update.
After a full shutdown and restart the following day, pfSense did not auto start up. I tried to replicate but perhaps after a proxmox update it needs a full shutdown / startup test.
# stay on top of VM updates
sudo apt update
sudo apt dist-upgrade
Upgrading the distribution of a linked clone - lets find out how this affects new instances of a linked clone.
Mount an external USB drive (don’t do this for backup disk)
https://forum.proxmox.com/threads/how-to-add-hard-drive-to-host.119376/ - don’t do this!
Plug it into the usb device and restart proxmox!
Can see my eternal disk 2TB Elements (note it is formatted with ntfs)
I had strange issues where the disk disappeared, so trying an exfat disk instead.
ChatGPT why does my usb disk disappear from proxmox
dmseg log output from the shell showing the disk.
Wipe Disk, Initialize with GPT
But do I want a snapshot or backup?
Disks, LVM-Thin, select correct Disk eg /dev/sda, Create - this took 10 minutes on a 2TB usb disk.
Disk is not LVM (thin)
And accessible as pmback.
Mount USB external drive as backup disk
https://www.youtube.com/watch?v=lZjMxdBPH7M hmm it didn’t work.. lets try this video
/dev/sda/
lsusb to see if usb 2 or 3. Just to make sure am connected to the right hub
fidisk -l - to see what disks are formatted as.
5:45
mkfs.ext4 /dev/sda - is apparently in use by the system; will not make a filesystem here!
blkid -o list - gets uuid
mkdir /mnt/usb-drive
ls -l /dev/disk/by-uuid/* - list devices by uuid. So that if we plug in other usb drives and gthey can assigned to /dev/sda then it would get a failure on mount if it is sdb etc..
vim /etc/fstab
Add in /dev/disk/by-uuid/ab6e004f-6c99-4d33-b145-4208201c404e /mnt/usb-drive ext4 defaults 0
df -h - it is not there yet
mount -a - run fstab
df -h
It is there!
Root level, Storage, Add, Directory
Select a VM, Backup Now,
Every one of my VM’s being backed up to the usb drive.
Snapshots VS Backups
Backups - complete representation of VM.
Snapshot - representation of VM’s state.
Use a snapshot if you’re doing a risky upgrade and may want to roll back a VM. Otherwise use a backup.
You can run a backup of a VM that is running.
Took 1 minute (on SSD) at 2GB in disk space.
Restore
Make sure the origianl VM is stopped. Then can restore it.
Restore from above took 7 minutes.
Restore to a new VM
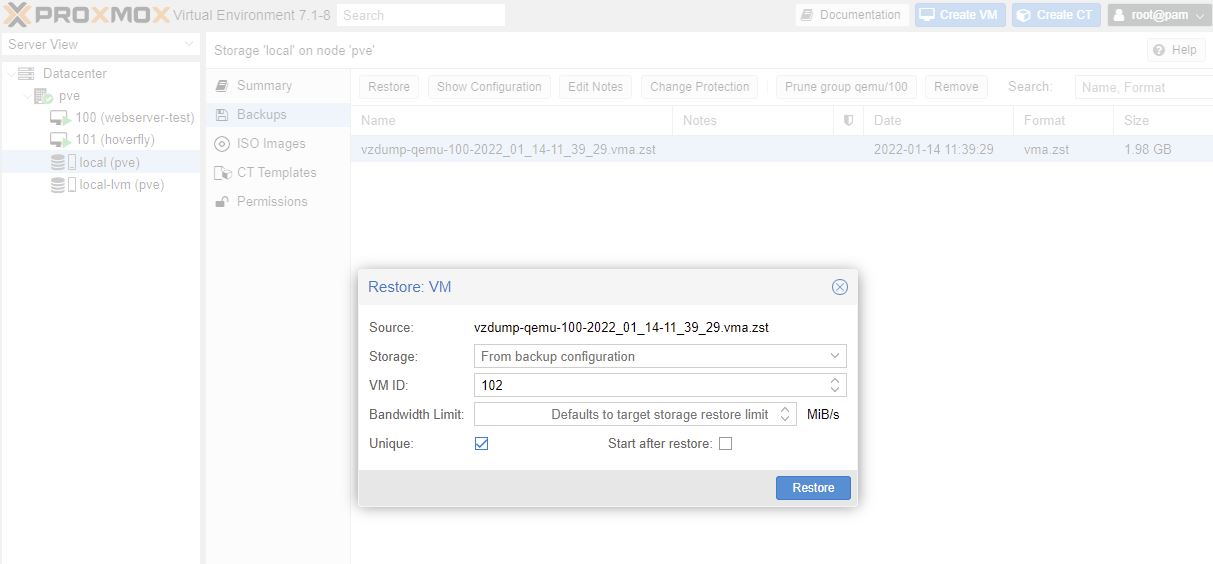
Local (pve) > Backups > Restore
Check the Unique box to generate a new unique values eg MAC address
This took 32 seconds to create a new VM
The new VM started with the same name Proxmox and the unix name was the same. Confusing.
Rename VM in Proxmox.
To change the hostname in Ubuntu:
# display current hostname
hostnamectl

# change hostname
sudo hostnamectl set-hostname newNameHere

# updates hosts file
sudo vim /etc/hosts

sudo reboot now
This works, but I’m sure there is a better way (Linked Clone) to easily spin up pre-built machine.
Schedule backups
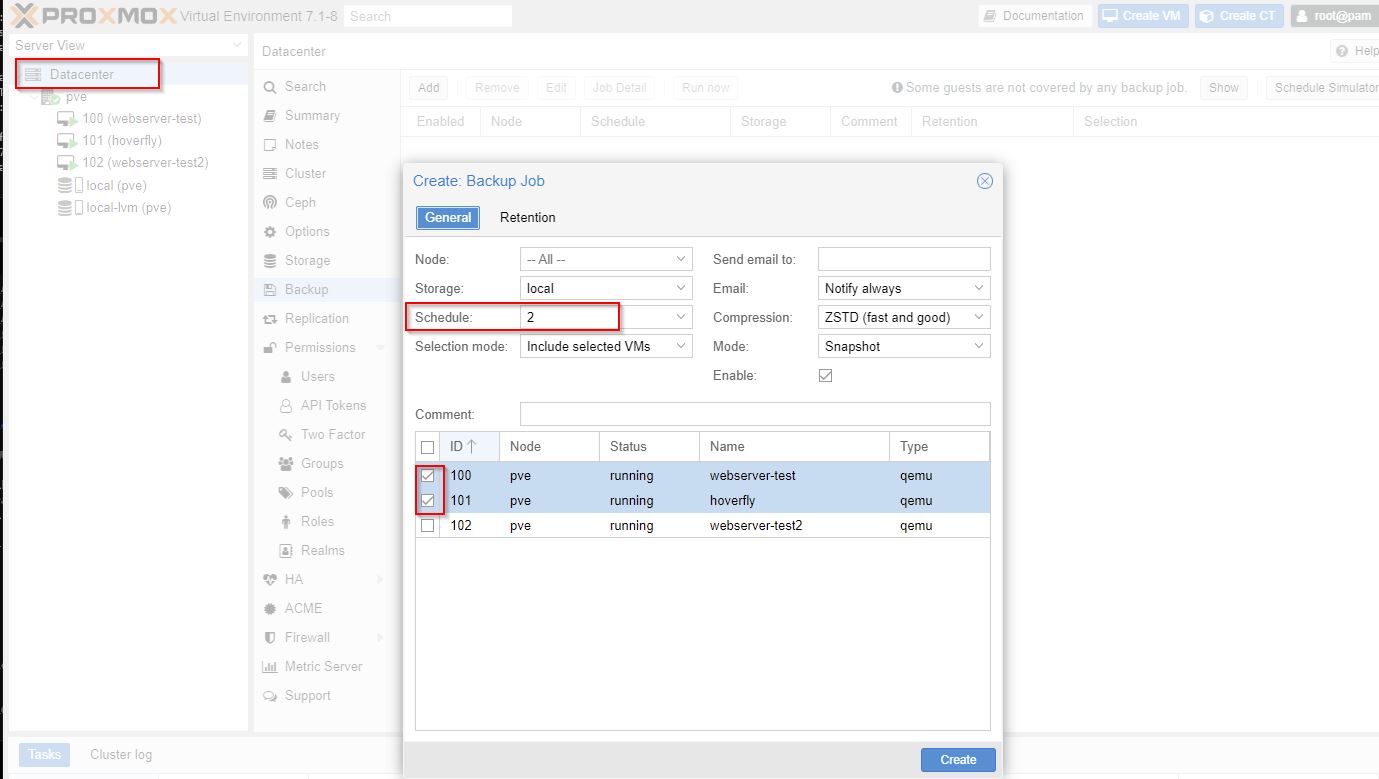
Selecting Schedule 2 am here I have a typo, Schedule should be: 02:00 and VM’s to backup. Next tab gives retention for days, weeks, months, years.
Intranet Site with pfSense - Part 3
https://www.dlford.io/pfsense-nat-how-to-home-lab-part-3/ Intranet Site pfSense
Proxmox provides some really great firewall features, unfortunately they don’t offer the configuration options we need for DHCP, DNS, and NAT, so we’ll be using pfSense to handle all of those.
But do I need this firewall if I want to host some websites?
Yes.. want the homelab to be as secure as possible. The firewall allows me to segreate my home network from the ‘prod’ which is called ‘LAN’ network.
TODO put in network diagram here
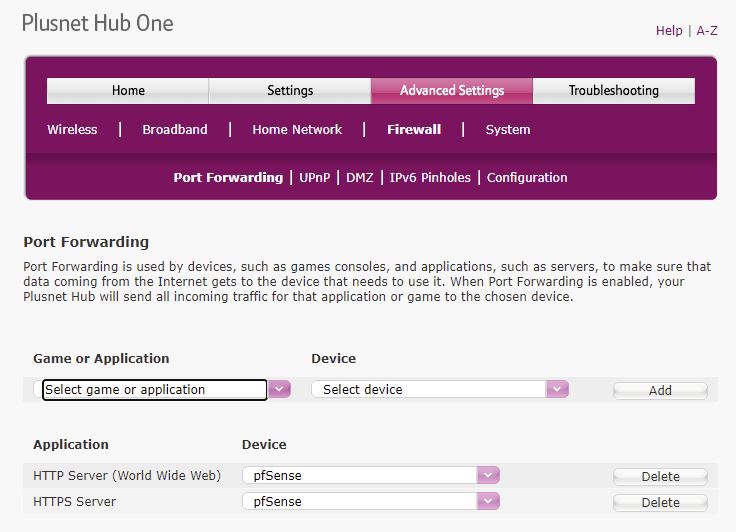
He is heading towards the modem in bridge mode so pfSense gets a public IP from the ISP. Bridge mode disables firewalling on the modem. I’m still using my modems firewall and port forwarding 80 and 443 to the firewall.
Everything else is connected to the pfSense box cia a VLAN aware switch. Separate VLAN networks in pfSense for lab, IOT, workstations.
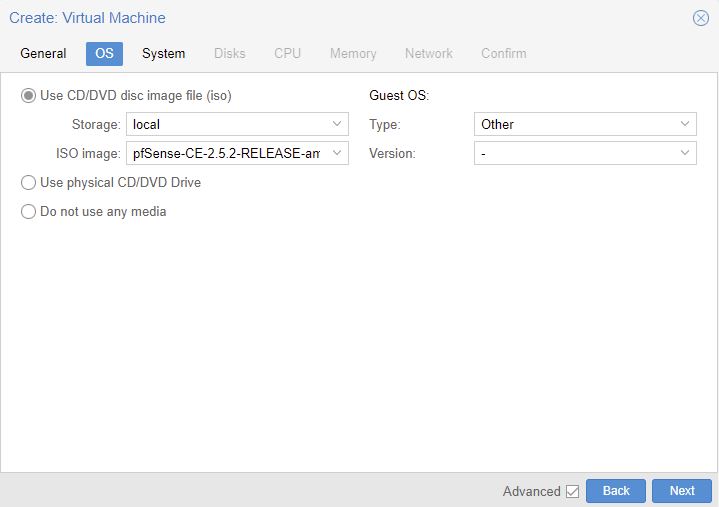
https://www.pfsense.org/download/ AMD64 and ISO. I’m using pfsense 2.5.2
upload ISO to PME.
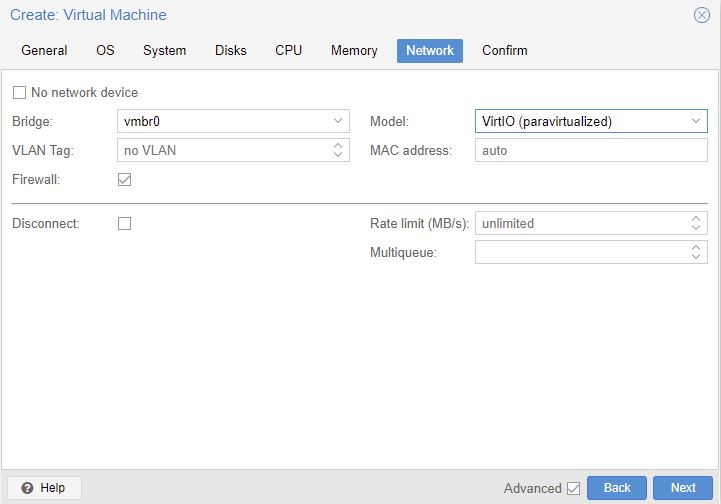
This was my System, Network with default settings before I changed anything.
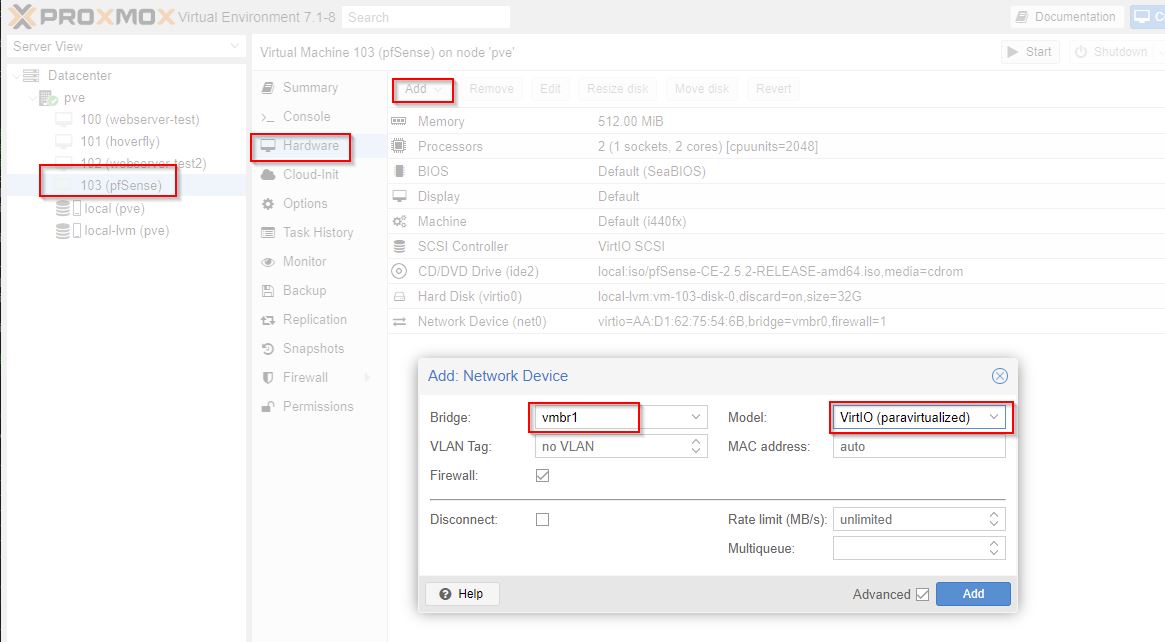
We are going to create a private internal network
Setting up a linux bridge for private internal nework (LAN) whgich is on 172.16.44.0
Reboot Proxmox after this.
Advanced settings, start at boot. Start this first (higher number is later). Delay other VMs starting for 30s
OS to type Other.
Bus/Device to VirtIO Block and Discard ticked.
Cores 2 and CPU units: 2048. The higher the number so this will get more priority than a default 1024.
512MB Memory is fine.
Choose VirtIO for Model, and leave Bridge on old one. We will do once wizard is done.
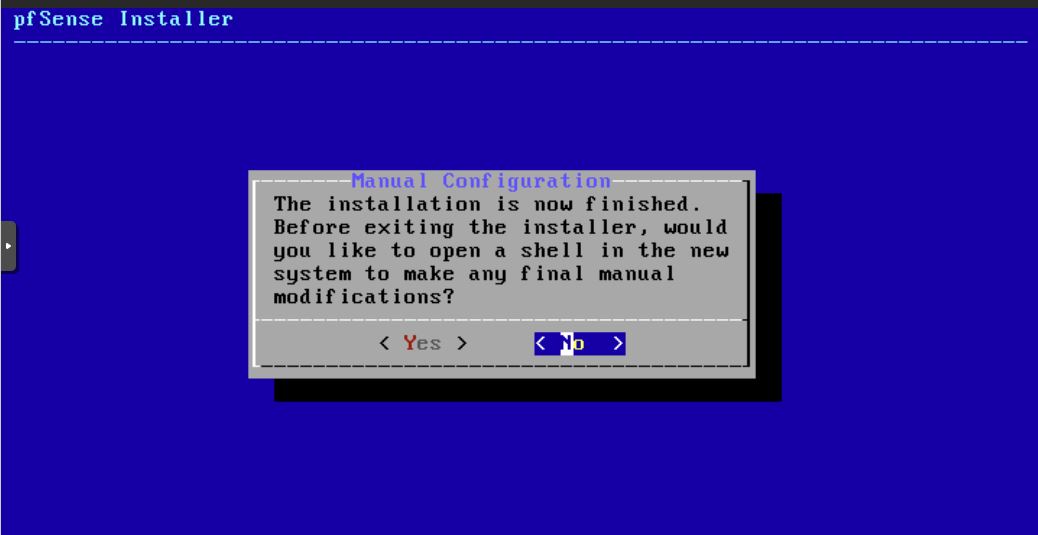
I pressed No.
After booting:
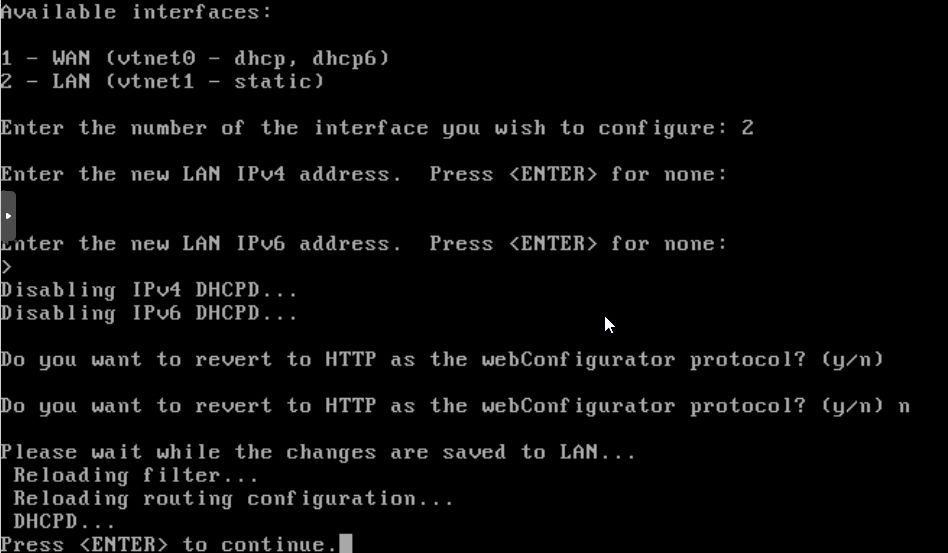
- Should VLANS be set up now? No
- WAN interface: (vtnet0)
- LAN interface: (vtnet1)
8 to access a shell
# disable packet filter (firewall) temporarily so can access web interface from WAN side
pfctl -d
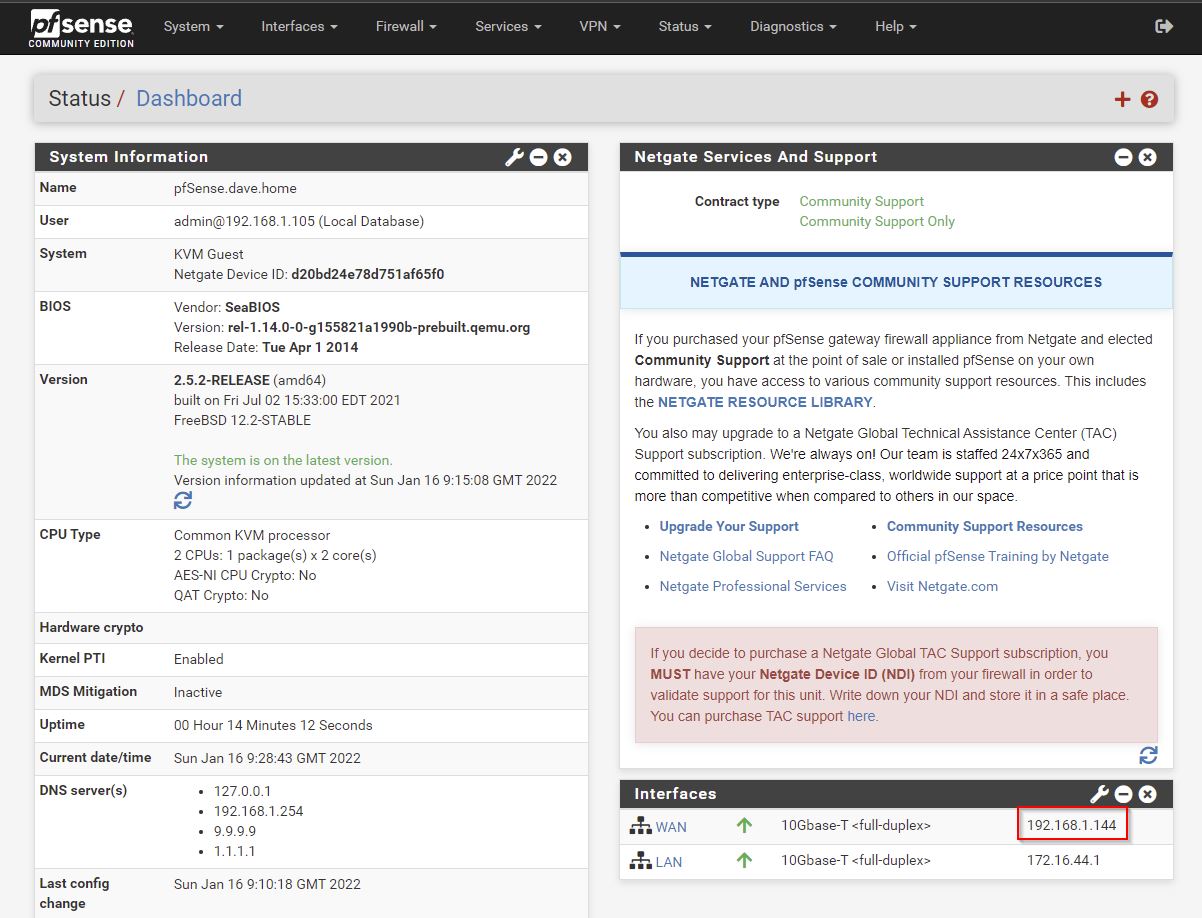
WAN IP is 192.168.1.144/24
LAN is 192.168.1.1/24 (ahh not good -conflicting)
I couldn’t connect to the web interface from my workstation. Tried taking off the LAN network and just having the WAN on 192.168.1.144. I had to full reboot pfSense and then it worked!
u: admin
p: pfsense
Domain: can use same as Proxmox host or a new one. I used pve.dave.home for Proxmox. https://news.ycombinator.com/item?id=29917860 discussion here on a better name.
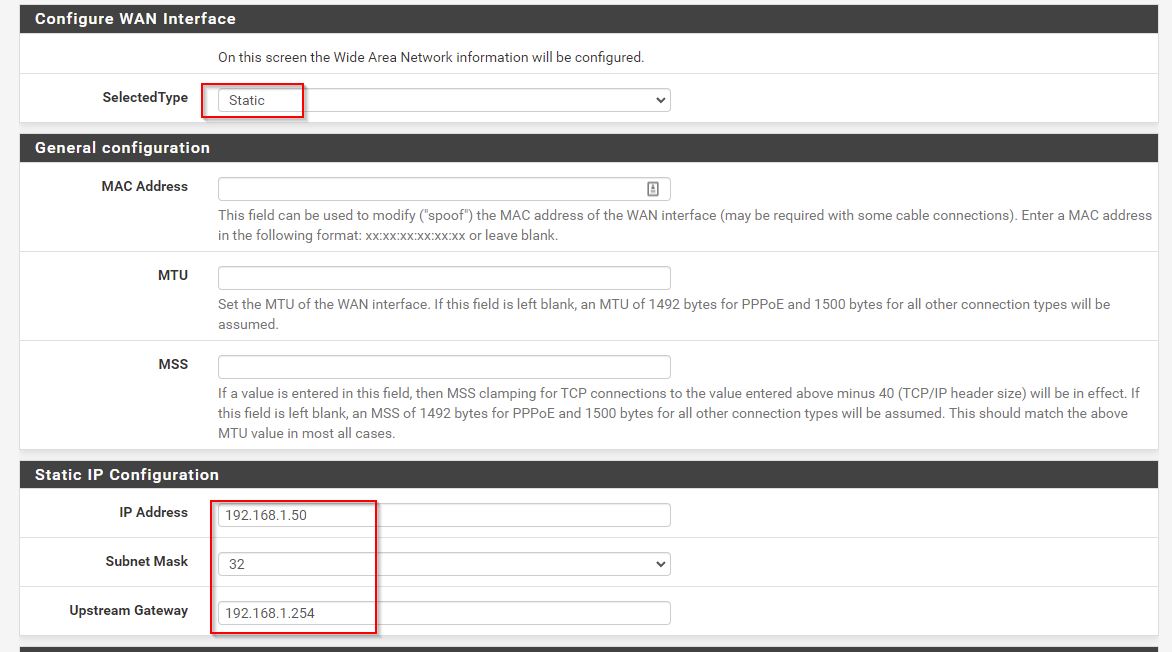
I’m going to force pfSense to use 192.168.1.50 which is outside of the DHCP range of my router/modem.
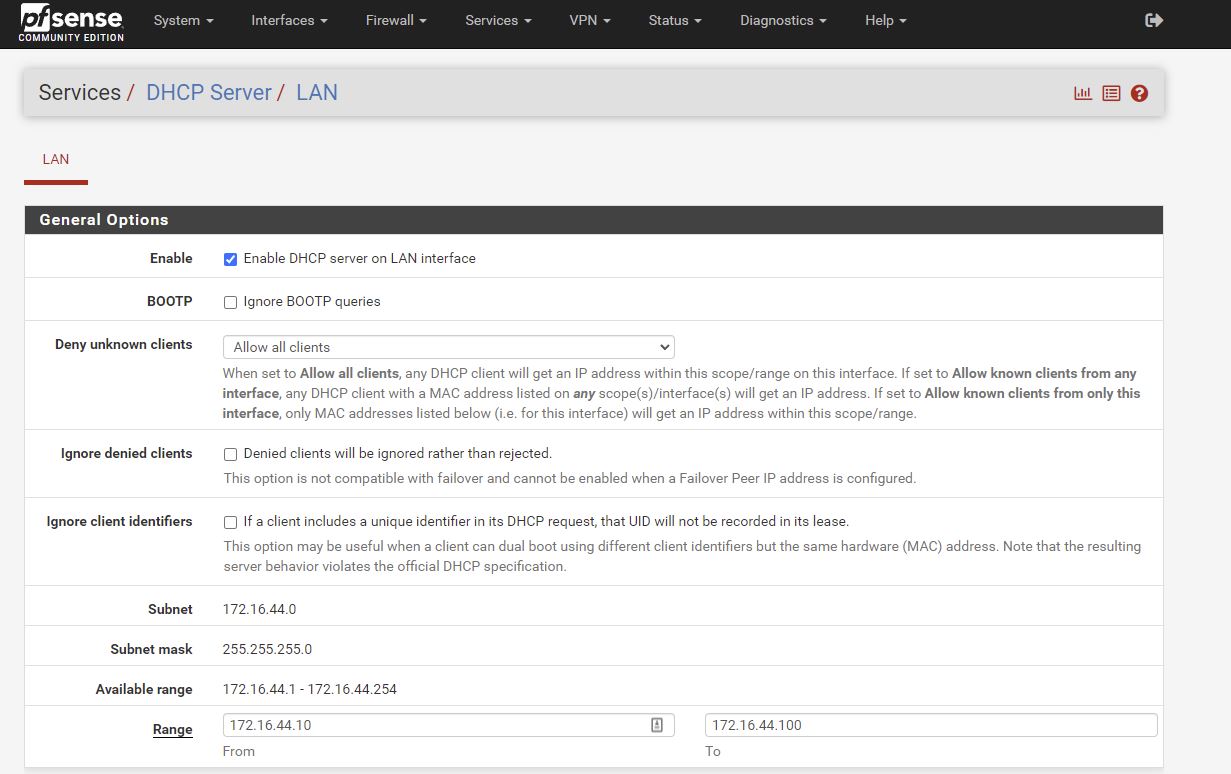
Lan on 172.16.44.1
My plusnet router didn’t like me assigning a static IP address when DHCP is turned on.
The way to get it working was to allow pfSense to get a DHCP address from the router, then force the router’s DHCP to always assign that IP address to pfSense (just like setting up PVE at the top of this article 1st screenshot)
Essentially I’ve 2 static IP’s on my ‘internal’ network now:
- 192.168.1.139 - pve
- 192.168.1.144 - pfSense
In the screenshot I’ve logged in from my workstation which is on 192.168.1.105 which is assinged a DHCP address from the plusnet router. I’ve since made that a static IP on the modem.
Firewall
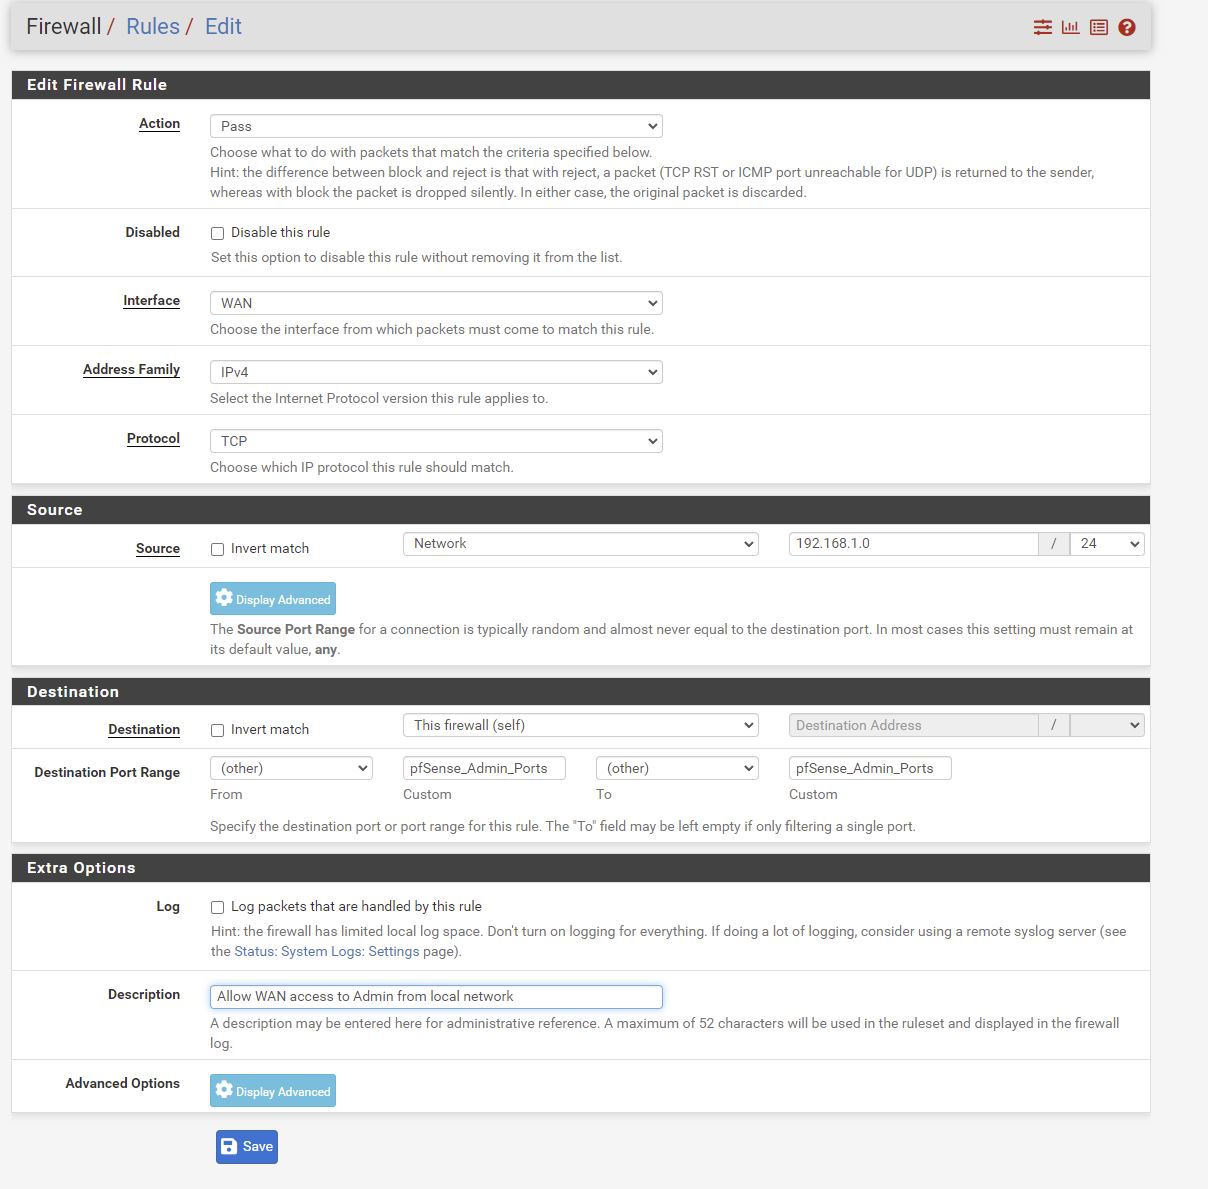
Lets try and get access from my local network only to pfSense
I was locked out after this change. I had to do pfctl -d again.
then
Interfaces > WAN, uncheck at bottom
pfcrl -e to enable the firewall
The firewall is enabled and we can now access the web interface from the workstation.
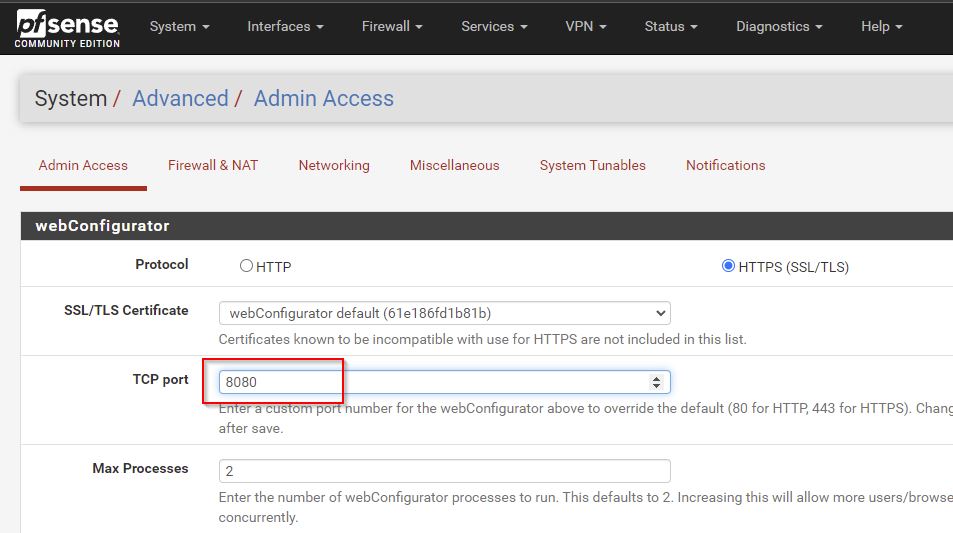
Setting firewall port to 8080
Template Server VM
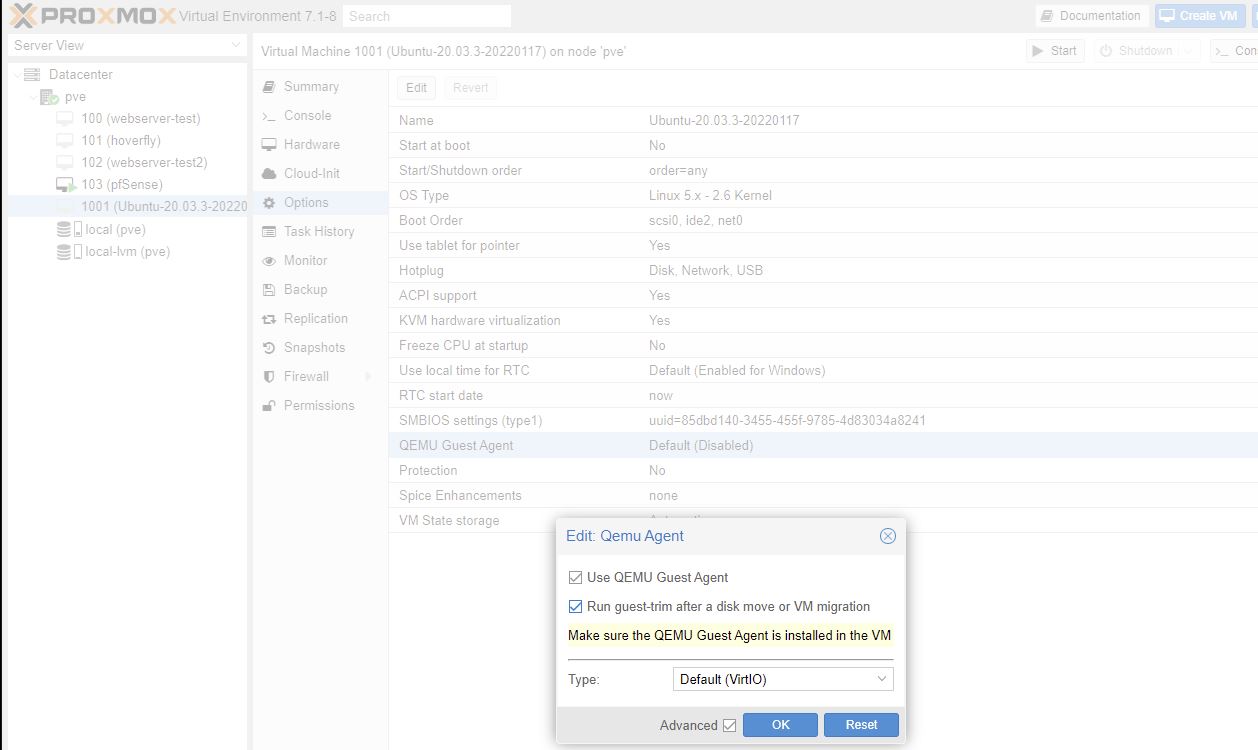
qemu-guest-agent need to install this agent on all VM’s running under Proxmox
- Convert VM to Template
When clone the template to a new VM you get to skip all the confiuration
Another option is to
- Use a template without actuall converting it to a tempalte
Can’t create a linked clone
But can make changes and install updates on teh template since clones aren’t linked
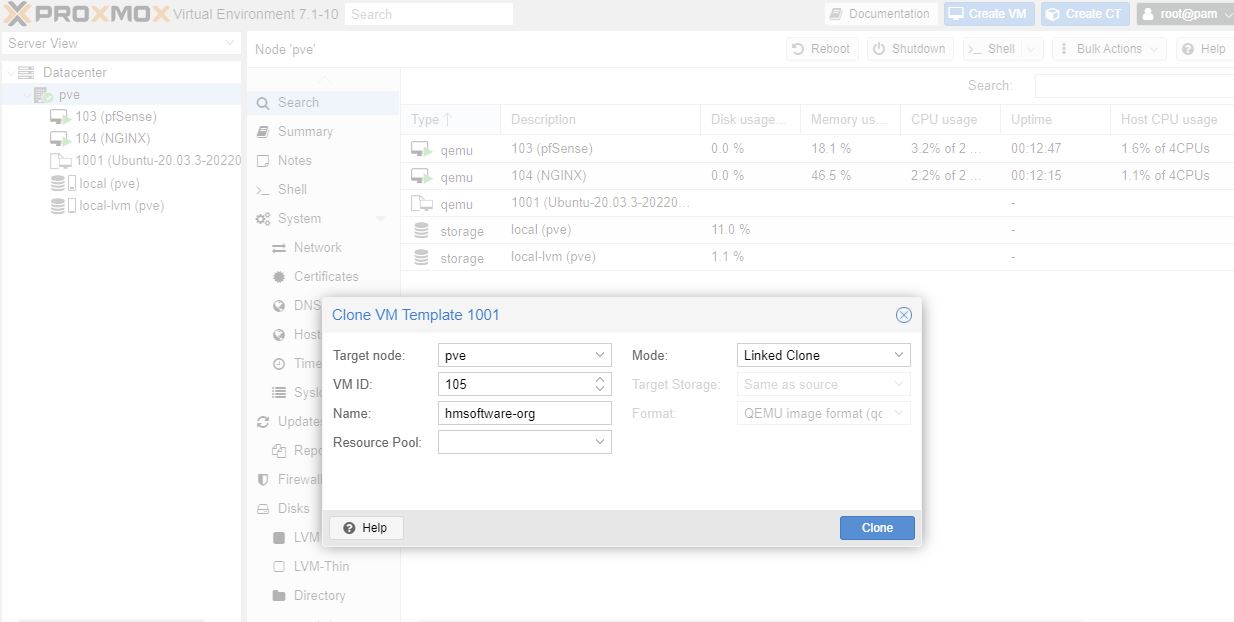
Linked Clones
Save disk space as base OS not copied to the clone
To create a linked clone:
Create VM
- General
- VM ID: 1001 (keep templates at the bottom of the VM list)
- Name: Ubuntu-20.03.3-20220117
- Disk:
- 8GB
- Discard checked (will free up space from files deleted on vm)
- 8GB
- CPU:
- Cores: 2
- Memory:
- 512MB
- Network:
- Bridge: vmbr1 (the private VM internal server network)
Start the VM
Hmm - didn’t work! Try giving it 1GB of RAM. Yes this worked - using 879MB during install.
Next thing is my internal network isn’t working ie not getting assigned a DHCP address.
So this worked and I’ve got an internal address now. I updated the installer
Install the OS
- Use an entire disk and set up LVM
machine name: red
user: dave
password:
Didn’t install SSH as I usually do
Proxmox: Hardware, CD/DVD, Do not use media
Then press enter in ubuntu console as have removed installation hardware.
sudo apt update
# Apt-get dist-upgrade has a smart conflict resolution system, so it will attempt to upgrade the most important packages, at the expense of those deemed less important
sudo apt dist-upgrade

# helps the Proxmox host communicate with the VM guest
sudo apt install -y qemu-guest-agent
Agent:
- shutdown command on Proxmox itself will result in cleaner shutdown on the vm
Shutdown the VM
Tick both boxes.
Click on name on VM, Convery to Template
Create Web Server VM
Right click on template VM and Clone, Linked Clone.
Options > Start at boot yes, Start/Shutdown order: 20 (so will start after pfSense)
Hardware, Network. Copy MAC Address - need it later to set up a DHCP reservation.
start the VM
The agent is working as I can see a good LAN address! We will change this below to be a static IP reservation.
Boilerplate
Anytime you clone a VM, run the following commands to ensure uniqueness:
So this was tricky as couldn’t copy and paste. I ended up doing a NAT Rule so I could SSH into the box.
An easier way is to do
# I forgot to do this in my template
# run from pve console
sudo apt install openssh-server

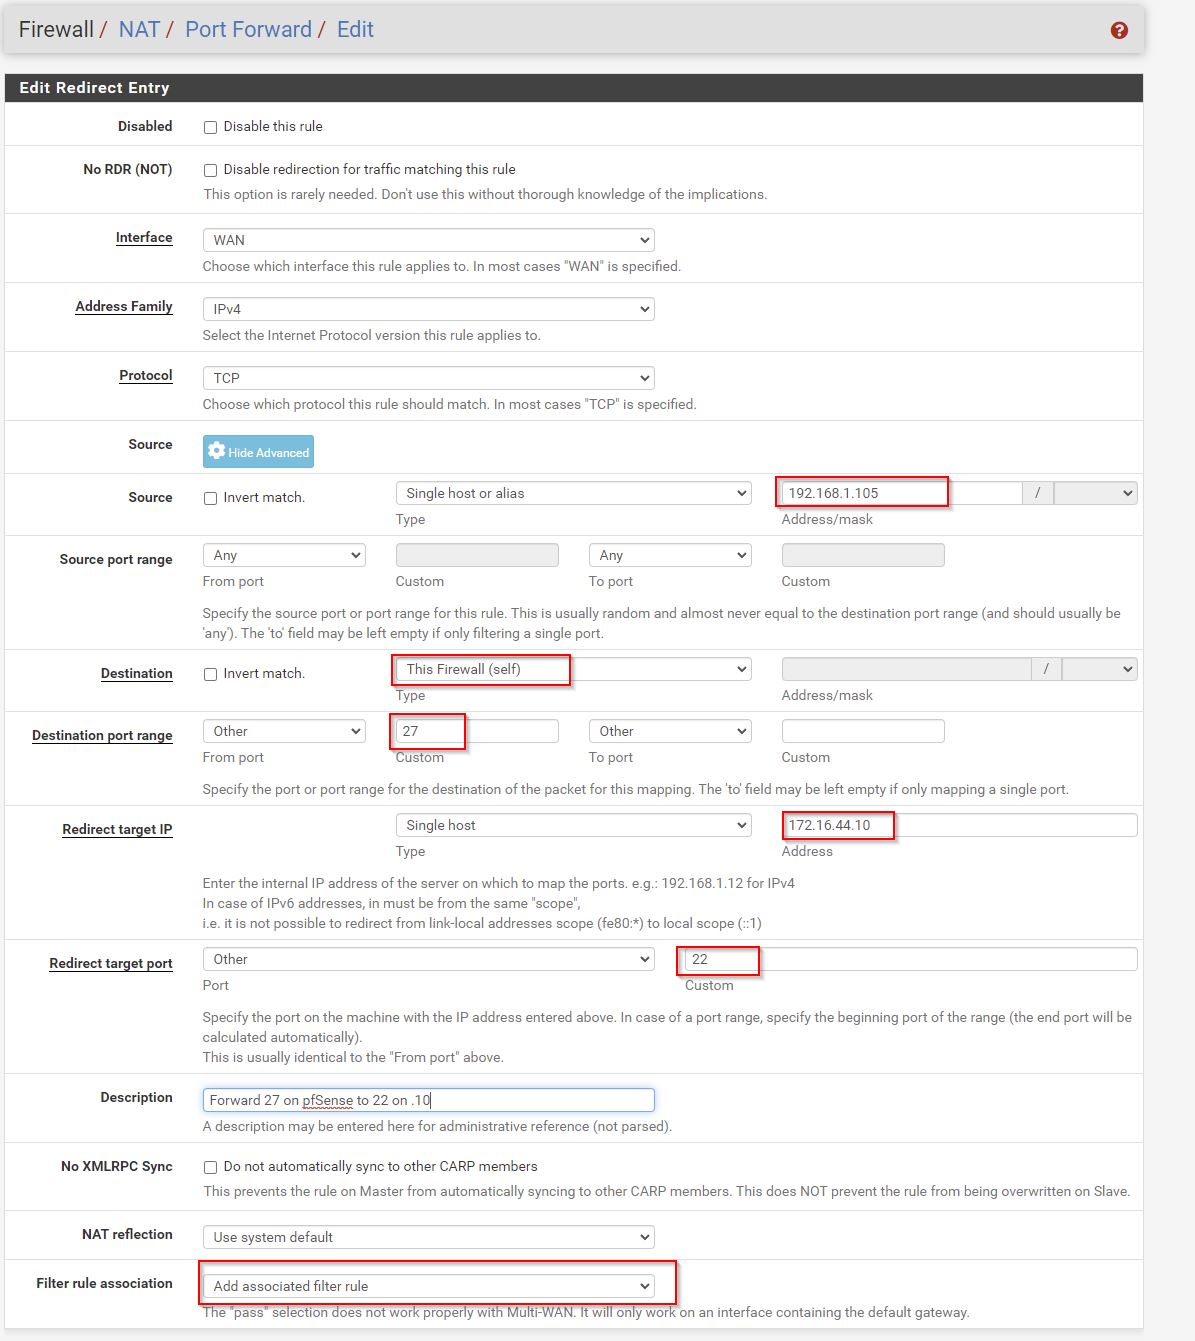
# setup port forward rule (screeshot below) for SSH so can copy and paste
Create a linked rule for NAT and Firewall.
- Firewall > NAT > Port Forward
**note below I’m now using 192.168.1.0/24 instead of 192.168.1.105 as my desktop has a non static IP.
This creates a linked WAN Firewall rule.
# run boilerplate
# https://www.dlford.io/secure-ssh-access-how-to-home-lab-part-5/#boilerplate
sudo bash -c "bash <(wget -qO- https://raw.githubusercontent.com/dlford/ubuntu-vm-boilerplate/master/run.sh)"

# STOP the above command does all below

# to run sudo as interactive session
sudo -i

rm -f /var/lib/dbus/machine-id
rm -f /etc/machine-id
dbus-uuidgen --ensure=/etc/machine-id
ln -s /etc/machine-id /var/lib/dbus/

ssh-keygen -f /etc/ssh/ssh_host_rsa_key -N '' -t rsa -y
ssh-keygen -f /etc/ssh/ssh_host_dsa_key -N '' -t dsa -y
ssh-keygen -f /etc/ssh/ssh_host_ecdsa_key -N '' -t ecdsa -b 521 -y

sudo touch /etc/cloud/cloud-init.disabled

# red was the name of my template vm
# **CHANGE red/xxxx to red/name of new machine**
sed -i 's/red/hmsoftwareorg/g' /etc/hosts
sed -i 's/red/hmsoftwareorg/g' /etc/hostname

# set new hostname to nginx
hostnamectl set-hostname hmsoftwareorg

sudo reboot
After a reboot I got another DHCP allocation 172.16.44.12, so can’t connect anymore.
DHCP Reservation
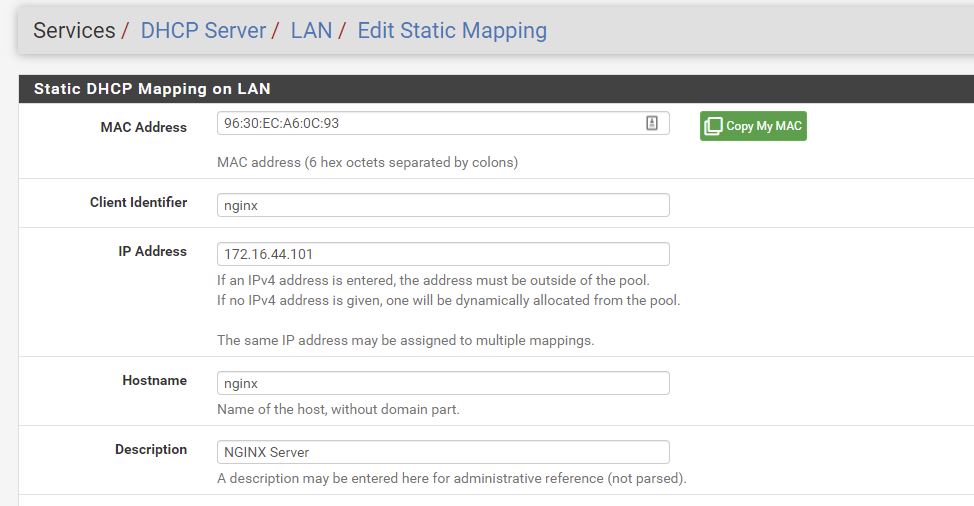
pfsense, Services, DHCP Server, Edit Static mapping (at bottom)
Reserving 172.16.44.101 for this mac address on ie the nginx server.
sudo apt update
sudo apt dist-upgrade

sudo reboot

sudo apt install nginx
https://github.com/djhmateer/proxmox is where I keep my nginx sites-available conf file.
Create Port Forward
We’re aiming for a reverse proxy, so this nginx box will forward on to other nginx vm’s. This way I can have multiple VMs running separate websites. And if one goes down, the others dont.
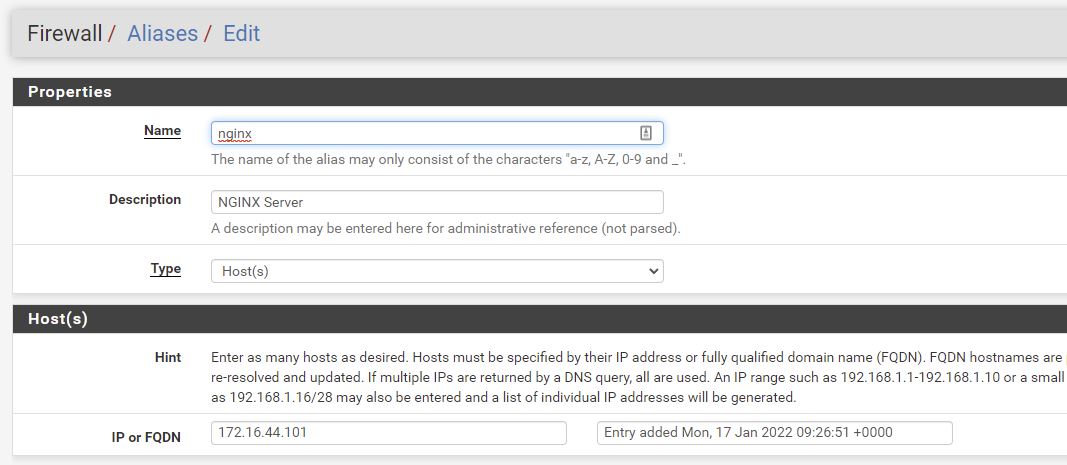
Firewall - Aliases - Add IP
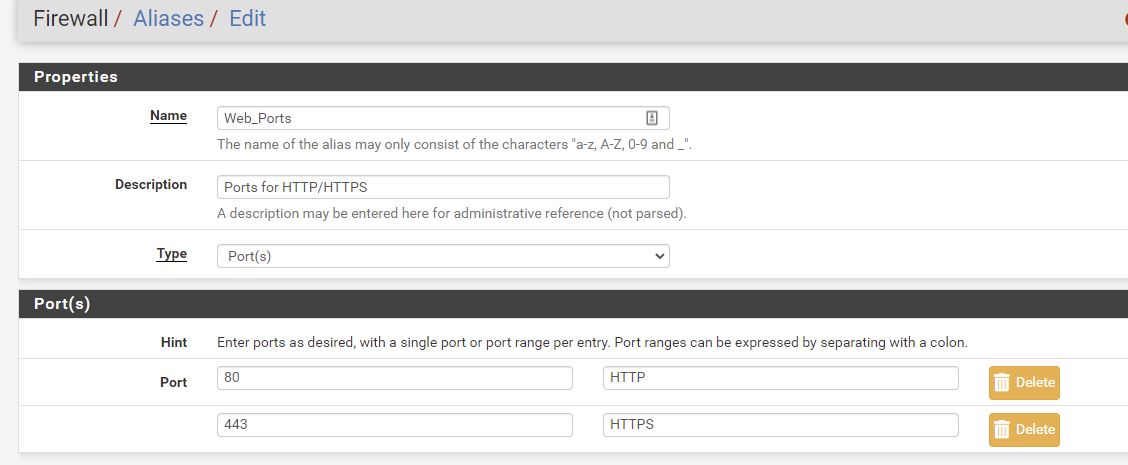
Firewall - Aliases - Ports
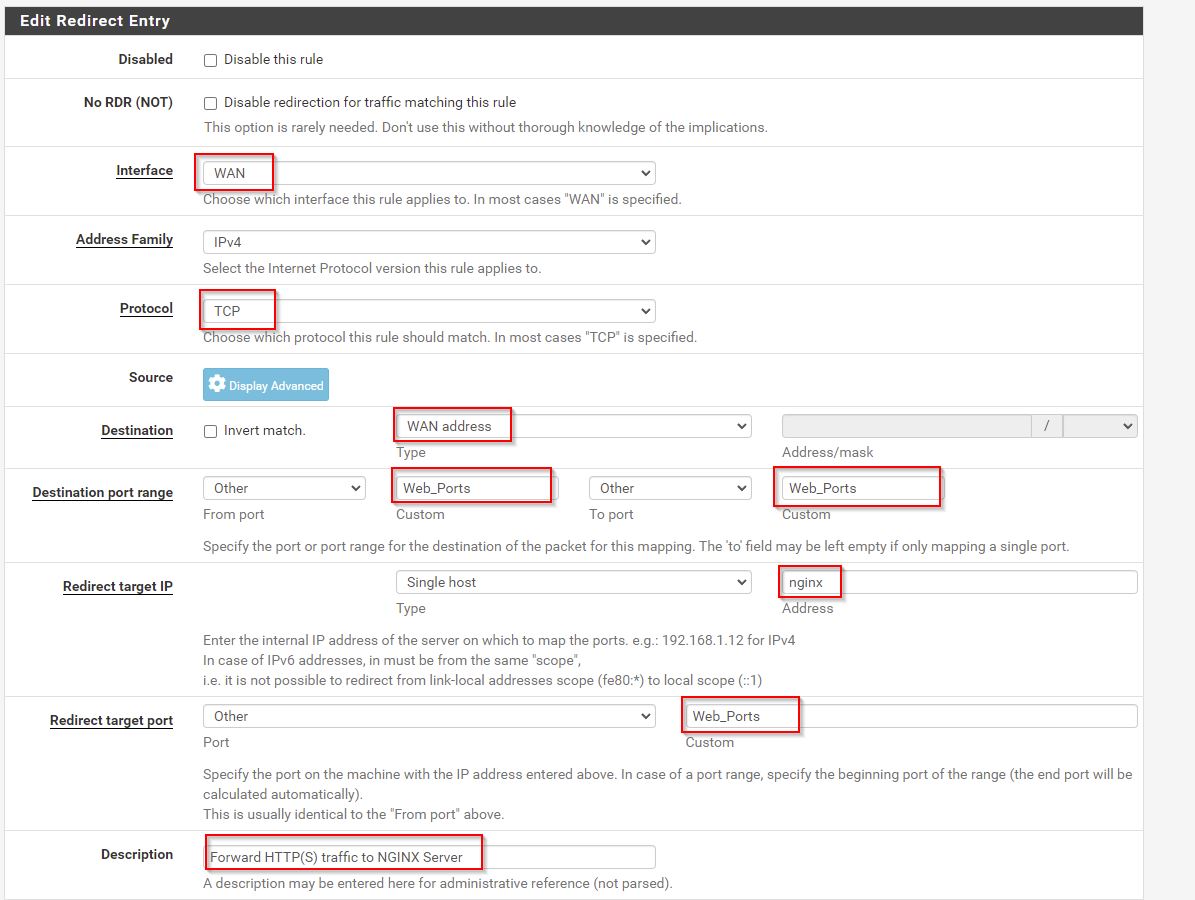
Firewall > NAT > Port Forward
Destination is WAN address. But this could be Firewall.
Then reboot NGINX VM.
Check IP Address is 172.16.44.101
Check if http://192.168.1.144/ which is the IP address of pfSense works after a few minutes. It did.
My workstation is 192.168.1.105
Summary so Far
NAT Port forward rules
Auto created NAT linked rules. Only extra one is allowing access to pfSense Admin Ports from my private 192.168.1.0 network.
We’ll done LAN rules below.
Serve an App on NGINX
This will just be a reverse proxy soon, but for now lets put something on it:
https://linuxize.com/post/how-to-set-up-nginx-server-blocks-on-ubuntu-20-04/
# example of installing from source
# setting up good permissions
sudo -i
apt install git
cd /var/www
rm -rf html
git clone https://github.com/ondras/my-mind.git html

chown -R www-data: /var/www/html

find /var/www/html/ -type d -exec chmod 755 {} \;
find /var/www/html/ -type f -exec chmod 644 {} \;
Setup NGINX Reverse Proxy - Part 4
https://www.dlford.io/nginx-reverse-proxy-how-to-home-lab-part-4/
Growing disk interesting here if we need to.
On our NGINX Reverse proxy
# sites-enabled is simply a sym link
# and has to be setup to point to whatever files we want in sites-available
cd /etc/nginx/sites-available
#sudo ln -s /etc/nginx/sites-available/4t-app.conf /etc/nginx/sites-enabled/

# for simplicity I'm keeping the config in default

# reverse proxy for hmsoftware.org
server {
    listen 80;
    server_name hmsoftware.org;
    location / {
        proxy_read_timeout 36000s;
        proxy_http_version 1.1;
        proxy_buffering off;
        client_max_body_size 0;
        proxy_redirect off;
        proxy_set_header Connection "";
        proxy_set_header Host $host;
        proxy_set_header X-Real-IP $remote_addr;
        proxy_set_header X-Forwarded-For $proxy_add_x_forwarded_for;
        proxy_set_header X-Forwarded-Host $host;
        proxy_set_header X-Forwarded-Proto $scheme;
        proxy_hide_header X-Powered-By;
        proxy_pass_header Authorization;
        proxy_pass http://172.16.44.102:5000;
    }
}

# reverse proxy for hmsoftware.uk
server {
    listen 80;
    server_name hmsoftware.uk;
    location / {
        proxy_read_timeout 36000s;
        proxy_http_version 1.1;
        proxy_buffering off;
        client_max_body_size 0;
        proxy_redirect off;
        proxy_set_header Connection "";
        proxy_set_header Host $host;
        proxy_set_header X-Real-IP $remote_addr;
        proxy_set_header X-Forwarded-For $proxy_add_x_forwarded_for;
        proxy_set_header X-Forwarded-Host $host;
        proxy_set_header X-Forwarded-Proto $scheme;
        proxy_hide_header X-Powered-By;
        proxy_pass_header Authorization;
        proxy_pass http://172.16.44.103:5000;
    }
}

# test config
sudo nginx -t

# reload
sudo service nginx restart
Notice that host headers are on here, and then point to different machines which I’ve got listening on 5000.
The backend webserver don’t need host headers and can just run as default.
Secure SSH Remote Access - Part 5
https://www.dlford.io/secure-ssh-access-how-to-home-lab-part-5/
Create a new VM - ap for access point.
Fail2Ban - looks useful.
I’m not opening up SSH from the outside yet.
Hosting on the Web - Part 6
https://www.dlford.io/hosting-on-the-web-how-to-home-lab-part-6/
Firewall > Alias
Firewall > Rules > LAN
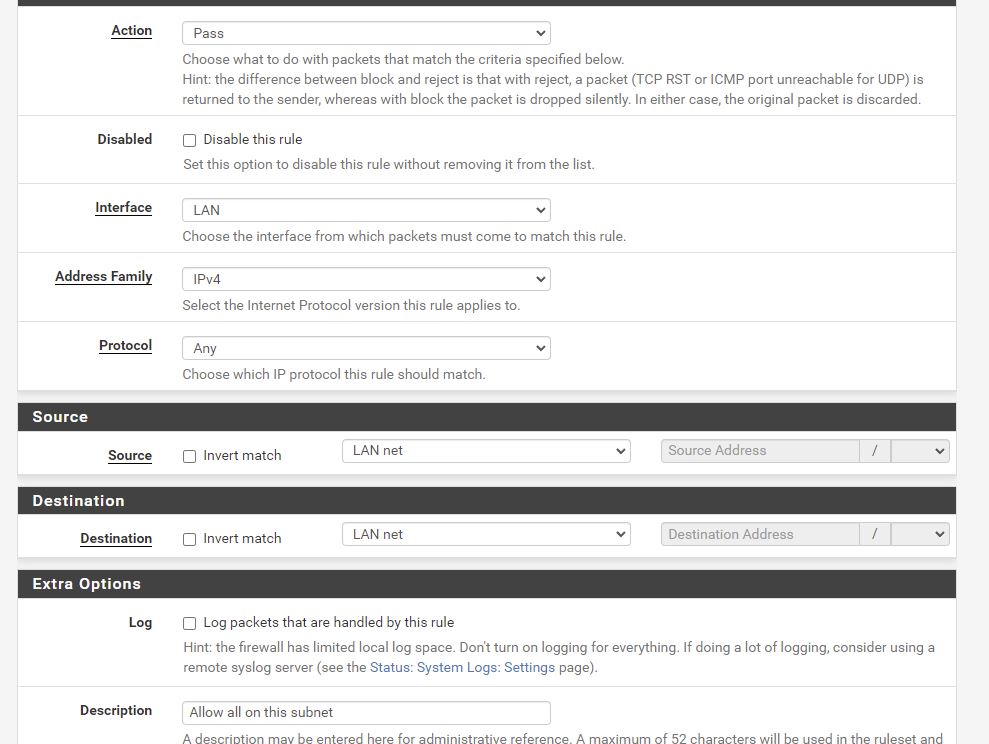
Allow all ports from Non_Public - all this is doing is allowing all ports between machines on the pfSense LAN. Currently I’ve only got 1 machine (nginx), but maybe I’ll have a reverse proxy soon.
Allow outbound DNS
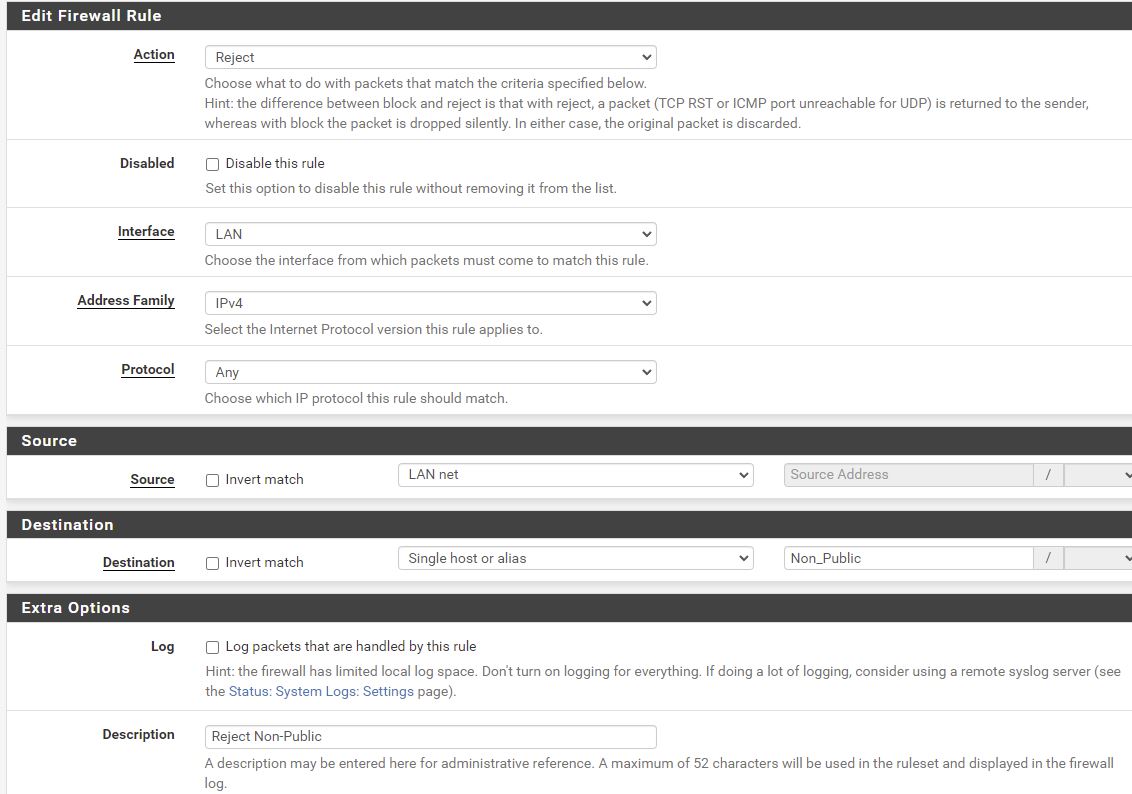
Reject Non_Public
Can’t go from LAN to any other machine on Non_Public ie can’t get to other machines on LAN or my workstation. ie this is to protect my home network.
I had issues with outbound requests going from nginx server to outside world, so deleted subnets here except 192.168.0.0 which is fine for me.
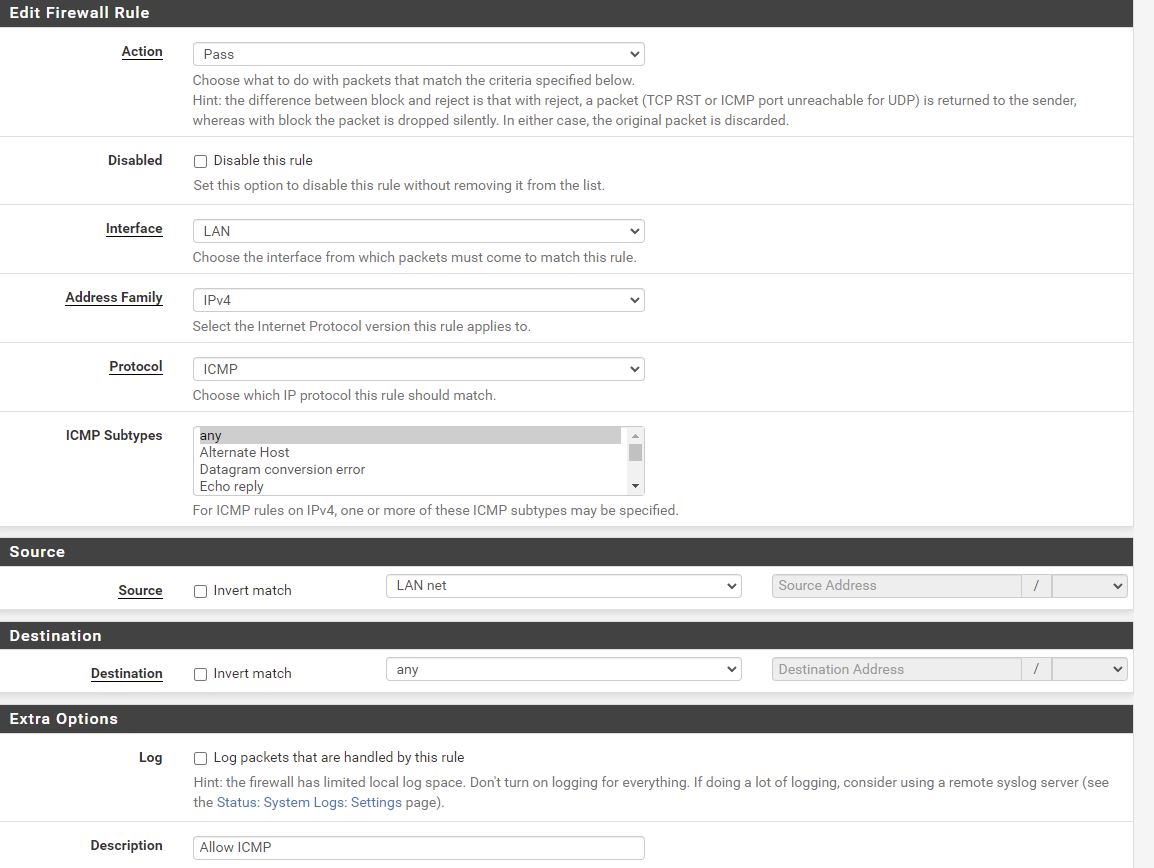
Allow ICMP from LAN outbound
Order and delete the final 2 rules.
Settings
System > Advanced > Networking
Allow IPv6 - uncheck
System > Advanced > Admin Access
Anti-lockout - uncheck
Add Port Forward from the Outside World
Get Nginx listening on 443
cd /etc/nginx/sites-available

sudo apt install ssl-cert

#sudo make-ssl-cert generate-default-snakeoil

# uncomment listen on 443
# uncomment snakeoil.conf
sudo vim default

sudo nginx -s reload

## comment back in the 443
I had a problem that I couldn’t reach apt update server from nginx 172.16.44.101 ie probable firewall rule?
@Yes it was a problem with the deny rule.
Let’s get SSL working on the local machine first:
Use a self signed cert.
https://www.dlford.io/hosting-on-the-web-how-to-home-lab-part-6/#reconfigure-nginx - I’m not using his instructions - the digital ocean ones are slightly different.
sudo -i
cd ~

# I took just defaults as don't care - we'll setup up proper cert later
sudo openssl req -x509 -nodes -days 365 -newkey rsa:2048 -keyout /etc/ssl/private/nginx-selfsigned.key -out /etc/ssl/certs/nginx-selfsigned.crt

# this tooks 10 minutes
sudo openssl dhparam -out /etc/nginx/dhparam.pem 4096

# create new file
sudo vim /etc/nginx/snippets/self-signed.conf

# contents of above file
ssl_certificate /etc/ssl/certs/nginx-selfsigned.crt;
ssl_certificate_key /etc/ssl/private/nginx-selfsigned.key;


# create new file
vim /etc/nginx/snippets/ssl-params.conf
I used this ssl-params.conf
ssl_protocols TLSv1.3;
ssl_prefer_server_ciphers on;
ssl_dhparam /etc/nginx/dhparam.pem;
ssl_ciphers EECDH+AESGCM:EDH+AESGCM;
ssl_ecdh_curve secp384r1;
ssl_session_timeout  10m;
ssl_session_cache shared:SSL:10m;
ssl_session_tickets off;
ssl_stapling on;
ssl_stapling_verify on;
resolver 8.8.8.8 8.8.4.4 valid=300s;
resolver_timeout 5s;
# Disable strict transport security for now. You can uncomment the following
# line if you understand the implications.
#add_header Strict-Transport-Security "max-age=63072000; includeSubDomains; preload";
add_header X-Frame-Options DENY;
add_header X-Content-Type-Options nosniff;
add_header X-XSS-Protection "1; mode=block";
then
# interesting sites-enabled is just a sym link
vim /etc/nginx/sites-available/default


server {
        listen 443 ssl;
        listen [::]:443 ssl;
        include snippets/self-signed.conf;
        include snippets/ssl-params.conf;

        root /var/www/htmldm;
        index index.html index.htm index.nginx-debian.html;

        server_name your_domain.com www.your_domain.com;

        location / {
                try_files $uri $uri/ =404;
        }

}

server {
        listen 80 default_server;
        listen [::]:80 default_server;

        root /var/www/htmldm;

        index index.html index.htm index.nginx-debian.html;

        server_name _;

        location / {
                # First attempt to serve request as file, then
                # as directory, then fall back to displaying a 404.
                try_files $uri $uri/ =404;
        }
}
then
# check firewall
ufw status

# test config
sudo nginx -t

sudo systemctl restart nginx

# works
curl http://localhost

# get a cert error
curl https://localhost
Then try from workstation and it works!
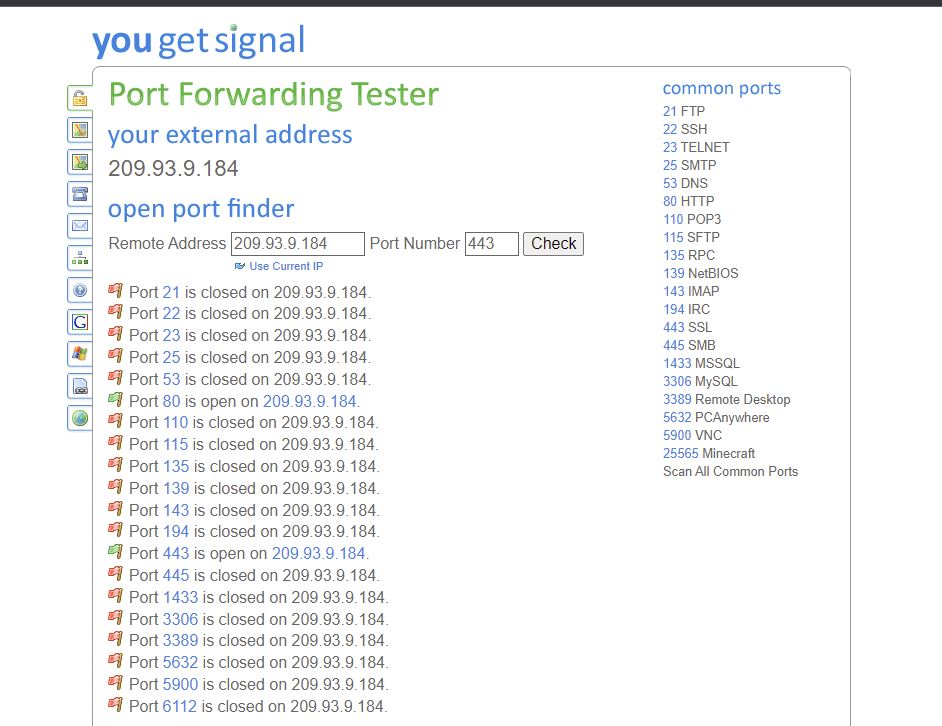
Now lets open up ports on my router to pfSense.
https://www.yougetsignal.com/tools/open-ports/ use this tool to see what open ports I have.
I’ve got Dynamic DNS running from the router on mateer.hopto.org
Then trying a real domain (which used to point to hmsoftwareuk.netlify.app)
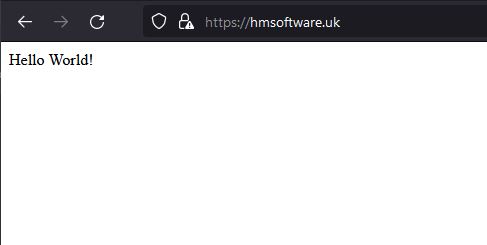
hmsoftware.uk should now alias to mateer.hopto.org
It works fine. Interestinly only Firefox allows me to see the invalid self signed cert, as I’m using HSTS.
hoverflylagoons.co.uk is now running from pve. DNS is handled by cloudflare which handles redirects to apex and https. The nginx reverse proxy has a self signed ssl cert (which cloudflare require) forwarding on port 80 to the backend apache2 server.
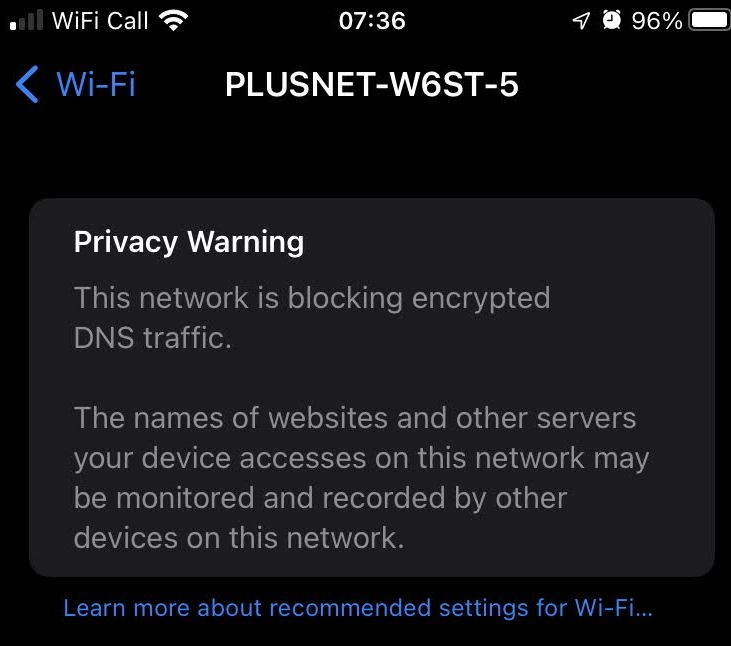
Privacy Warning
“This network is blocking encrypted DNS traffic
The names of websites and other servers your device accesses on this network may be monitored and recorded by other devices on this network.”
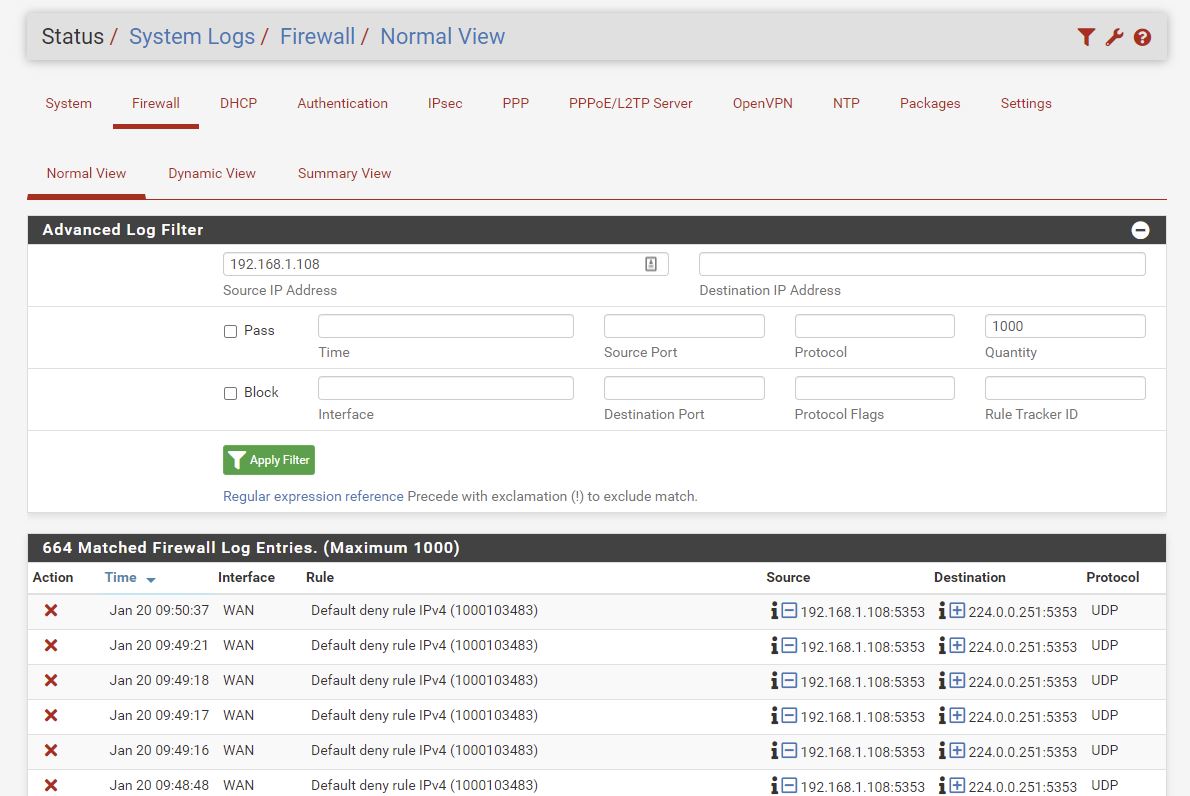
My iPhone7 on 192.168.1.108 is sending out multicast DNS on UDP 5353. Used by Bonjour, AirPlay, Home Sharing and Printer Discovery.
I don’t believe that UDP is being blocked on the 192.168.1.0 network, however it is being blocked coming into the WAN of pfSense ie it can’t get into the 172.16.44.0 network. Which is good.
https://support.apple.com/en-us/HT202944
Apex Domains
https://www.yes-www.org/ he argues to keep the www. whereas I’ve gone the other way. Google goes to www. as does the BBC
Some large sites do not use www.
LetsEncrypt
See https://www.dlford.io/hosting-on-the-web-how-to-home-lab-part-6/#letsencrypt
Currently I’m running CloudFlare in front of the live site I’m hosting so don’t need LetsEncrypt
Logging - Part 7
https://www.dlford.io/log-management-how-to-home-lab-part-7/
Graylog he implements
Docker - Part 8
https://www.dlford.io/docker-basics-how-to-home-lab-part-8/
VLANs - Part 9
https://www.dlford.io/expanding-your-home-network-how-to-home-lab-part-9/
Resources
https://www.reddit.com/r/Proxmox/
https://mtlynch.io/building-a-vm-homelab/ - he uses Proxmox
https://www.youtube.com/user/ProxmoxVE/videos - ProxmoxVE YouTube
Remote Admin
https://tinypilotkvm.com/ looks very good.
Conclusion
It took me about 5 days of part time effort to get this working. After another 5 days it has worked very well and is serving the website well. Issues I’ve seen are:
- Need to pass the correct IP address from nginx reverse proxy to apache
- Would like to monitor traffic load
- Would like to move Plex server from my workstation onto Proxmox, but no rush
Overall I’m very happy with the current setup and am monitoring stability now.
Overall Network Diagram
I use
# ssh to hoverfly webserver on port 29
ssh pfsense -p 29

# hash-test machine running on 172.16.44.105 (static IP but no holes punched through)
ssh pfsense -p 30
hmsoftware.org is using mateer.hopto.org which is here (a test page!)
hmsoftware.uk is now using the hmsoftwareuk.netlify.app redirect (March 2022)
To create a new VM scroll up to: Create Web Server VM
Increase Disk Size
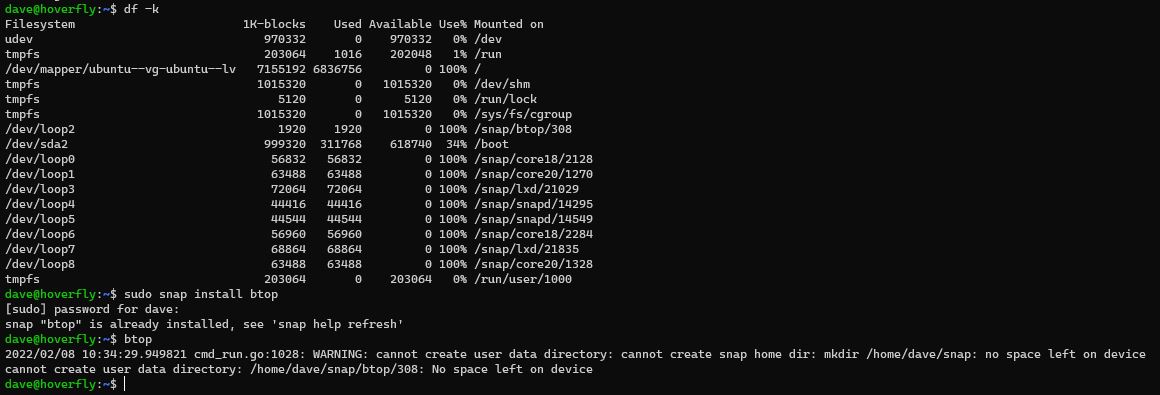
I didn’t notice but I’d been creating VMs with an 8GB disk size above. And look above you can see I’ve used 100% of the space and the VM is not happy.
To extend the disk turned out to be more involved that I thought, so here is what I did.
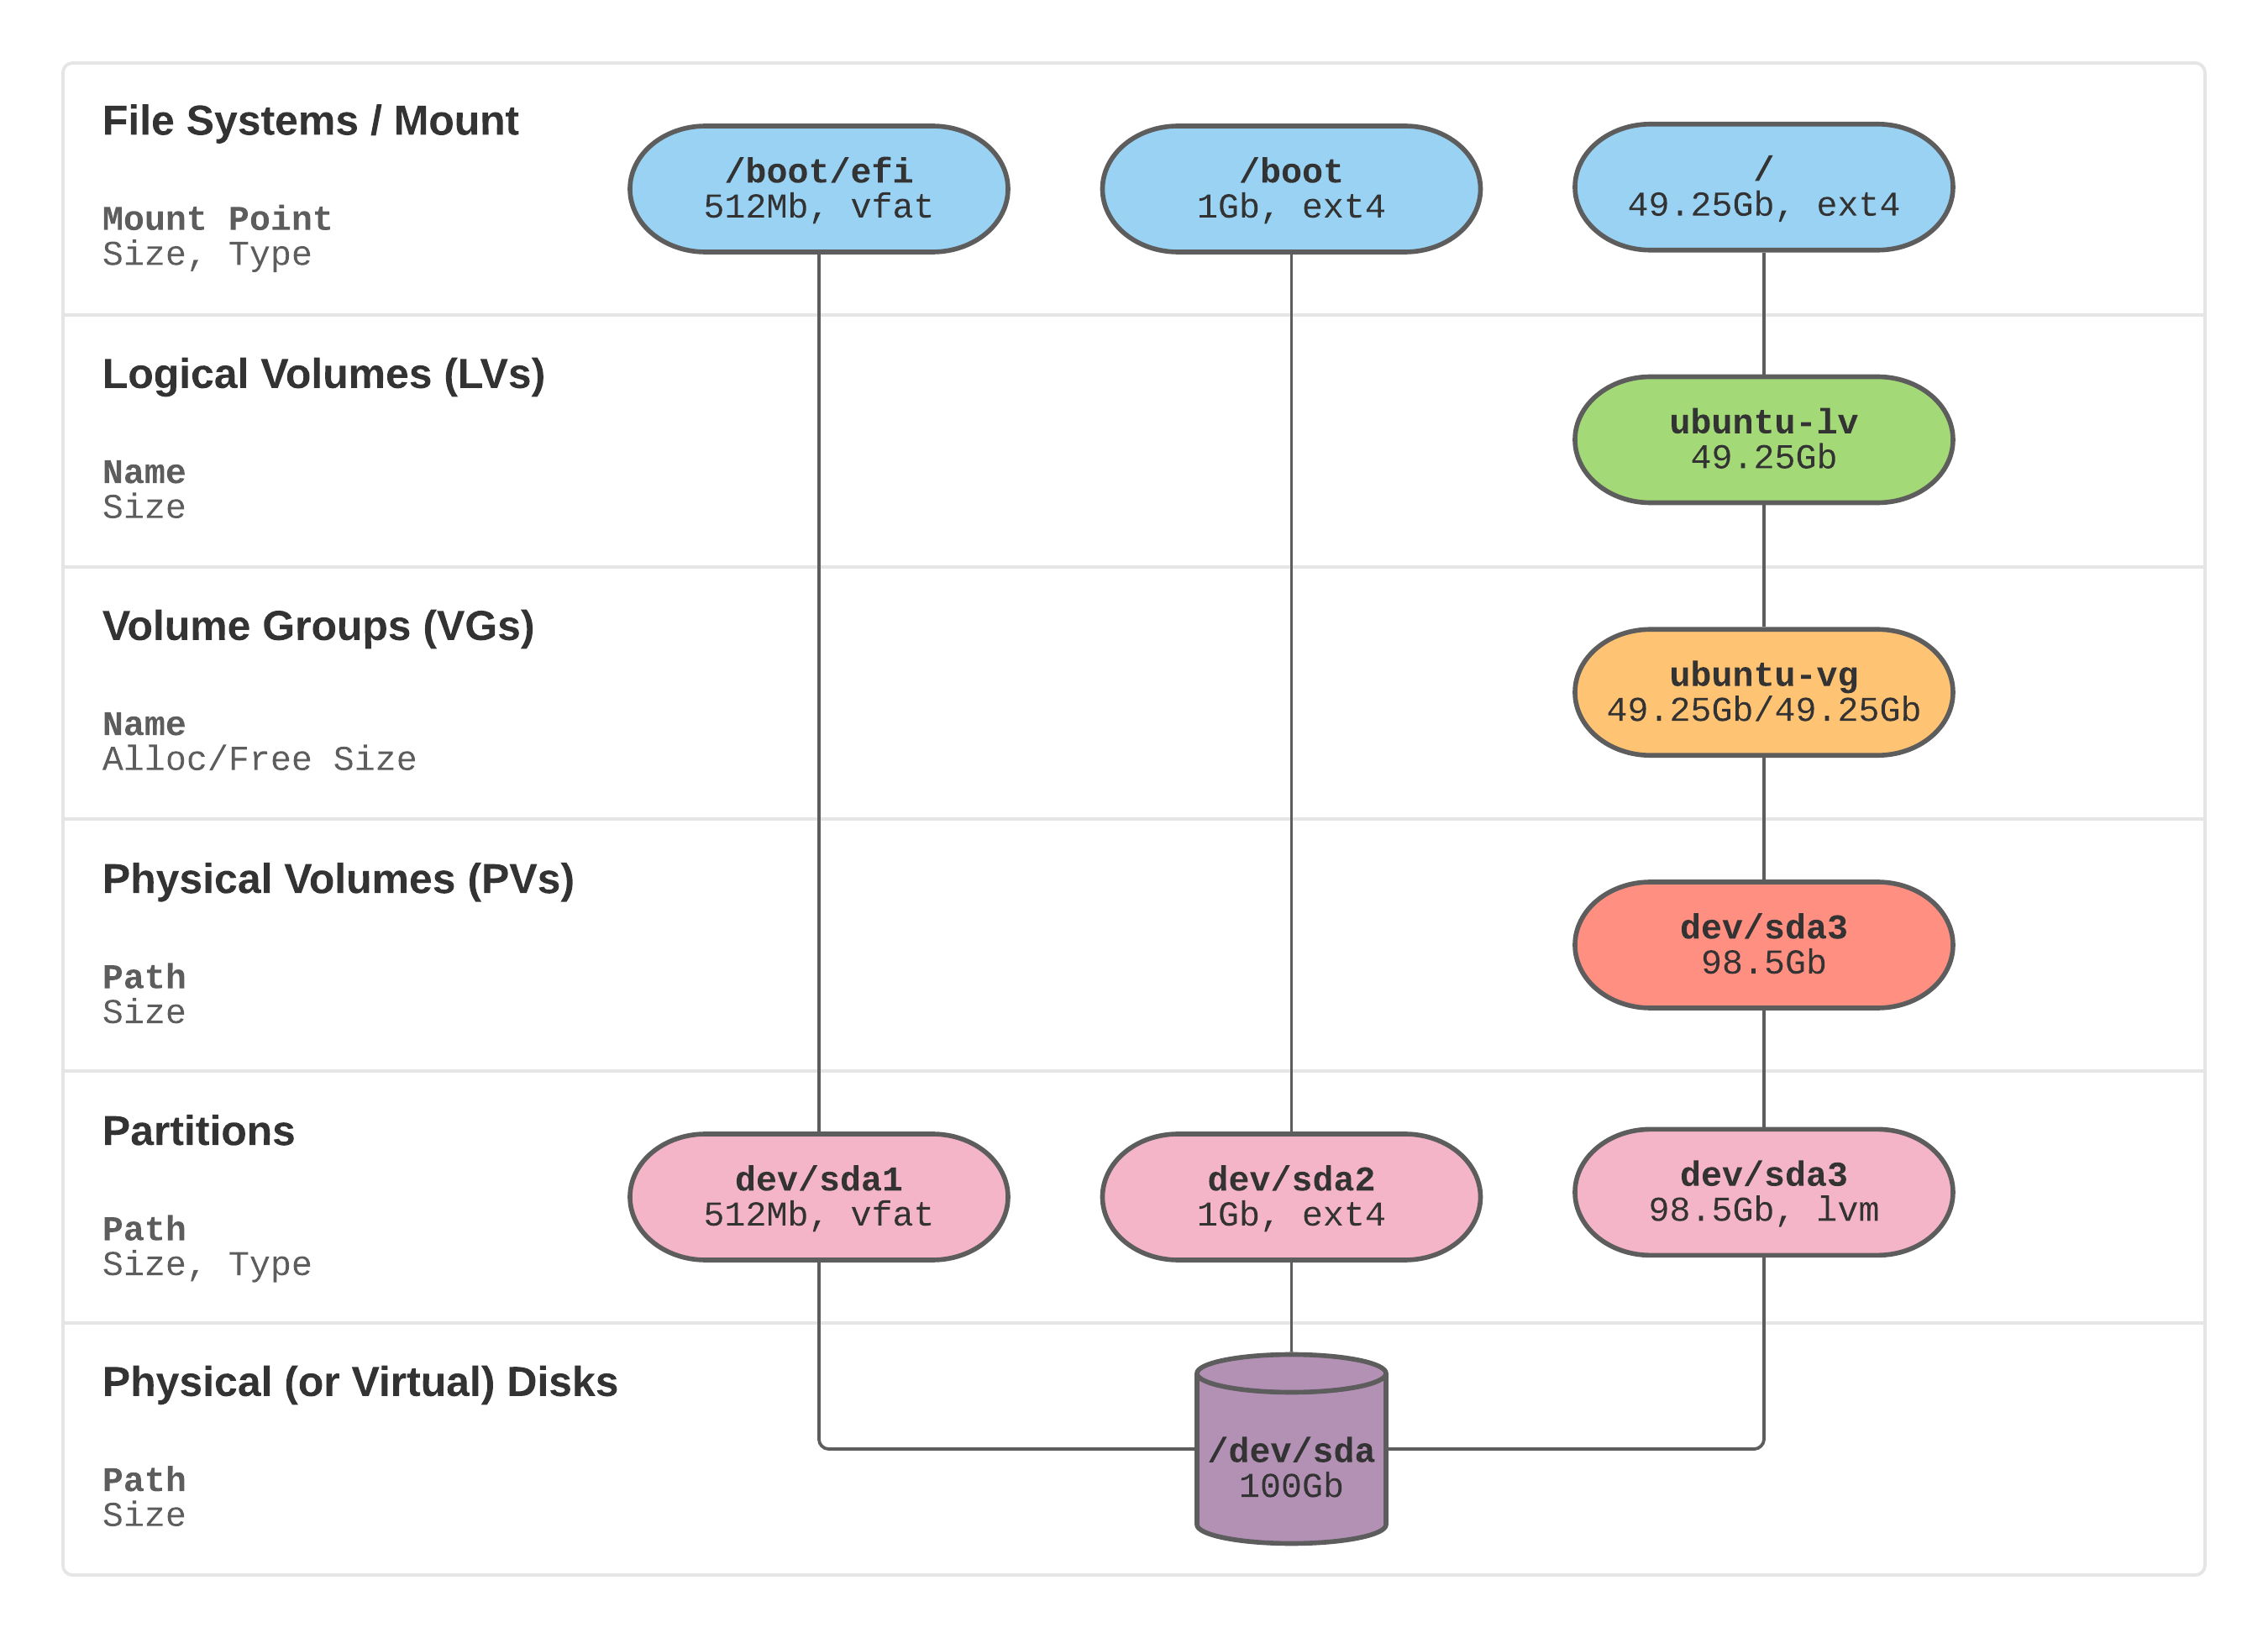
https://packetpushers.net/ubuntu-extend-your-default-lvm-space/ this was the blog post which helped me the most, and I’ve copied his excellent diagram:
Going from the bottom
# list block devices
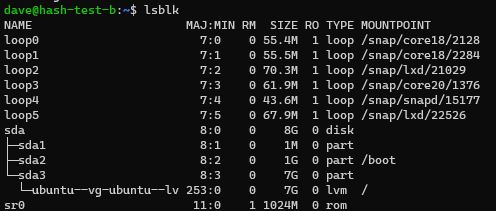
lsblk
Physical/Virtual disk of 8GB on /dev/sda - allocated from Proxmox.
3 partitions just like his on sda1 sda2 sda3
1 Physical Volume (PV) just like his on dev/sda3
# show physical volumes
sudo pvs
Check for existing free space on Volume Group (VG)
# is there free space on the Volume Group?
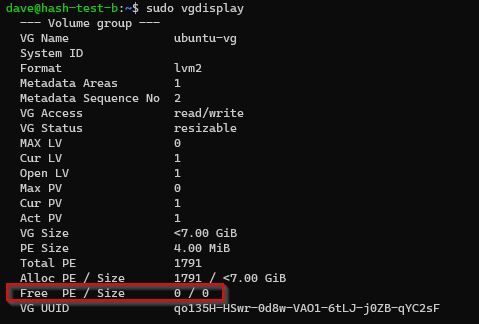
sudo vgdisplay
No existing free space on my Volume Group.
Make space being presented to linux
In summary this is what to do:
# allocate more space on hypervisor

# make the partition see the space (dev/sda3, Resize, Write, quit)
sudo cfdisk

# extend the physical volume from the partition
sudo pvresize /dev/sda3

# extend LV to use up all space from VG
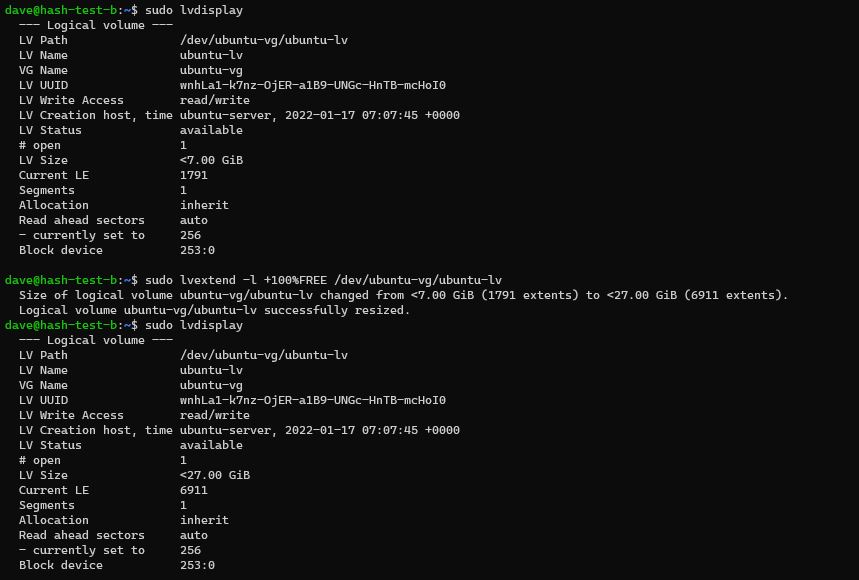
sudo lvextend -l +100%FREE /dev/ubuntu-vg/ubuntu-lv

# resize file system
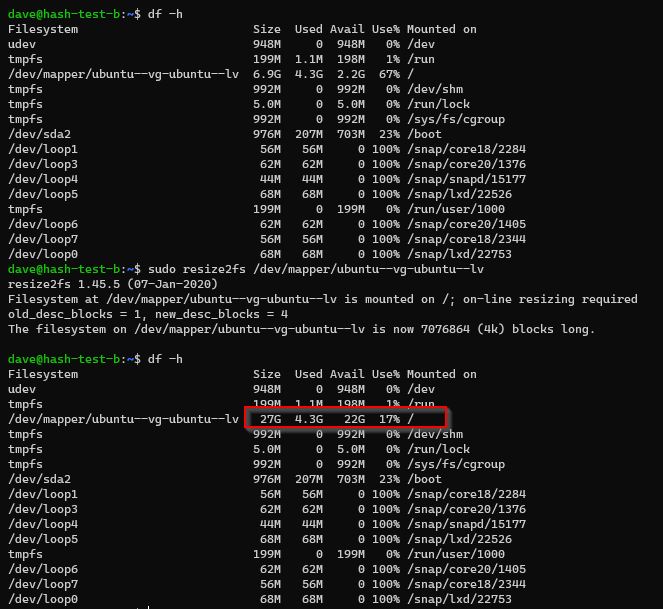
sudo resize2fs /dev/mapper/ubuntu--vg-ubuntu--lv

# check can see the space on filesystem
df -h
I increased space by 20GB to 28G while the machine was running
# partition editor similar to fdisk but with an interface
# make the partition see the space
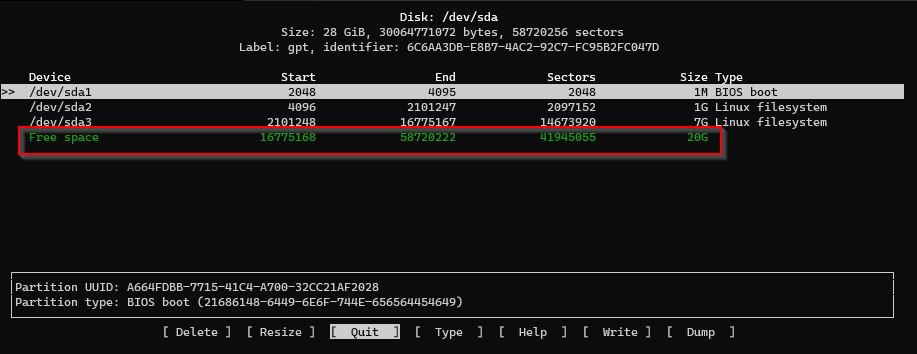
sudo cfdisk
Can see the free space without a restart of the VM.
Select the /dev/sda3 partition and select Resize, Write, q (for quit)
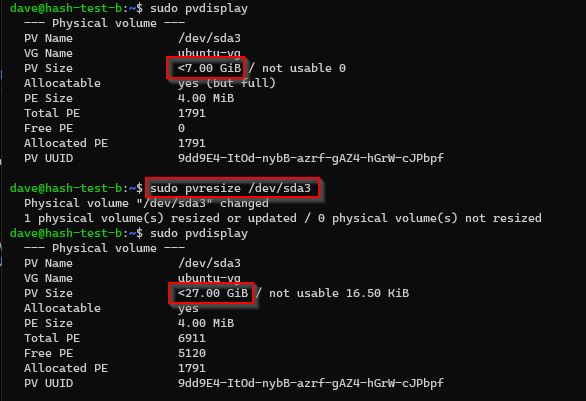
So the /dev/sda3 partition backing the /dev/sda3 Physical Volume (PV) has been extended, we need to extend the PV.
# extend the physical volume from the partition
pvresize /dev/sda3
My physical volume (PV) can now see the 27GB.
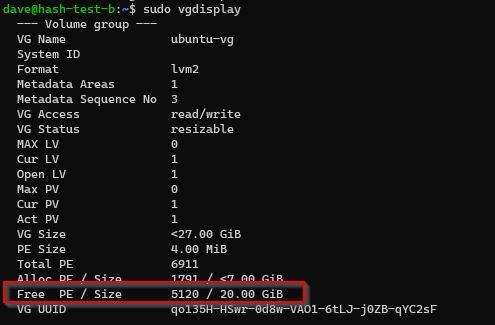
Volume Group
Have unused (free) space in Volume Group.
Logical Volume
# only 7GB
sudo lvdisplay

# extend LV to use up all space from VG
sudo lvextend -l +100%FREE /dev/ubuntu-vg/ubuntu-lv
Can now see 27G in my Logical Volume (LV)
File System
At this point the block volume underpinning our root filesystem has been extended bu thte filesystem itself has not been resized to fit that new volume.
# check current size of file system
df -h

# resize file system
sudo resize2fs /dev/mapper/ubuntu--vg-ubuntu--lv
Can see the space now in our filesystem! It worked!
https://unix.stackexchange.com/questions/697237/expand-logical-volume-ubuntu-on-proxmox?noredirect=1#comment1317392_697237 my question on SO which prompted this article.
Automating Building of VMs
https://www.reddit.com/r/Proxmox/comments/jo3bno/automate_proxmox_vm_creation_from_cloud_images/
https://www.reddit.com/r/Proxmox/comments/jo3bno/automate_proxmox_vm_creation_from_cloud_images/
I’m going to try a backup/restore strategy of a vanilla VM to start with. This is because my networking requires a DHCP allocation based on MAC. So keeping it simple.
CPU
I got this error whilst doing some Tensorflow work:
The TensorFlow library was compiled to use SSE4.1 instructions, but these aren’t available on your machine.
https://github.com/home-assistant/core/issues/18435 I had to change the CPU type to host on Proxmox.
The default CPU is: Default (kvm64)
Appendix
https://www.youtube.com/watch?v=xBUnV2rQ7do video series in 19 parts by Learn Linux TV.
Firewall (pfsense)
I’ve got an outbound http request on port 22225 (a proxy)
To find the error go to
- Status / System Logs / Firewall / Normal
- serach for port eg 22225
Click the little plus arrow to make a quick rule to make a rules
Then
- Firewall / Rules / LAN
- Allow many/* destinations IPs on 22225
Setting up remote access to a VM via SSH
no-ip.com provides Dynamic DNS that gets my the my correct IP address via http://mateer.hopto.org/
I’ve currently got port 80 and 442 open on my plusnet router which port porward to pfsense (my firewall)
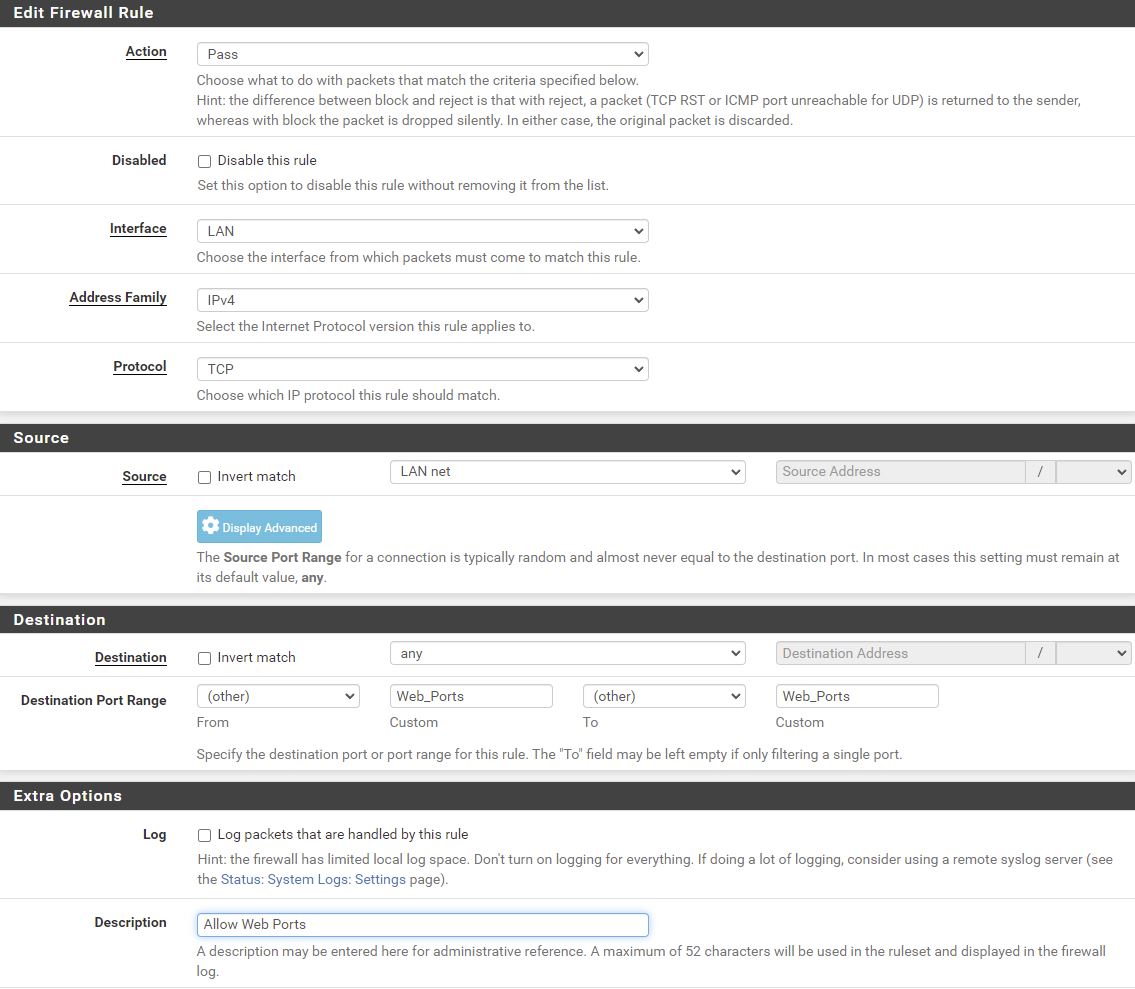
The firewall accepts traffic on Web_Ports ie 80 and 443 from any Source Address ie the internet and my local network, and forwards it to the nginx reverse proxy.
You can see I’ve also got my local LAN allowed to SSH via different ports, which port forwards onto the correct VM via NAT.
Lets do the simplest thing as a test and see if I can open up port 22 (SSH) to a spare VM (which could eventually become an access point).
I disabled a NAT rule which was the old port 22 for now. (goes to ngingx)
Allowed port 22 from the outside world to the pfsense firewall
ssh mateer.hopto.org
Monitor logins on
tail -f /var/log/auth.log
Then from this access point machine I can hop onto other machines I need to admin.
Bot attempts started within 25 minutes of the port being opened.
# list all unsuccessful logins
grep "Failed password" /var/log/auth.log
Next up is to use SSH keys instead
# find local public key in WSL2 ./ssh/id_rsa.pub

# copy via ctrl c/v to ./ssh/authorized_keys on remote machine

# sort out permssions
chmod -R go= ~/.ssh

# test it all works
then lets disable password based authentication.
sudo vim /etc/ssh/sshd_config

# uncomment and set to no
PasswordAuthentication no

# restart service
sudo systemctl restart ssh

# view login attemps
tail -f /var/log/auth.log
Fail2ban https://www.dlford.io/secure-ssh-access-how-to-home-lab-part-5/
sudo apt install -y fail2ban

sudo vim /etc/fail2ban/jail.local

[sshd]
enabled = true
port = 22
filter = sshd
logpath = /var/log/auth.log
findtime = 3600
bantime = 300
maxretry = 2

sudo systemctl enable fail2ban
sudo systemctl start fail2ban
Scripting a Build
Automate build of Proxmox VM?
what is a good way of scripting a VM build to put on proxmox?
Apparently it is with the qm command
# ssh into my proxmox server from bash
ssh root@192.168.1.139

# show all the vm's (not containers)
qm list

qm start 107

qm reboot 107

# if a vm is not stopping properly.. ie vm is stuck. not graceful
qm reset 107
# not graceful
qm stop 107


# set start a boot to no
qm set --onboot 0 107

# info on the vm
qm config 120

qm set --memory 2048 107

qm config 120 | grep memory

# useful
qm stop 122

# destroy it
qm destroy 122
Clone a template
ssh into proxmox ssh root@192.168.1.139 password in lastpass
# CLONE commands here
# clone my template
qm clone 1002 123 --name hmsoftwareuk-p37

qm set --startup order=20 123

qm start 123

# get dynamic IP address
pvesh get /nodes/pve/qemu/123/agent/network-get-interfaces --output-format=json | jq

# from an internal proxmov vm eg ssh pfsense (access point)
ssh 172.16.44.20

# ssh into the vm with dynamic IP address eg ssh 172.16.44.25
# set new hostname
sudo bash -c "bash <(wget -qO- https://raw.githubusercontent.com/dlford/ubuntu-vm-boilerplate/master/run.sh)"

# Get MAC
qm config 123
# eg 92:61:B1:A5:5E:6A

#pf sense -  Services / DHCP Server / LAN / Edit Static Mapping
# eg to 172.16.44.111

# firewall, NAT
# allow ssh on port 36 or whatever

# reboot the new vm

# sudo don't type
# https://askubuntu.com/questions/147241/execute-sudo-without-password
# sudo visudo

dave ALL=(ALL) NOPASSWD: ALL
# ctrl X to exit and save

# for a straight html website
sudo apt install nginx
# do a backup so can easily restore from this point?
vzdump 123

# easier to use the GUI?
qmrestore /var/lib/vz/dump/vzdump-qemu-123-2023_10_17-11_40_41.vma 123
Patch through domain name from reverse proxy and put in certbot to ensure ssl is working.
So now I have a serer in proxmox ready for Wordpress.
# build the wordpress instance

# copy all files from /dev/chatgpt/wordpress/ to ~/source/
# infra should be in ~/source/infra

# run through the shell commands
I’ve got certbot/letsencrypt working for the cert on the reverse proxy for the proxmox server. Very easy.
So now we have a
- working wordpress install
- ssl working via letsencrypt
- live on the internet hosted on proxmox
Aug 2024 Crash
So after a server move I’ve had a proxmox server failure. It started gradually with 1 VM not being able to start with a kernel panic. Whilst debugging more went down and I ended up not being able to restart the server.
Getting errors like
ext4-fs error
It now sometimes boots into recovery mode (emergency)
I’m suspecting SSD failure from the messages - there is a Samsung ssd 970 Plus 1TB. It has lasted 2 years and 8 months.
Last time I looked it was healthy
I’ve taken apart the server, and re-seated the SSD - didn’t work. In fact it struggled getting to the BIOS! It did have 2 partioned SSD’s it could see in the bios and now only 1..
I do have backups on an external USB drive, so lets see if that works. I can’t see it from my Windows machine (ext4 fs?)
I’ll order a new SSD (same) and build back from there with exactly the same version of proxmox which used kernel? 5.15.158-1
PVE 7.4-1 and 8.2-2
From 23 Mar 2023 here is 7.4.1
downloads or https://download.proxmox.com/iso/
According to Chat GPT I should be able to restore to 8.2
https://etcher.balena.io/ to create a usb
8.2-2 I got an error The installer could not find any supported hard disks. I could see the new Samsung 970 EVO Plus 1TB NVM2 M.2 SSD in the BIOS.
Lets try Proxmox 7.4-1 which I know worked onto my 32GB Sandisk USB.
In my BIOS the M.2 is showing in the boot order, but not in the M.2 screen.
**pic
Lets try the older one to see if it appears (and it’s SMART status)
Gave up and tried differnt hardware
I need my server working, so lets use a spare 4790 PC I have with 16GB RAM and a 250GB SSD.
- IP - 192.168.1.139 (which is hard assigned on the router)
- Gateway - 192.168.1.254
- DNS - 8.8.8.8
It cam alive very fast.
Turn off router firewall
- 80 to pfSense (192.168.1.144) start/end internal/external 80
- 443 to pfSense start/end internal/external 443
backup usb disk
# list usb devices - Western Digital Elements 2621 is my disk
lsusb

# look for sdb, sdc etc.. with correct size of disk - mine was sdc
lsblk


mkdir /mnt/usb-drive

mount /dev/sdc /mnt/usb-drive

# MAYbe don't need to do this
# datacenter, storage, add, directory

ID - local-usb
Directory - /mnt/usb-drive
Content: Disk Image (all)

# Copy backups - maybe don't do this
cd /mnt/usb-drive/dump/
cp *2024_08_16* /var/lib/vz/dump

# view the local-usb disk under pve
# can see backups from here

# override storate to local-lvm (ie not the usb drive)
# didn't care about id of the new VM
after a restore I got this from trying to start the new pfSense restore
TASK ERROR: volume 'local:iso/pfSense-CE-2.5.2-RELEASE-amd64.iso' does not exist
local (pve), ISO, upload the image found here
next bridge vmbr1 does not exist
PVE, System, Network, Create Linux Bridge for internal nework of 172.16.44.0/24 and no gateway
Admin interface on https://192.168.1.144:8080/
Nginx
Machine restored with an internal IP of 172.16.44.101
# 172.16.44.101
ip addr show
I can access the outisde world from this machine using apt update
Services, DHCP Server - MAC addresses should be the same so should have same IP addresses.
Firewall, NAT, Port Forward - so I can get to internal machines from outside eg port 39 to archiver
Firwall, Rules, Edit (filter rules) - these are created automatically when doing a new port forward rule. I’ve got port 46 now going to nginx
mateer.hopto.org now works and goes to the nginx reverse proxy!
VMs
pfsense 100 - 500MB
nginx (reverse proxy) 101, p46 - 1GB
hoverflylagoons 102, p29 - 2GB
accesspoint 103, p27 - 1GB
cir-tweet-p30, 6GB RAM - old auto archiver (not there). Just python running tweets. TODO reduce RAM
hs-api-p31 - TODO last not started or restored
fire-map-p33, 8GB TODO not started as low RAM
theskatefarm-p40, 2GB
Had to download
ubuntu-22.04.3-live-server-amd64.iso
https://old-releases.ubuntu.com/releases/22.04/
local (pve) disk, upload ISO
p39 - 8GB Auto archiver FB for CIR
TODO
get backups working!
Hardware Future thoughts
Restoring from backup is stressful!
Trying to get old hardware working again is stressful (and didn’t work)
Amazon failed to deliver an important part (SSD) and probably left it somewhere in my garden to get wet
SSD wearing out after 2.5 years (due to lots of polling probably).. but SMART didn’t catch it the last time I looked
I need this server for
- archiving due to residential IP (so don’t get blocked by FB, YouTube)
- cheaper than cloud services
- enjoy doing it!
Probably need some advice on this so don’t make this mistake again
V1 Future Thoughts
https://www.youtube.com/watch?v=_sfddZHhOj4&t=33s
- 32 GB RAM
- 1 256GB Boot drive SSD
- 4 * 1TB SSD as raid-z (meaning 1 ssd can fail without data loss)… all machines eg windows can access this as a NAS.
He gave IP address as static 192.168 address
- IOMU - allows passthrough for PCI device eg graphics card / network card inside VM
- TrueNAS - periodic snapshots… and cloud sync! and rsync!
And pi-hole for DNS.
- Portainer for running containers (under Debian linux)
