Azure DevOps GUI Pipelines
Part 1 - Azure DevOps GUI Pipelines
Part 2 - Azure DevOps YAML Pipelines Using Infrastructure as Code to define our pipelines (do this!)
Both these articles were written when I needed to use DevOps, and now I’m not using it (March 2020) so I’m putting the thoughts at the time online.
What is Azure DevOps
Azure DevOps is a collection of services:
- Boards (like Jira or Trello- idea to release of software.)
- Repos (like GitHub, BitBucket)
- Pipelines
- Builds and automated tests - (like TeamCity, Appveyor, CircleCI, Jenkins)
- Releases - (like Jenkins, Octopus deploy)
- Test plans (manual and exploratory testing tools)
- Artifacts - packages eg nuget
Use the YAML way of defining Azure DevOps. I found that exploring the GUI was very helping in understanding the product, but Infrastructure as Code (IaC) is where you should be
For continuous delivery especially for collaboration / more complex projects this pipeline is invaluable. It needs time and work to set it up and maintain it.
You can pick and choose which services to use eg could keep using GitHub
There has been a lot of people commenting on the UI and I can confirm there is a steep learning curve.
Excellent video from NDC London 2019 giving a good overview starting with the many names some of the tools have been called eg VSTS, VSO, TFS
Microsoft Architecture Solutions
Goal
Goal is that infrastructure should be defined just like code, which can be checked into source control. So then we can spin up all the infrastructure in Azure at any point eg for a Feature branch that I want to test.
Perhaps there is webserver (PaaS) and a database (MSSQL) initially.
Below is shown how to setup the Build and Release pipelines in the GUI, however in the next article we will explore the azure-pipelines.yml recommended way.
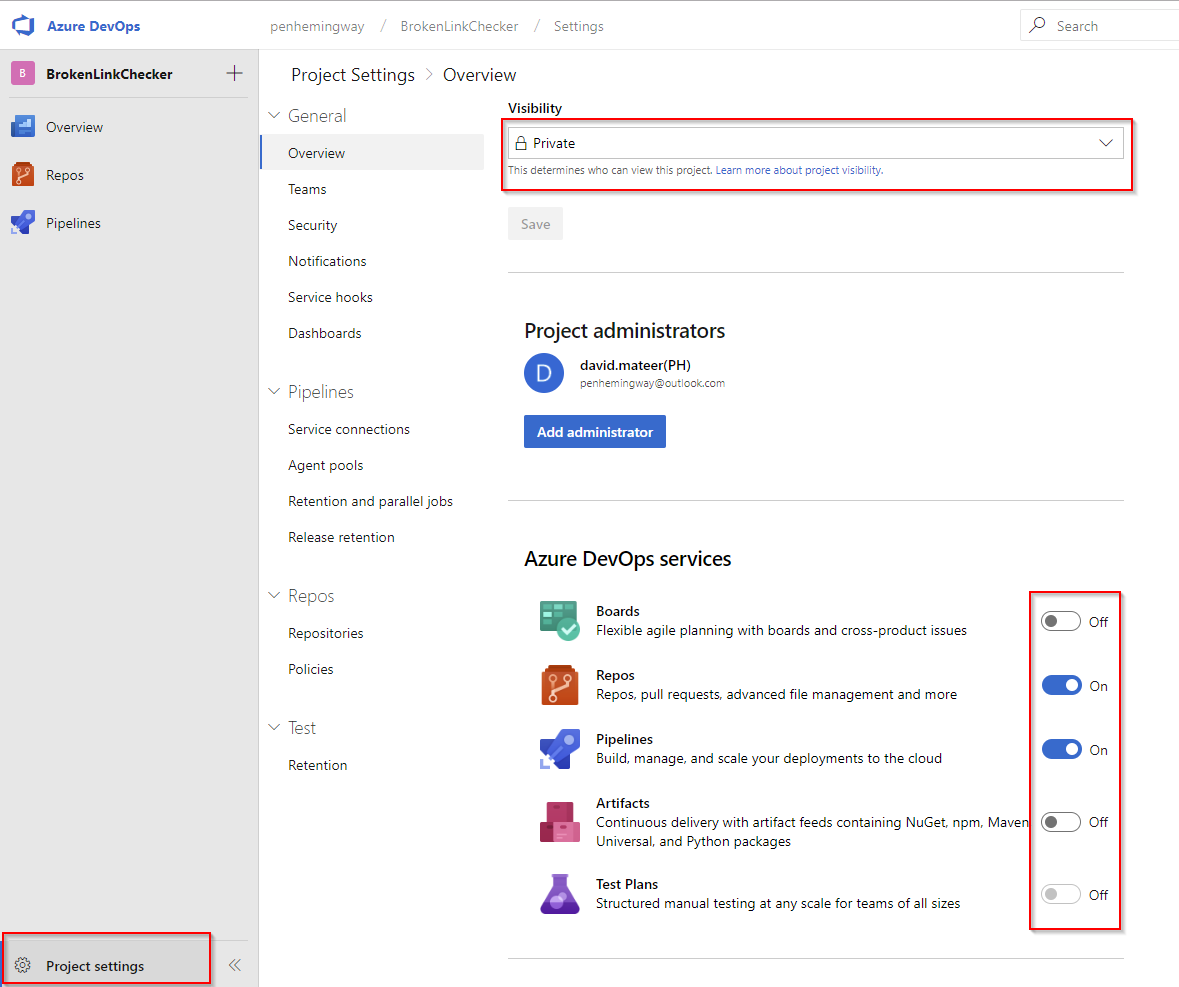
Settings
Turning off Boards, Artifacts and Test Plans helps reduce noise. I’m keeping this Project private
Release Pipelines
After setting up a repository with a single index.html in it with ‘Hello World’ as text, lets make a Continuous Deployment pipeline that deploys to the live Azure App Service whenever a new commit is pushed to the master branch.
Step 1 - Add an Artifact
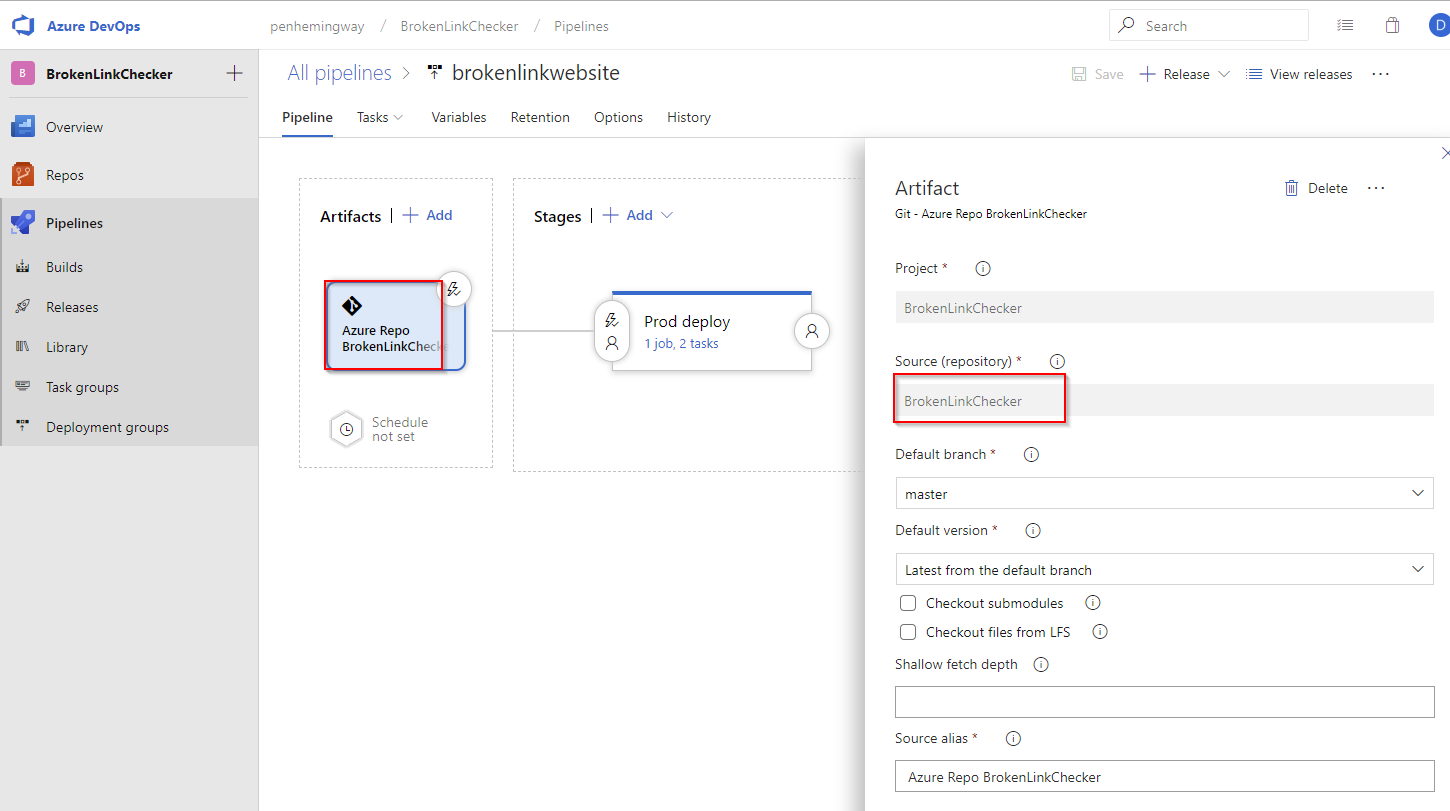
Wiring up the Artifact directly to the master branch of the Repo (not doing any building)
Step 2 - Trigger getting the Artifact
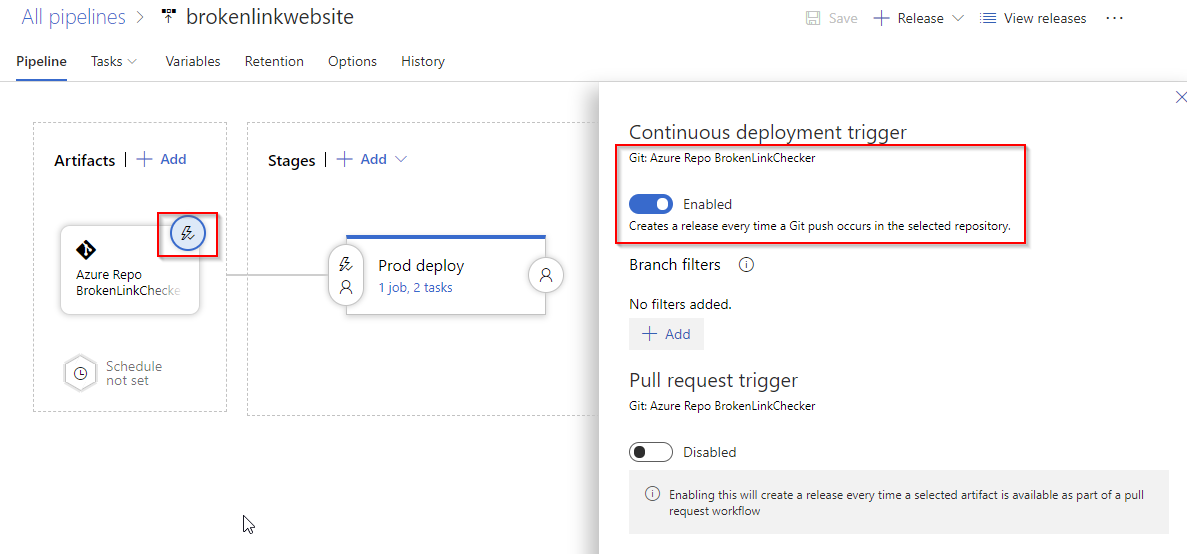
Trigger to deploy whenever there is a push to the branch (master as defined in first step)
Step 3 - Stages create an Agent to do the Deploy
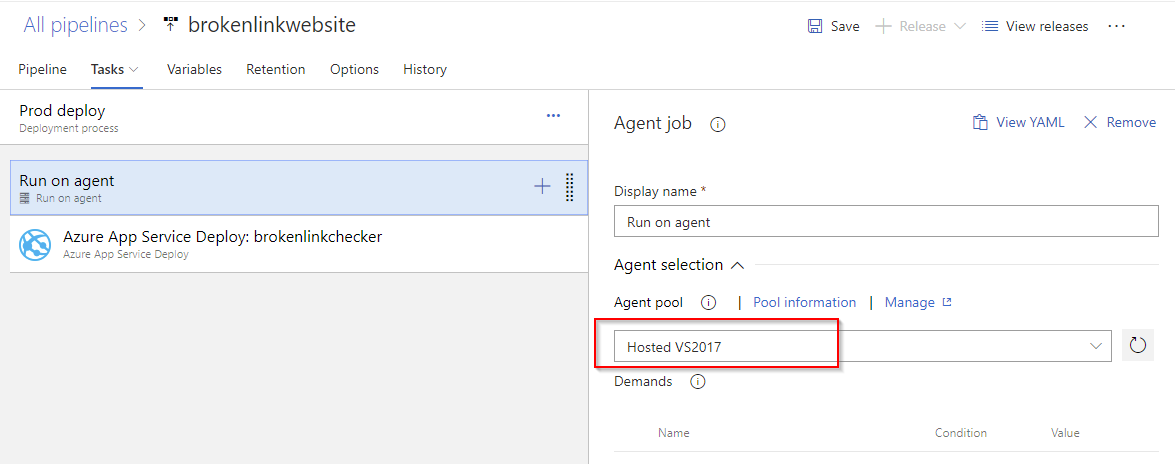
Use VS2017 here - could use Ubuntu, Server 2019, Mac, Self Hosted agent
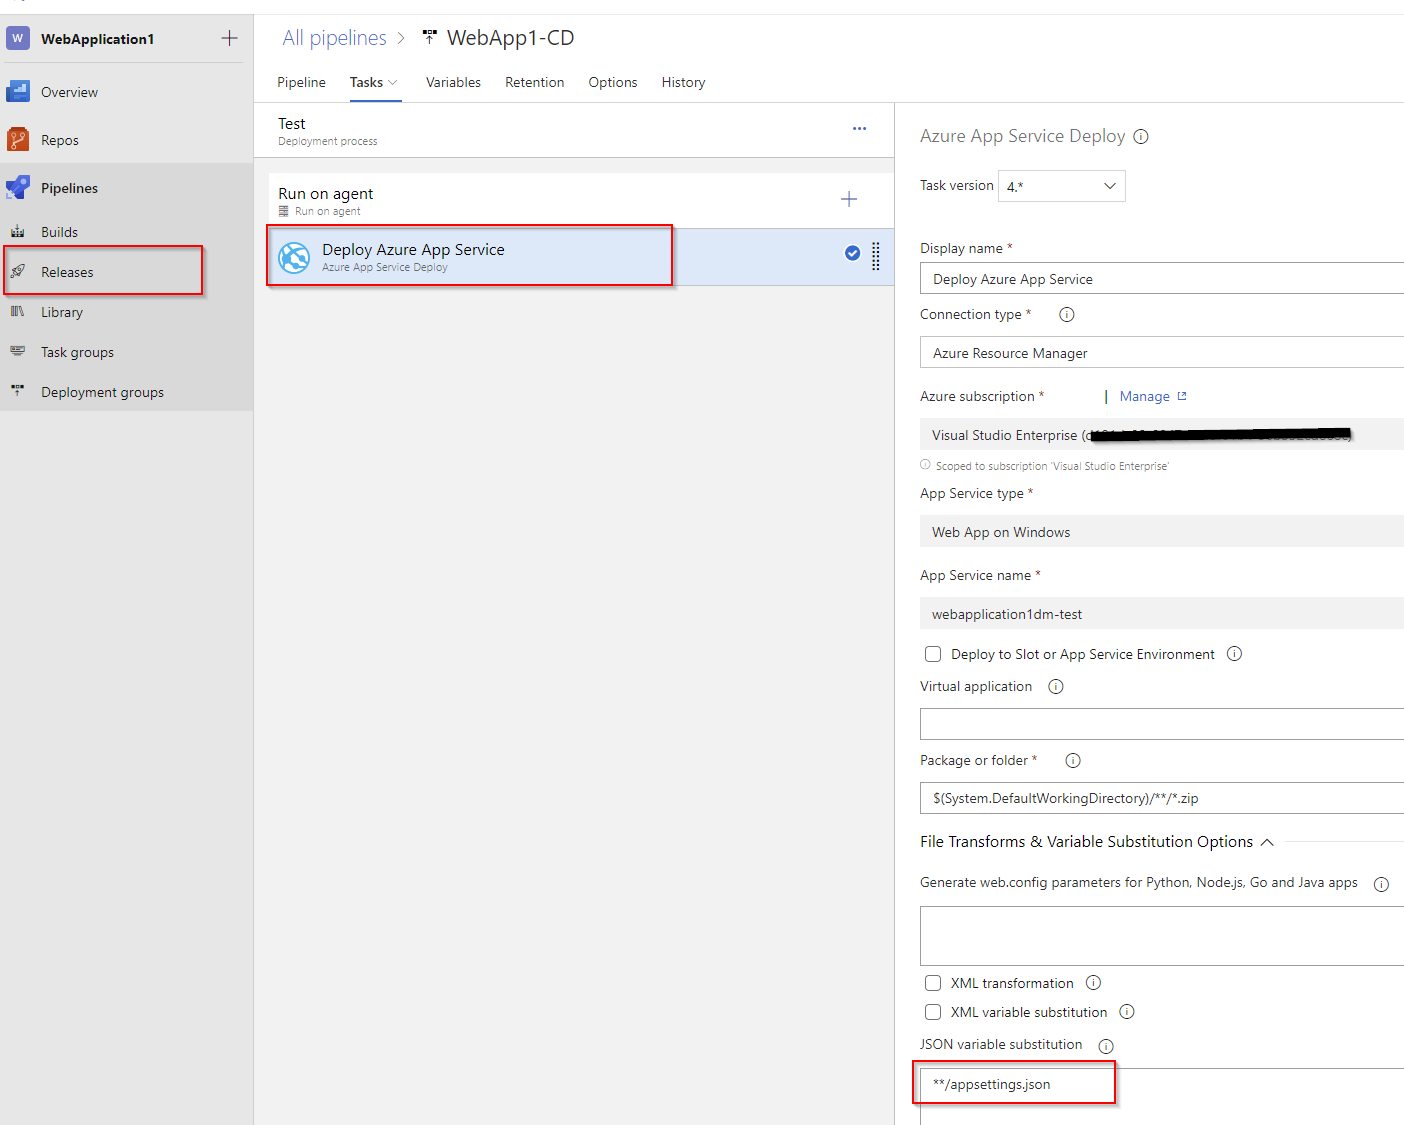
Step 4 - Azure App Service Deploy
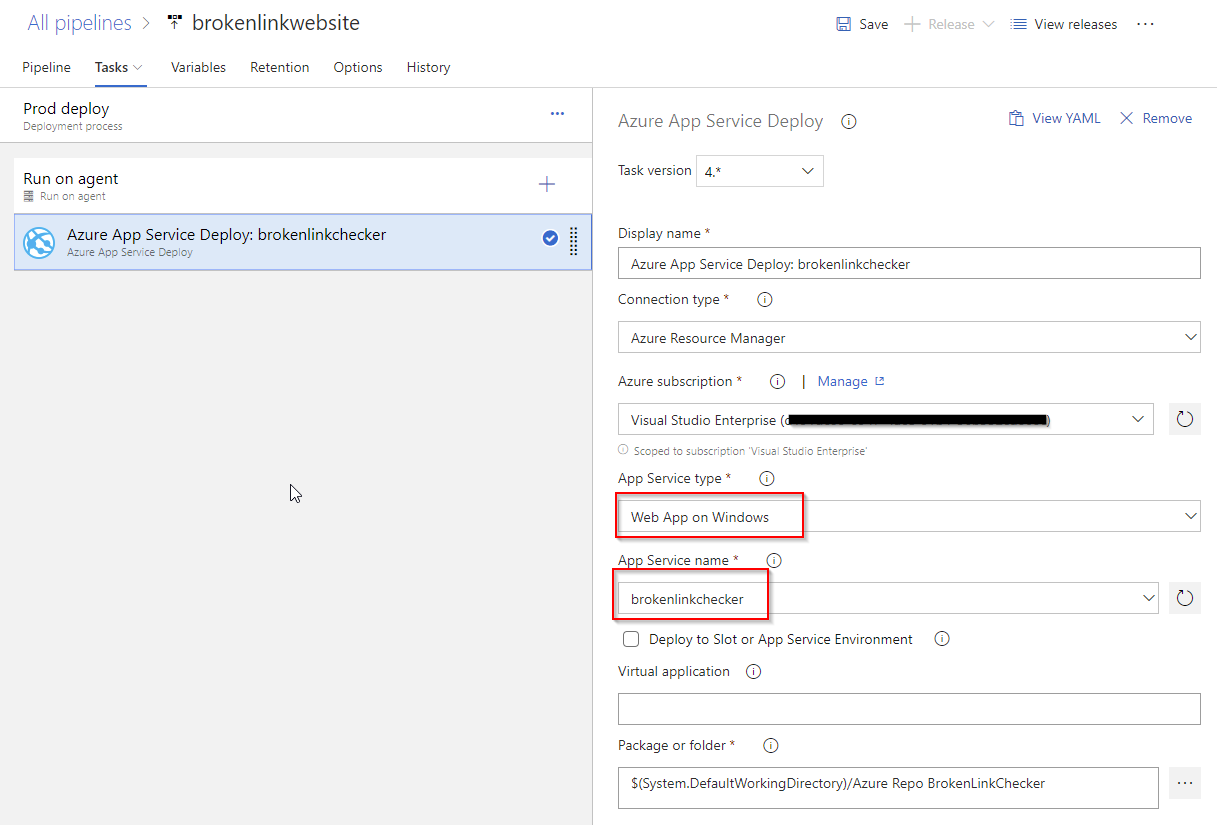
So it is zipping up everything in the linked repository and sending to an already created App Service in Azure.
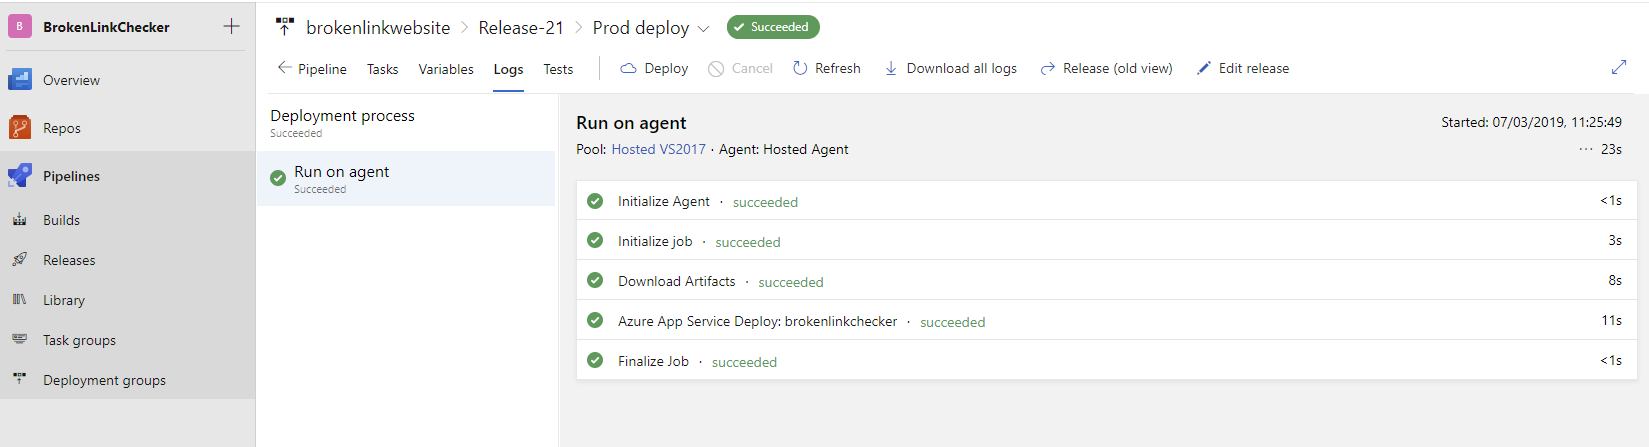 For each release you can see the logs, and could deploy from here manually eg to roll back to a previous release.
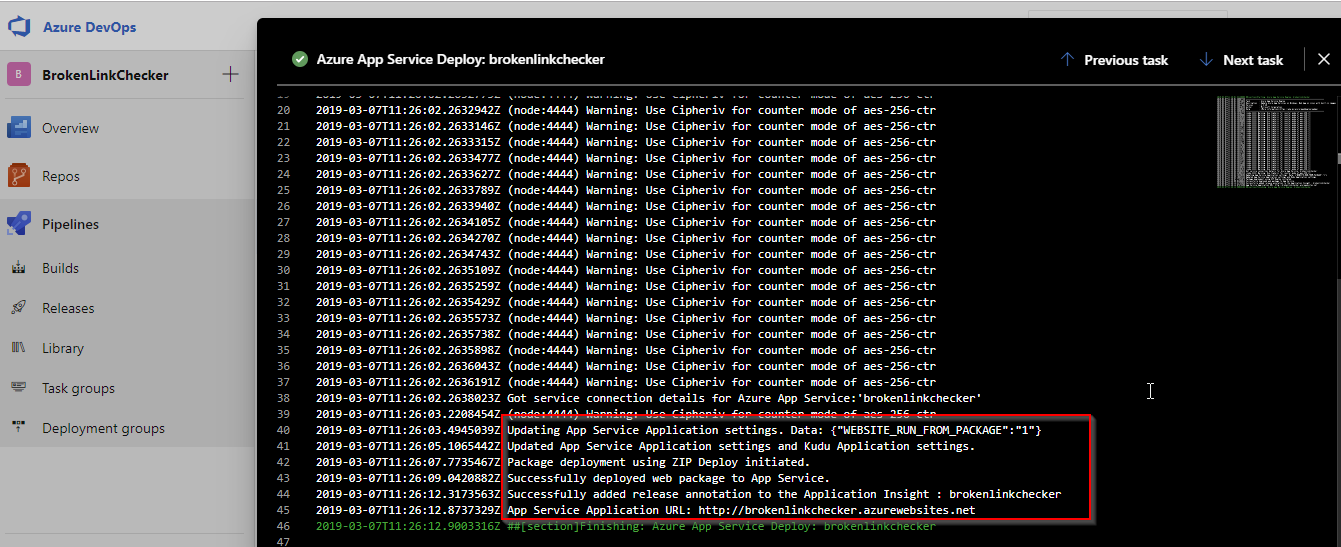
Azure App Service Deploy - looks like it uses Zip Deploy
Stages, Prod Deploy - 1 job, 1 task, using a Windows machine running VS2017 to do the deploy (could use Ubuntu or Server 2019 with VS2019).
Time to deploy to live site between 35s and 60s.
Build Pipeline
There is the yaml or visual designer way to do the Build. From the Azure DevOps Docs comments at the bottom it seems like yaml doesn’t have stages in Releases (eg dev, test, prod) or approvals in Releases which are very important.
The documentation recommends using the yaml way so everything is in source control, however others I’ve talked to who use this in production suggest the UI.
Visual Designer
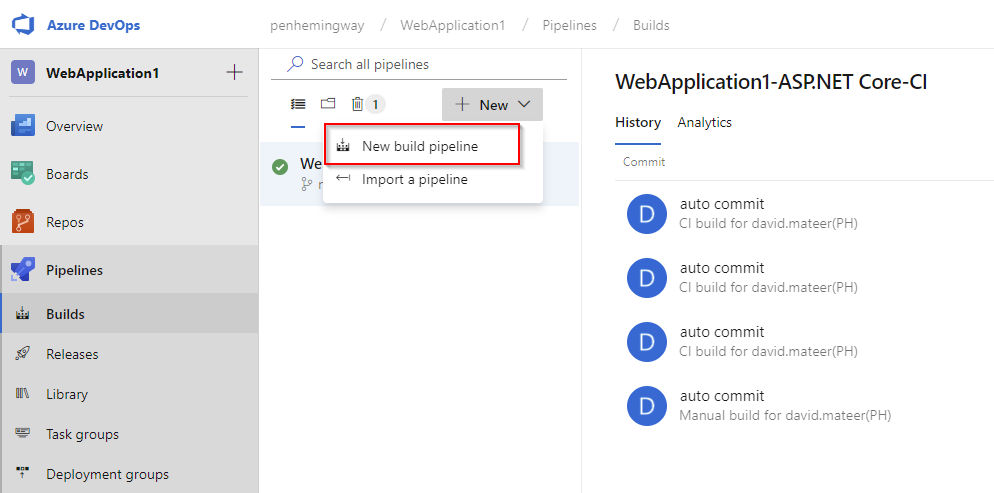
Creating a new build pipeline
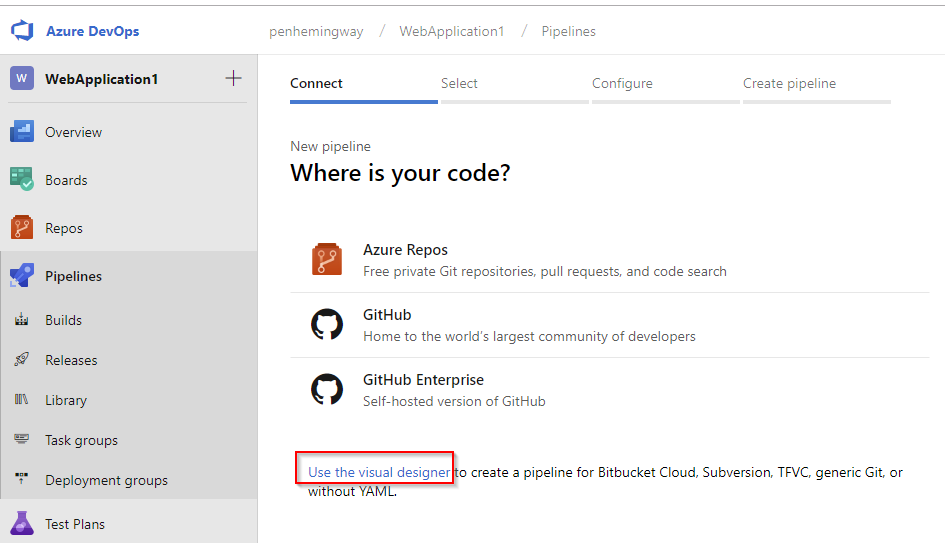
Selecting the visual designer
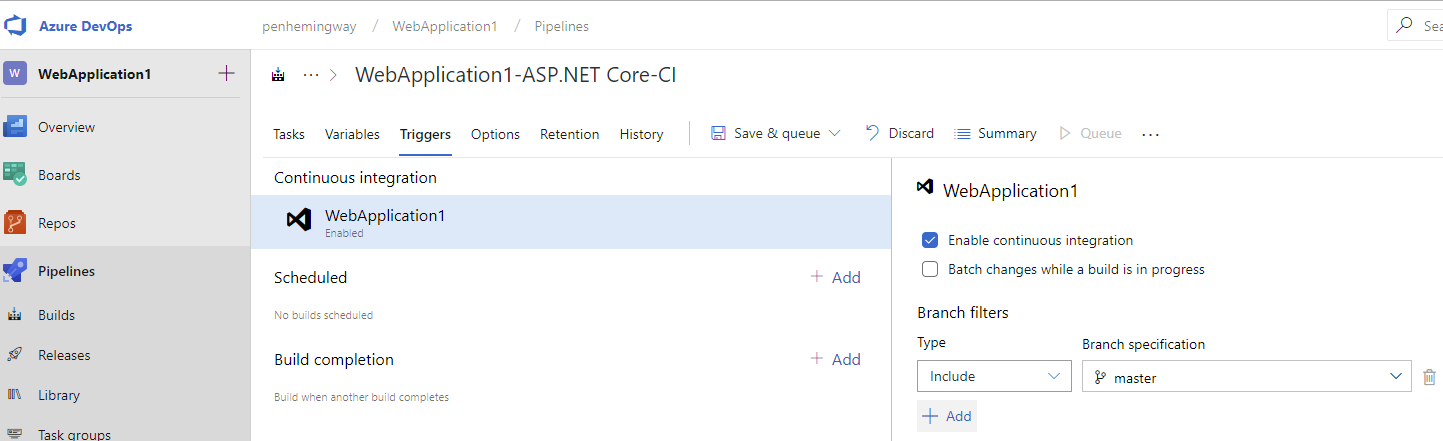
If Enable CI is not checked then it will not trigger on a Repo change.
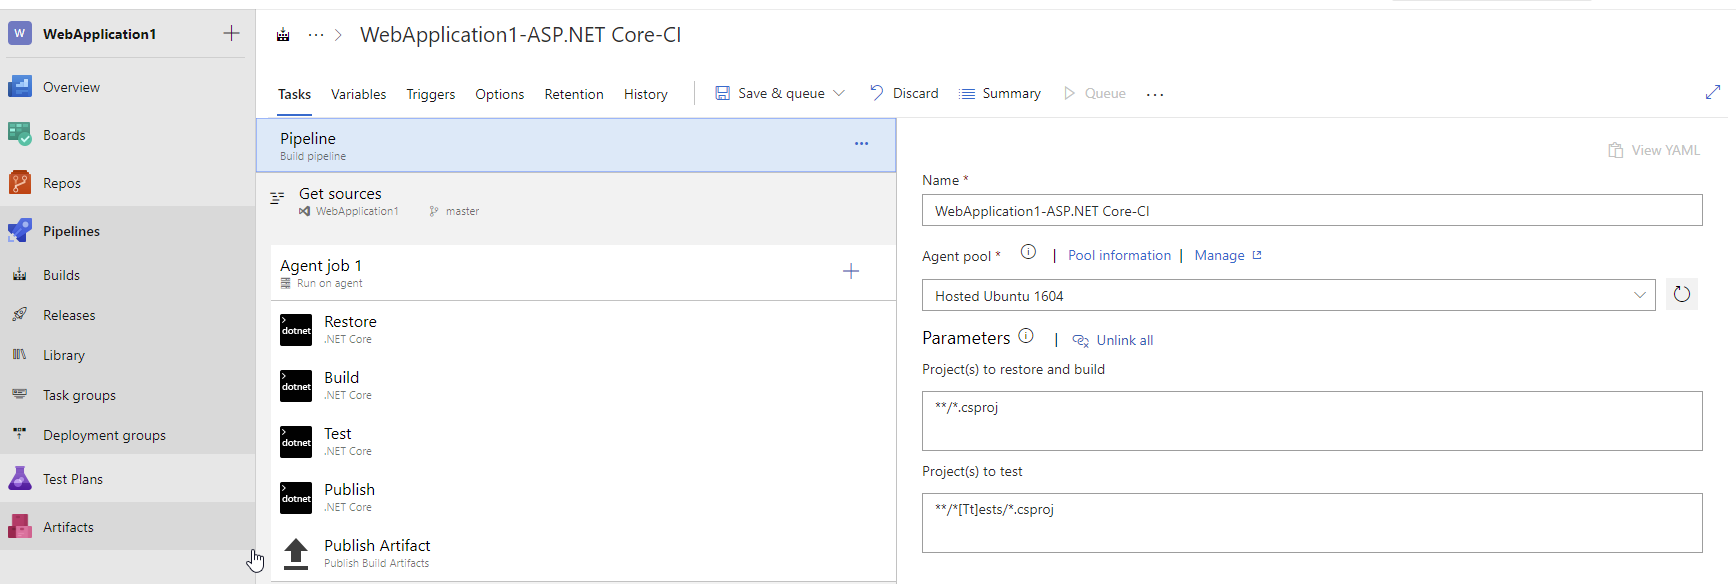
Building all projects on an Ubuntu machine. Interestingly I’ve not got any test projects defined, so it just gives a warning.
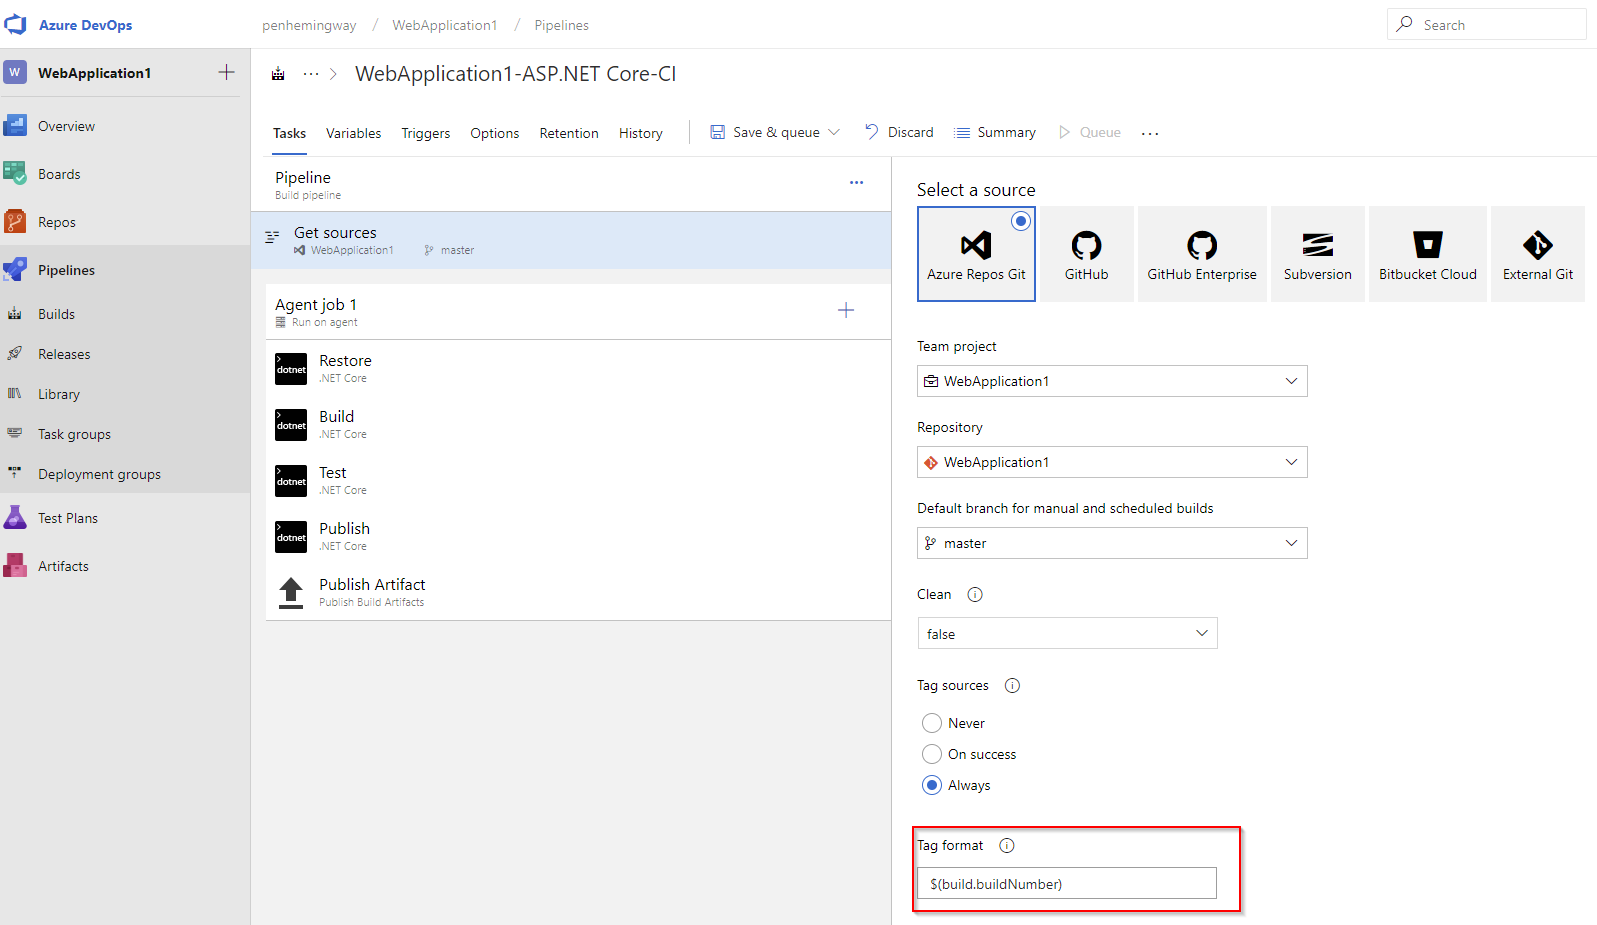
Setting the source Repo for the Build and branch. Tagging source repo always

We can see in source control which every build and its $build.buildNumber More Information on Microsoft Docs and all the predefined variables
We’re inheriting Ubuntu build server from the Pipeline.
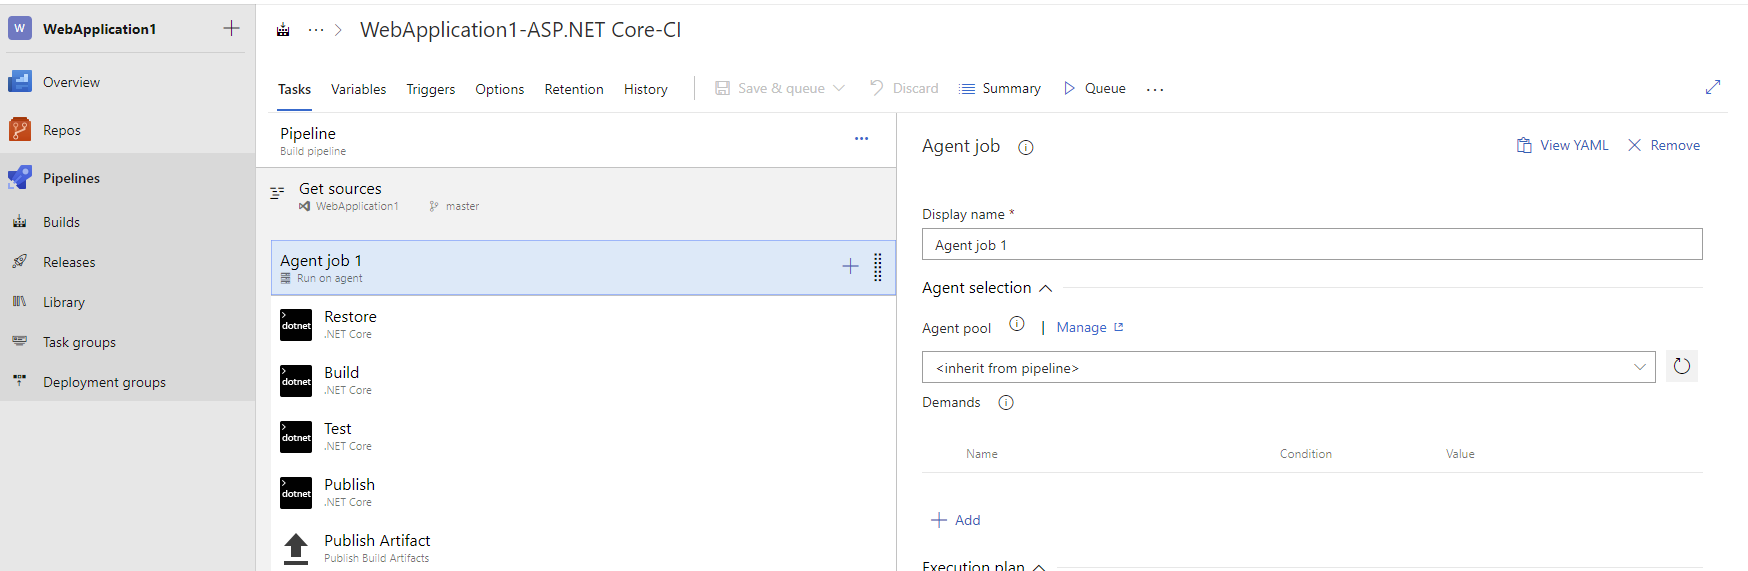
Restore, Build, Test, Publish, and Publish Artifact (which doesn’t go into the Azure DevOps Artifacts, but is accessible from the Agent whic does Releases
Stages
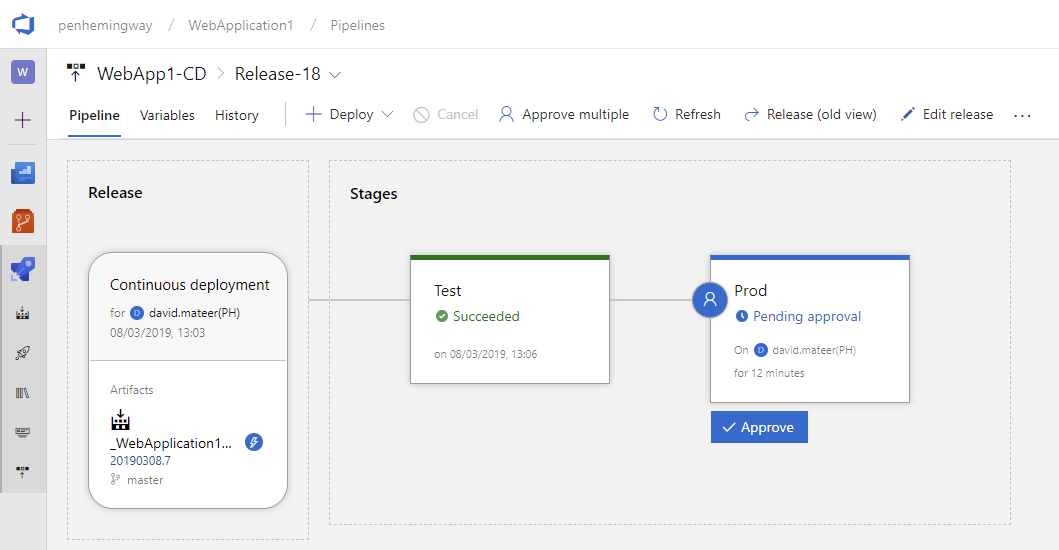
A push to master branch automatically triggers a deploy to Test http://webapplication1dm-test.azurewebsites.net then manually Approve to promote to Prod http://webapplication1dm.azurewebsites.net
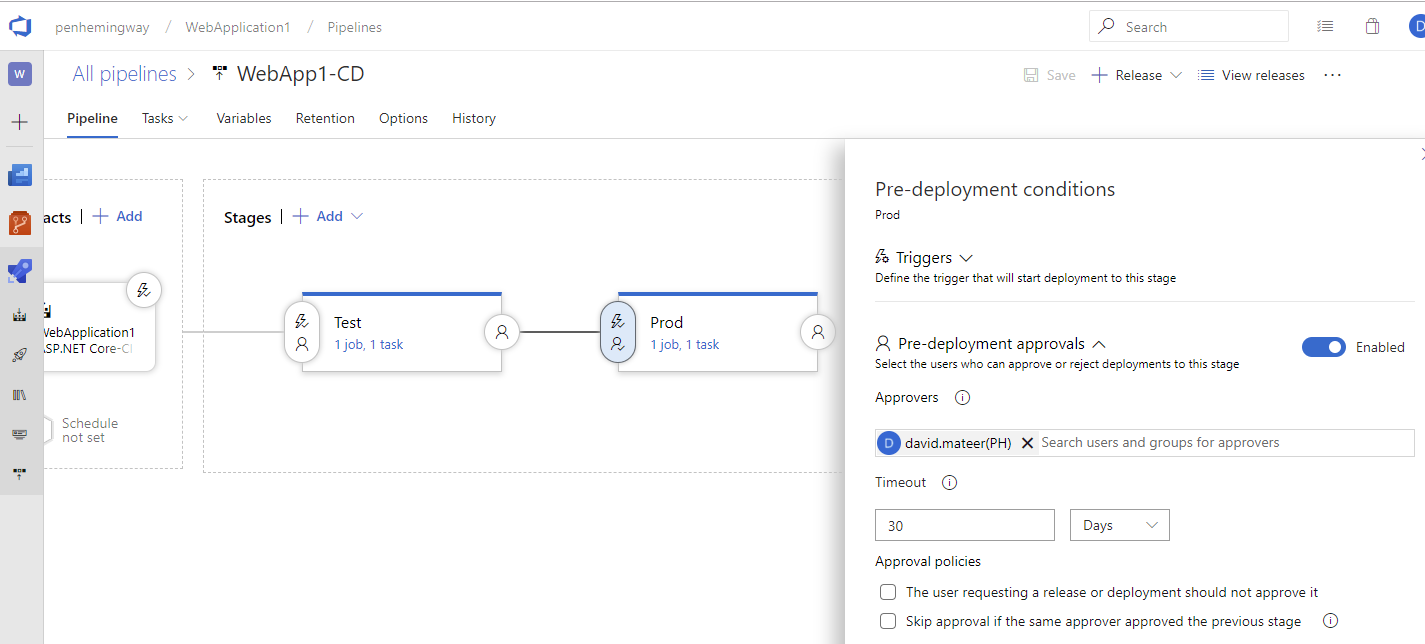
Setting up the Approval process so that I can approve.
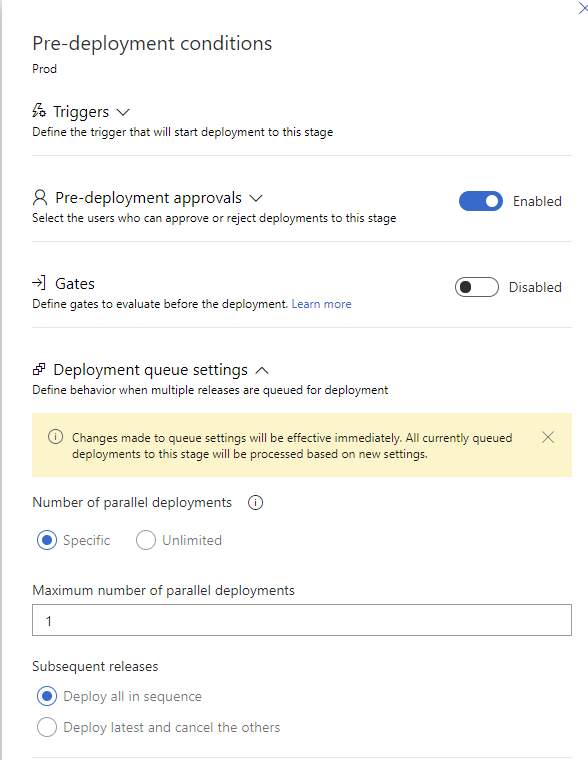
If you do this, then can only deploy the latest to Prod. I prefer the ability to promote any build to Prod (and can then easily promote a previous build to prod if something breaks), so use Unlimited above
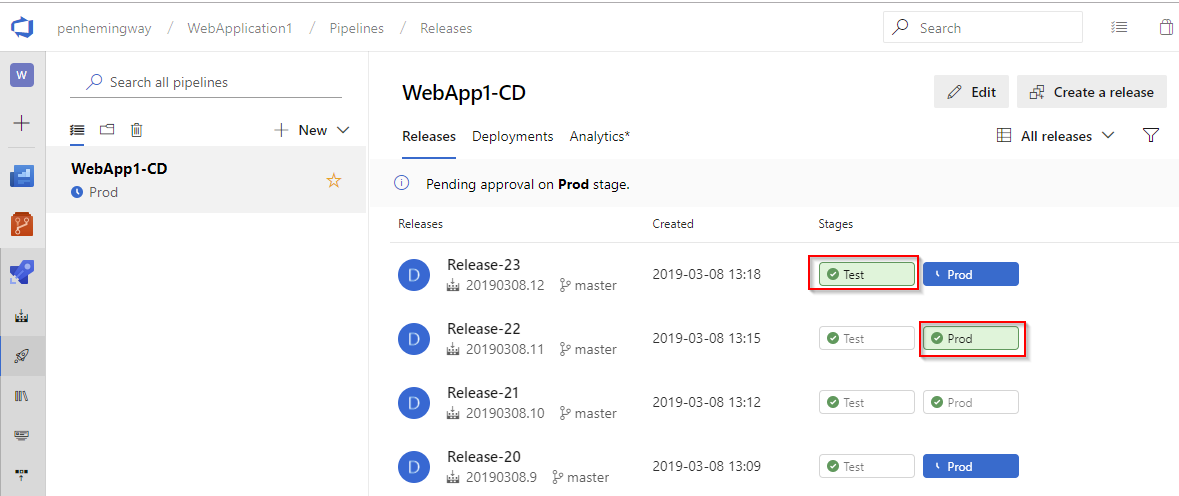
We have Release-23 in Test and Release-22 in Prod.
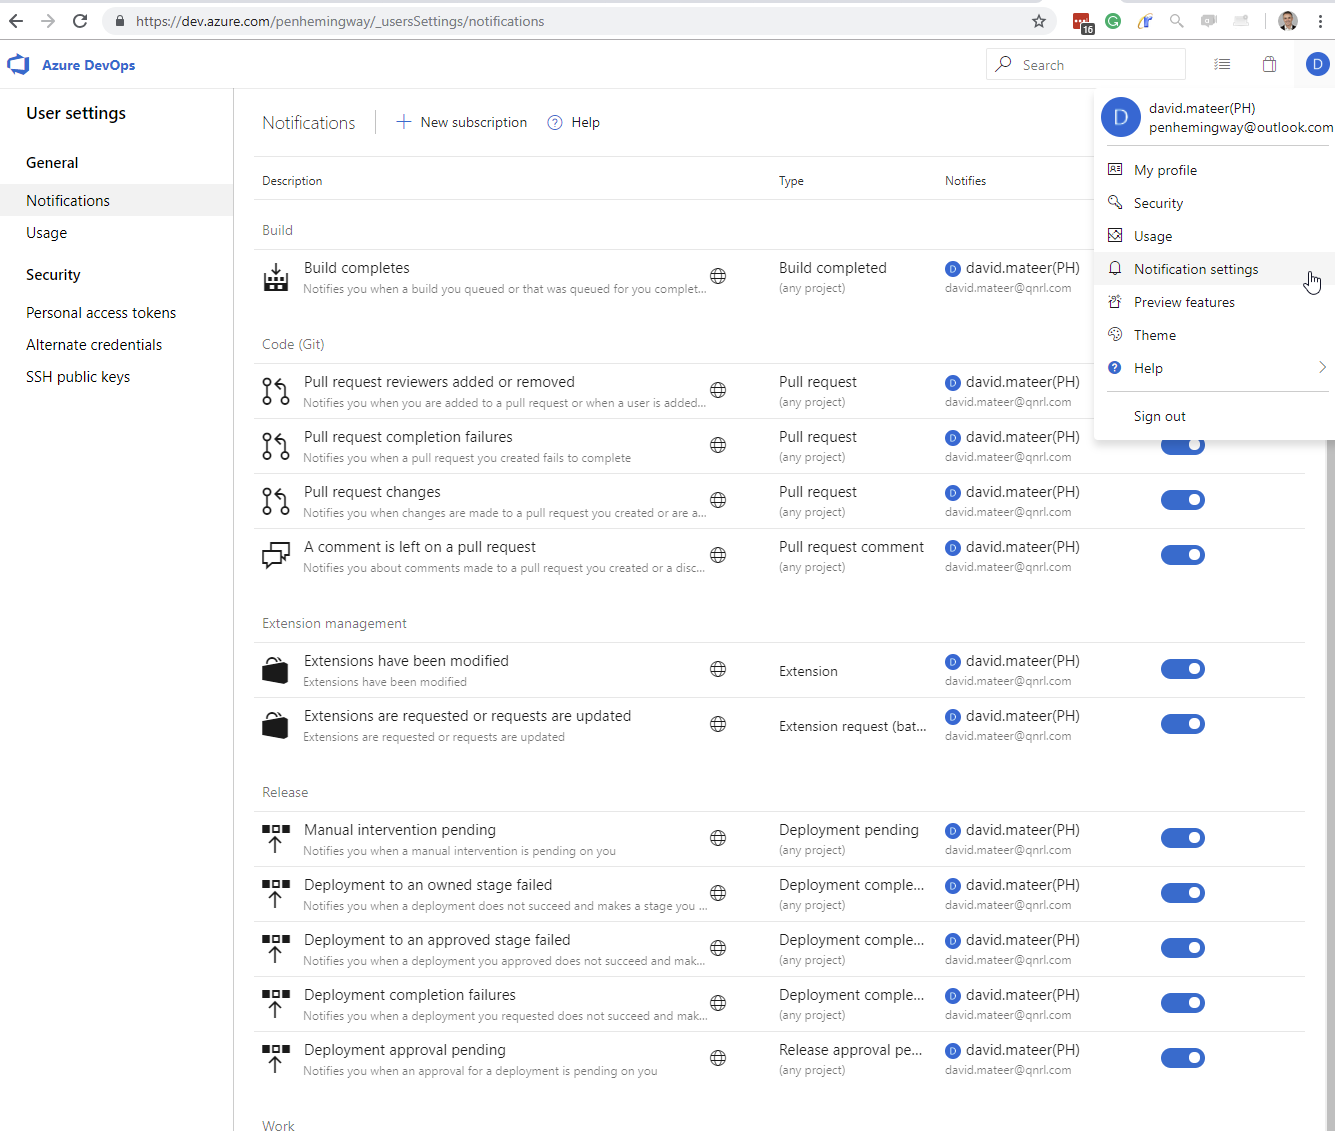
Email Alerts
Look in your personal settings to turn them on or off
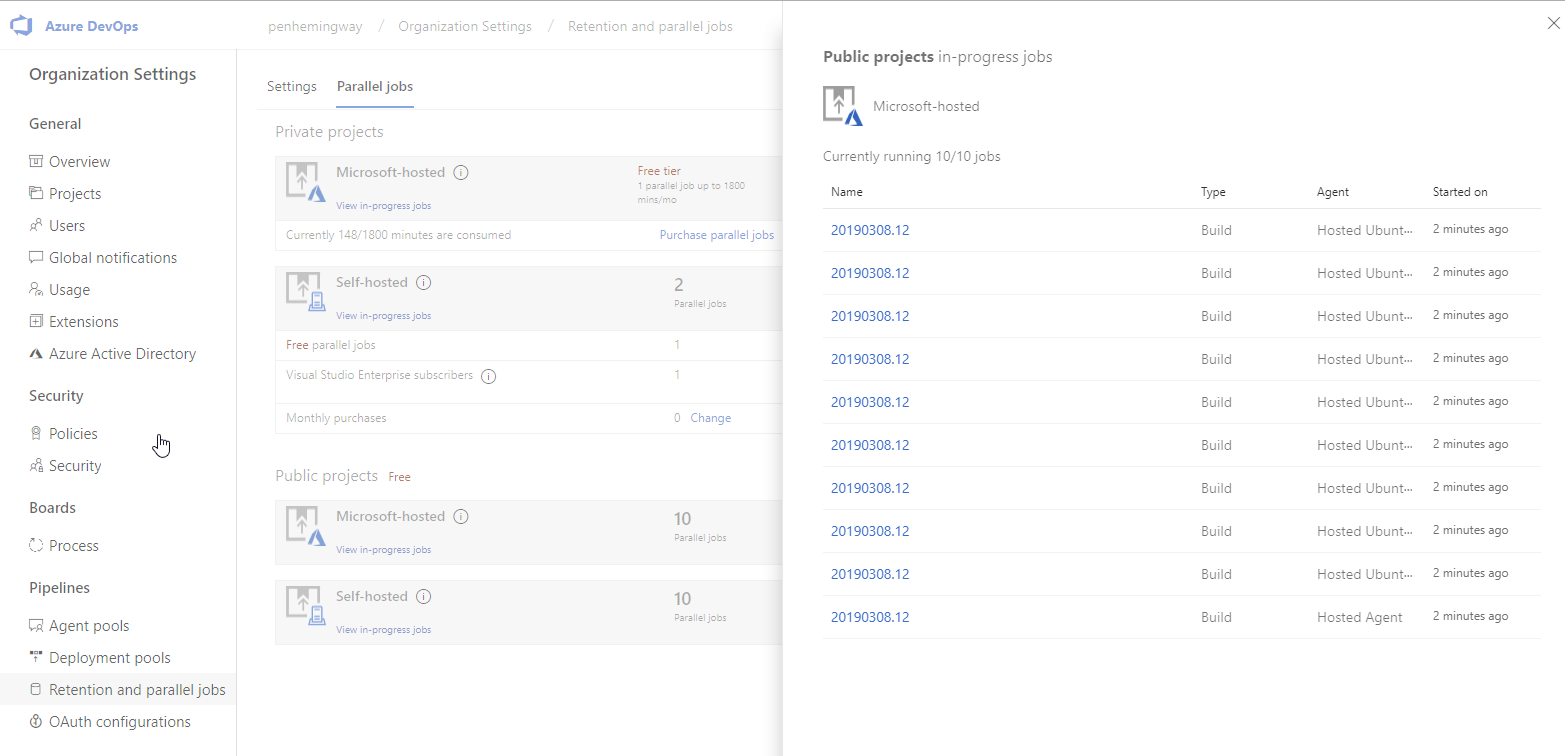
Build Minutes and Parallel Jobs
A handy screen to see how many build minutes we have used. Notice that Public projects get free build minutes. See below as I’ve gone to using the faster Self-hosted build agents.
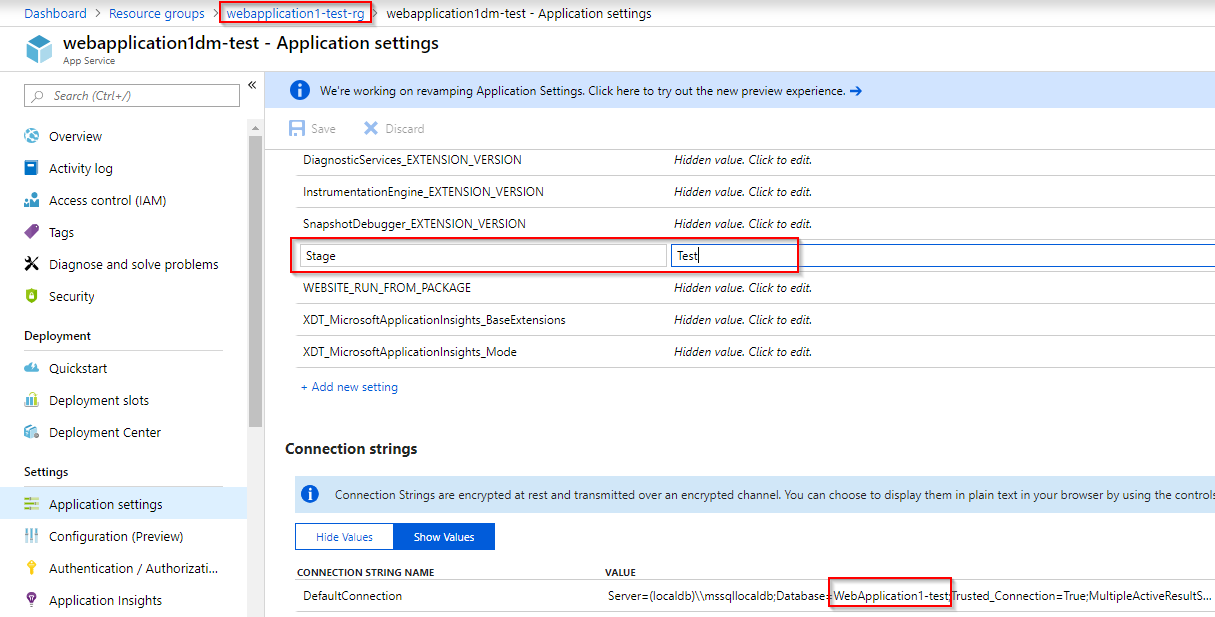
Connection strings and secrets
We want an automated pipeline to put in the correct secrets into the application depends on which Stage eg Test/Prod we are in.
The simplest workflow is if we are using a ASP.NET Core web app, then put in variables in appsettings.json
{
  "Stage": "Local",
  "ConnectionStrings": {
    "DefaultConnection": "Server=(localdb)\\mssqllocaldb;Database=WebApplication1;Trusted_Connection=True;MultipleActiveResultSets=true"
  },
  "Logging": {
    "LogLevel": {
      "Default": "Warning"
    }
  },
  "AllowedHosts": "*"
}
Then in the Azure portal we can put in the secret connection strings. We don’t need the build chain to insert them (yet) as we have already got our Test and Prod enviornments built.
To access the configuration settings from say Index.cshtml.cs, you can use the ASP.NET Core’s DI to inject in IConfiguration which then allows us to read:
-appsettings.json when running locally
-Azure Application Settings and Connection Strings (these settings take precedence)
public class IndexModel : PageModel
{
    private readonly IConfiguration _config;
    public string Message { get; set; }
    public string ConnectionString { get; set; }
    public string Stage { get; set; }

    public IndexModel(IConfiguration config)
    {
        _config = config;
    }

    public void OnGet()
    {
        Message = "test message";
        var connectionString = _config.GetConnectionString("DefaultConnection");
        var stage = _config.GetValue<string>("Stage");
        ConnectionString = connectionString;
        Stage = stage;
    }
}
On the razor view:
<h1 class="display-4">Welcome!_   n</h1>
<p>Message is: @Model.Message</p>
<p>Stage is: @Model.Stage</p>
<p>ConnectionString is: @Model.ConnectionString</p>
Variable Substitution - Display Build information on the website
To know exactly which build you are looking at on a Test / Prod server is invaluable. So many production issues have been solved this way.
 Here we are on the Test stage, connected to the test database, on build 104 done at 14:22 on the 13th of March 2019.
 The same build on Prod.
To add a variable which we can substitute:
- Add variable into appsettings.json with local settings
- Make sure in Releases (all Stages) that in Deploy Azure App Service, the File transforms JSON variable substitution is set eg **/appsettings.json
- Add variable in Releases, Variables.
If you put the same variable in Azure dashboard Application settings it will override any previous settings
  "Stage": "Local",
  "ConnectionStrings": {
    "DefaultConnection": "Server=(localdb)\\mssqllocaldb;Database=WebApplication1;Trusted_Connection=True;MultipleActiveResultSets=true"
  },
  "DevOpsBuildNumber" :  "BuildNumberNotSet",
  "DevOpsBuildId" :  "BuildIdNotSet",
  "DevOpsReleaseId" :  "ReleaseIdNotSet",
appsettings.json
I am using a json transform of the appsetting.json file
Set the json transform in Test and Prod Stages
Adding in variable in Releases, Variables
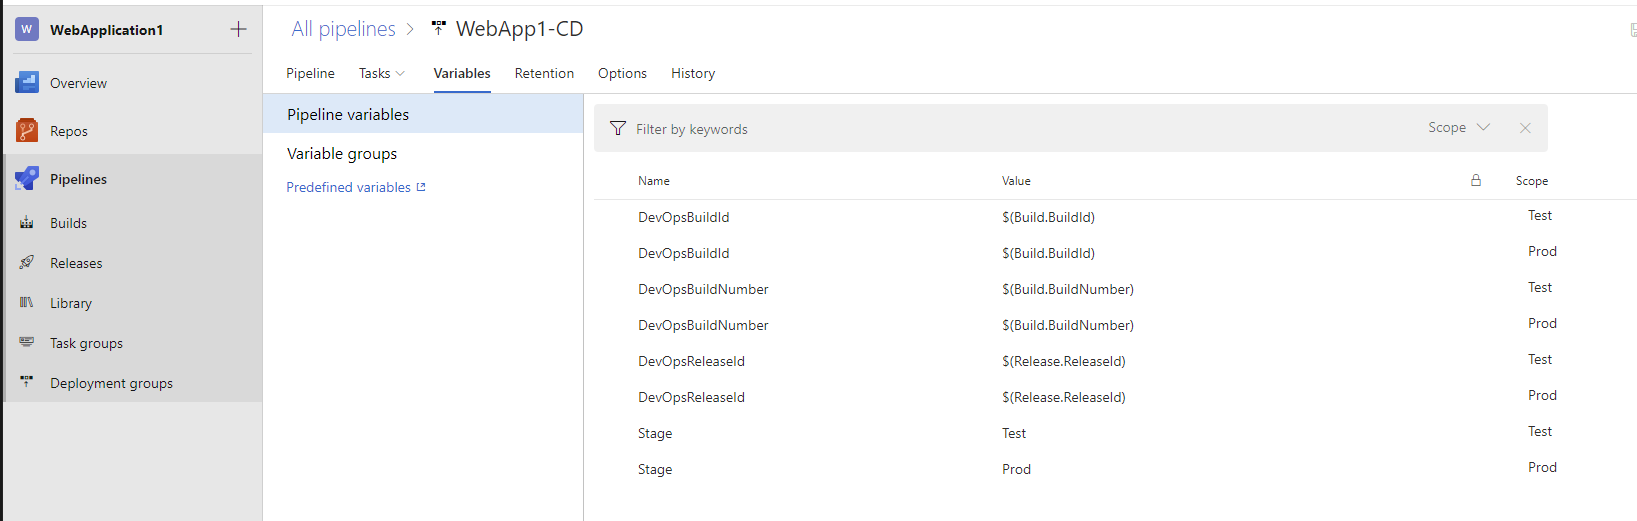
Build Variables defined here
Release Variables defined
- Build.BuildNumber eg 20190312.2 - typically this is used to make a git Tag
- Build.BuildId eg 62 useful for making a hyperlink to the build
- Release.ReleaseId eg 50 useful for making a hyperlink for the release
The Build.BuildNumber format can be modified
I now use a BuildNumber like: 20190312_1426_77 ie $(Date:yyyyMMdd)$(Date:HHmm)$(BuildID)
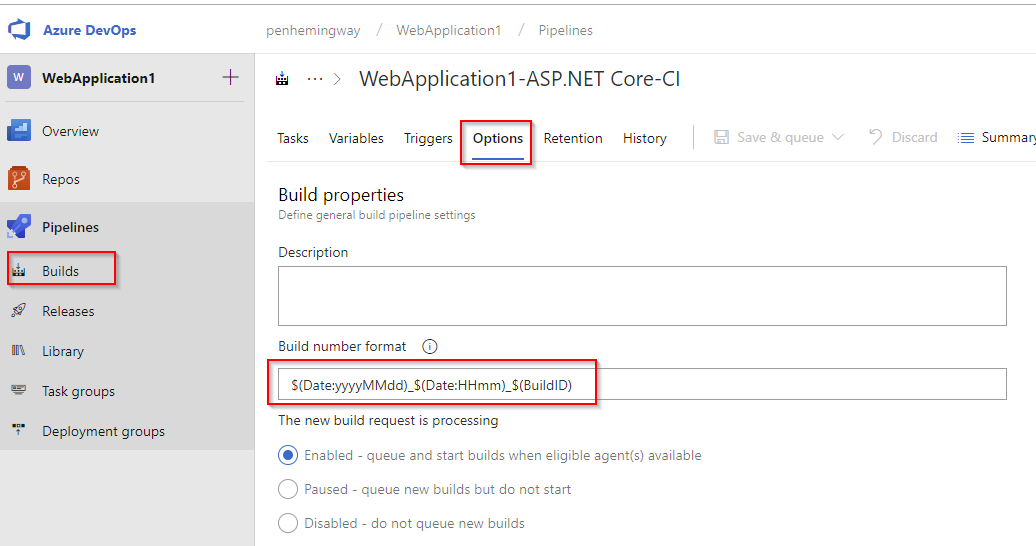
Setting the BuildNumber which is useful to display at the bottom of the final websites.

Having the BuildNumber 101, BuildDateTime 13:48, Stage: Test, and db connection string (part of it!).. provides invaluable debug information. StackOverflow do something similar with the BuildNumber.
To access this data from code:
var connectionString = _config.GetConnectionString("DefaultConnection");
// so wont throw if < 50
ConnectionString = new string(connectionString.Skip(7).Take(50).ToArray());

Stage = _config.GetValue<string>("Stage");
DevOpsBuildId = _config.GetValue<string>("DevOpsBuildId");
DevOpsBuildNumber = _config.GetValue<string>("DevOpsBuildNumber");
DevOpsReleaseId = _config.GetValue<string>("DevOpsReleaseId");
DevOps Status
I had an issue where the Build was triggering when a new commit was found on the branch, but the Release pipeline wasn’t picking up that a new artifact was there. It turned out to be an issue with DevOps which was shown on the status.dev.azure.com board
Even an hour after it was fixed I noticed issues - seeing a 17minute then 6minute then 4minute lag between Build finishing and Release artifact being picked up. I’m assuming it is message queues clearing.
Linux Docker Build Agent
To speed up the Builds and Releases I use my own Linux build agent running as a Docker container on my local windows machine (fast desktop with a 140Mbps synchronous internet connect). This is not recommended for Production, but is very good for experimentation with the system.
Build agent on Docker Hub and instructions
docker run -e VSTS_ACCOUNT=penhemingway -e VSTS_TOKEN=************** -e VSTS_POOL=MateerPool -e VSTS_AGENT='workdesktop-agent' -it mcr.microsoft.com/azure-pipelines/vsts-agent
-VSTS_ACCOUNT is from: https://dev.azure.com/penhemingway/
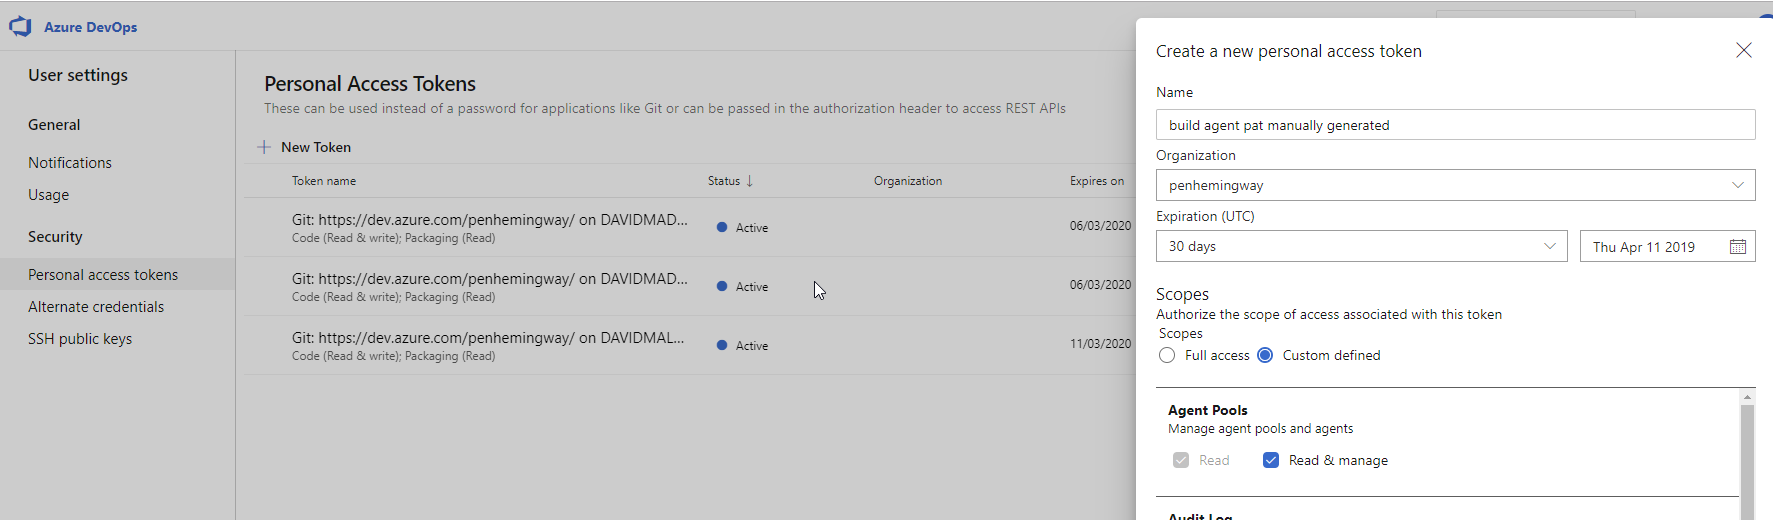
-PAT Token can be got from: DevOps Portal, Your user icon, Security, then:
-VSTS_POOL is an obvious name (see below in Organisational settings, Agent Pools)
-VSTS_AGENT is the name of your build server
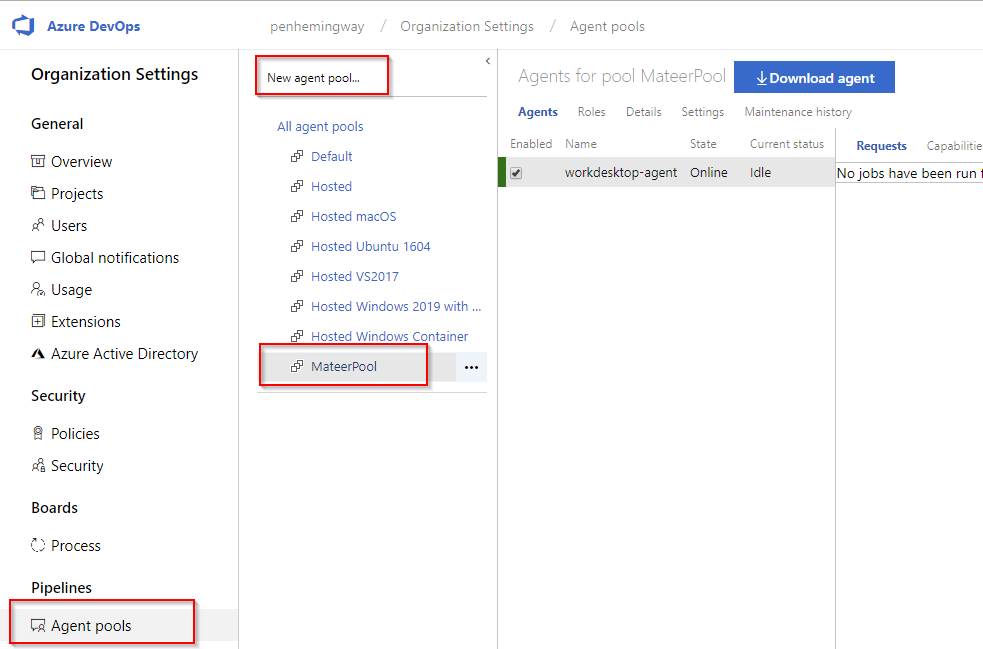
Setting up own pool makes it clearer in Builds and Pipelines (instead of the nebulous Default).
Performance improvements on local vs Hosted Ubuntu: -Builds from 2:30 to 17seconds -Release stage is much faster
To see changes in Dev takes 50 seconds now, compared with 3:30.
Windows Build Agent
Apparently they are working on a Windows Docker build agent but for now we have to use a local one:
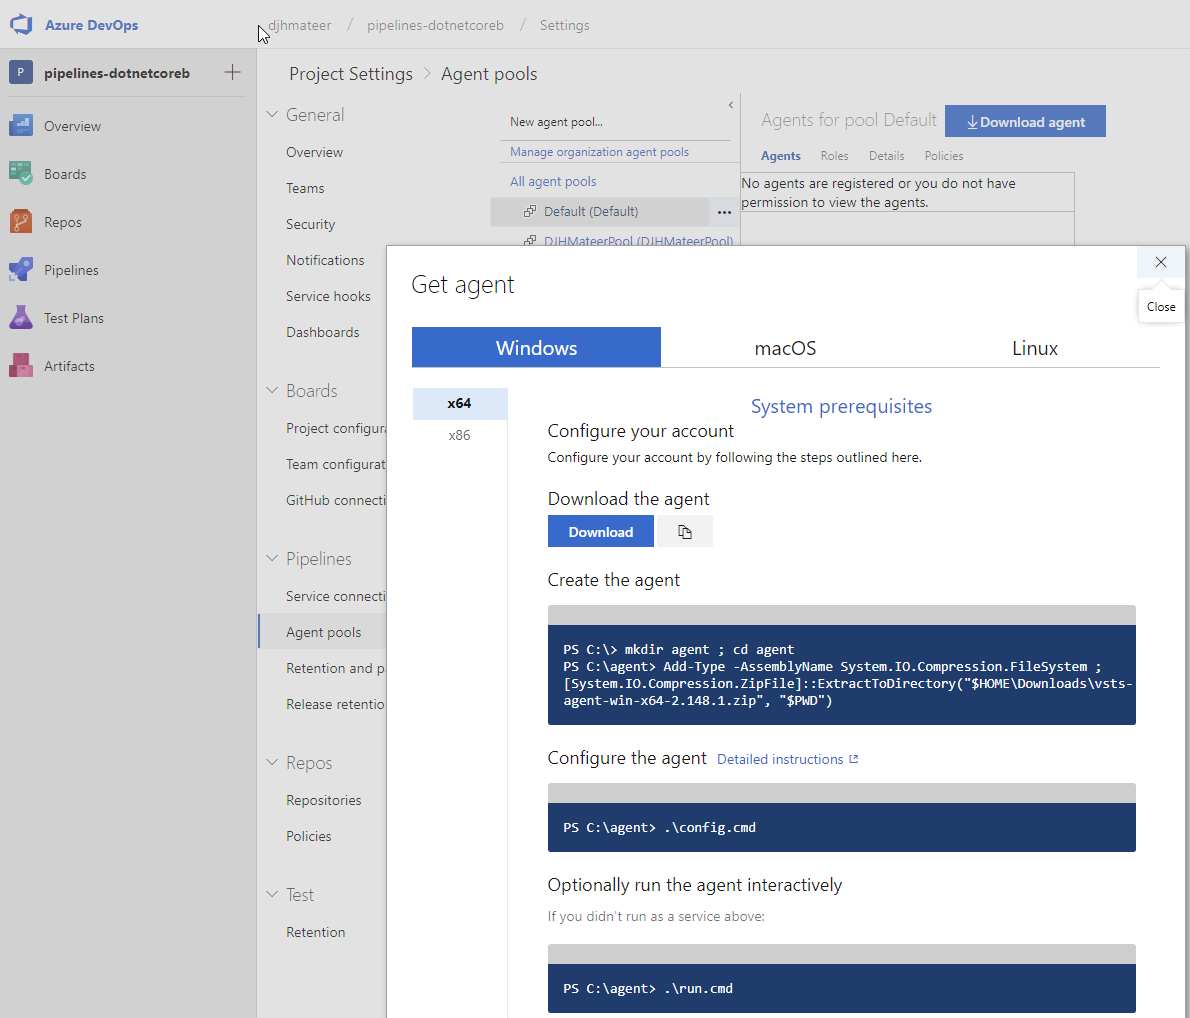
I found that using Powershell was the way forward (so don’t download the agent). Essentially:
mkdir agent ; cd agent
Add-Type -AssemblyName System.IO.Compression.FileSystem ; [System.IO.Compression.ZipFile]::ExtractToDirectory("$HOME\Downloads\vsts-agent-win-x64-2.148.1.zip", "$PWD")

# configures the agent - I chose to not run it as a service
.\config.cmd

# runs it in the powershell
.\run.cmd
- pat (personal access token) is found from Personal, Security on the dev.azure.com page
- url is of the form: https://dev.azure.com/djhmateer
- pool is: DJHMateerWindowsPool
- name is: WorkDesktopWindows
Using a database
SQL Server hosted on Azure
To get debug error messages on Test, use the environment variable:
ASPNETCORE_ENVIRONMENT = Development
AzureDevOpsDemoGenerator
https://azuredevopsdemogenerator.azurewebsites.net generates up sample DevOps projects with Boards,. Repos, Pipelines, Test Plans and Artifacts.
https://azuredevopslabs.com/labs/azuredevops/continuousintegration/ requries the Parts Unlimited project be setup. This is an ASP.NET 4.5 project talking to MSSQL.
AzureDevOps TLA’s
PBI - Product Backlog Item
Summary
We have looked at using the GUI for driving Azure DevOps.
In the next article we will look at driving the Pipeline from yml which is the recommended way