Wordpress in AKS
update 14th Oct 2020
Wordpress install on VM using cloud-init is how I do things now. I highly recommend this approach and not using K8s unless you really need it.
update 25th Jan 2019 I don’t recommend this way of deploying Wordpress purely because it is complex and I’ve found using Azure PaaS to be good. See Azure Hosting Wordpress Article
This article details setting up a Wordpress instance in Azure Kubernetes Service (AKS). I will show you how to setup AKS then go step by step until we have a working Wordpress installation with SSL and appropriate redirects.
Background
We had an issue where an existing Wordpress installation was years out of date and could not be updated because it was running a version of Wordpress called Project Nami. This meant that some plugins wouldn’t work and therefore the entire application was not updated.
It had become very slow (5s to load the home page).
What we considered
We looked at many options including shared hosting, dedicated hosting, a custom VM, a VM running Docker, and orchestrated Docker using Kubernetes (commonly shortened to K8s).
We ran a VM running Docker for many months as a test server - essentially a VM with Docker installed using docker-compose to run Wordpress and MySQL in different containers.
Why host in Docker and K8s
- Fully scripted and source controllable deployment
- Easy to deploy to dev/test/live
- Managed Linux machine on live
- Security - easy to update
- Cost - higher density of applications on VMs
What are we using
Azure Kubernetes Service (AKS)
Azure managed MySQL
A single node cluster with an Azure attached disk for persistence
Ingress controller
Nginx reverse proxy (includes enforcing https)
Nginx server (enforces www)
Setting up the AKS Cluster
I use the Azure CLI tool to script all the building in Azure. At the time of writing the version is 2.0.33.
az account show

az login

# -n is --name, -l is --location
az group create -n aksrg -l westeurope

# -n is --name, -g is --resource-group, c is --node-count, -k is --kubernetes-version
# -s is --node-vm-size, --generate-ssh-keys needed first time only
# az aks create -n aks -g aksrg -c 1 -k 1.9.6 -s Standard_B2s --generate-ssh-keys
az aks create -n aks -g aksrg -c 1 -k 1.9.6

# get aks versions and vm sizes
az aks get-versions -l westeurope -o table
az vm list-skus --location westeurope -o table
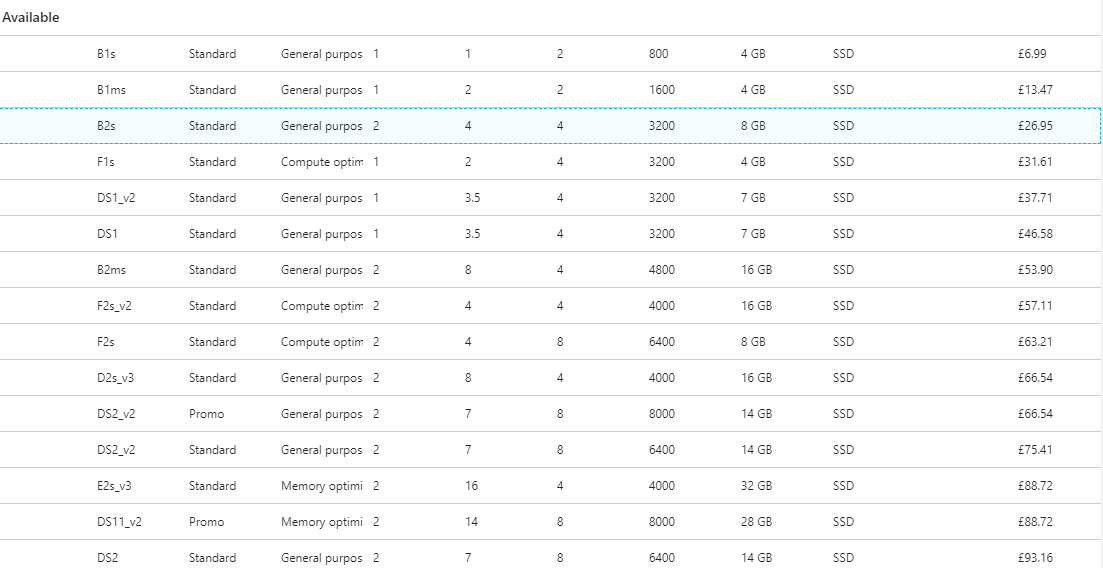
The Azure support team (5th May 2018) recommend using the default Standard_DS1_v2 vm size as the B series still needs some more work. At time of writing eastus didn’t have B series.
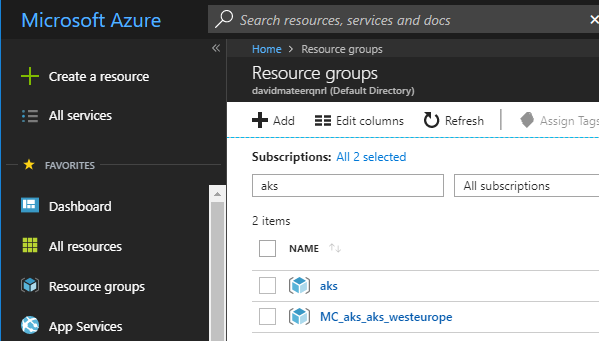
The aks resource group has been created and an automatically created group which contains all the resources
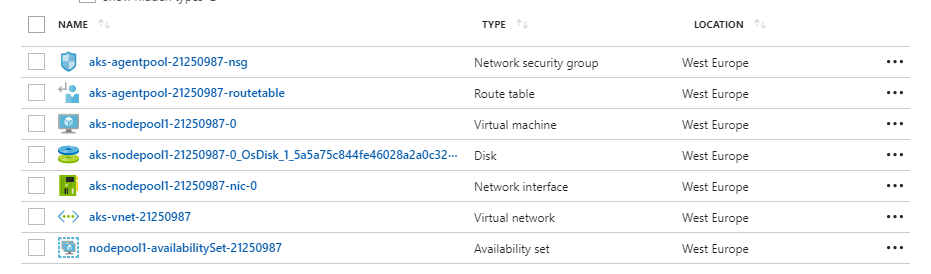
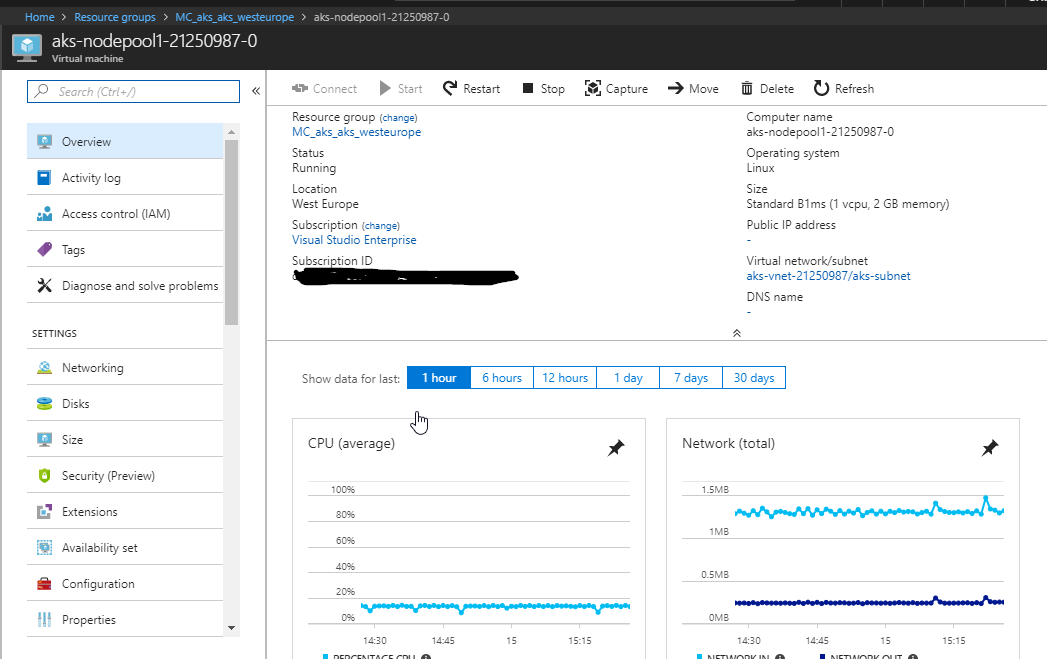
and the Worker (previously called Minion in K8s) VM is here:
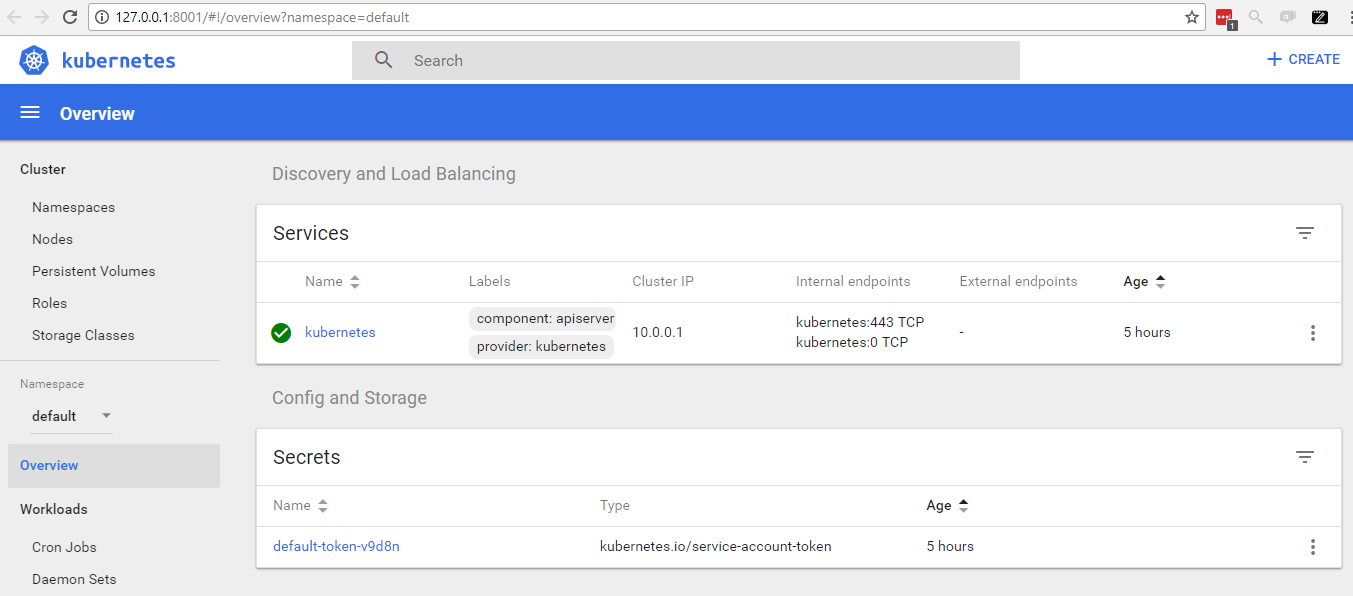
Dashboard
I find the dashboard useful - mostly to see what is waiting to happen and if the cluster is ready. It’s also a great way to look around and see how the different parts of Kubernetes fit together.
# dashboard
az aks browse -n aks -g aksrg

# get the credentials of the cluster (you may need this if the above command fails)
az aks get-credentials -n aks -g aksrg

# check you are on the correct cluster
k cluster-info

k config get-contexts

# change cluster
k config use-context aks

# get pods
k get po
k get all
Install Kubectl
If you ever get unauthorised using kubectl, try deleting the folder C:\Users\yourname\.kube
If you ever get strange permissions issues (I did after an upgrade of Kubernetes) run this script
# dashboard-admin.yaml
apiVersion: rbac.authorization.k8s.io/v1beta1
kind: ClusterRoleBinding
metadata:
  name: kubernetes-dashboard
  labels:
    k8s-app: kubernetes-dashboard
roleRef:
  apiGroup: rbac.authorization.k8s.io
  kind: ClusterRole
  name: cluster-admin
subjects:
- kind: ServiceAccount
  name: kubernetes-dashboard
  namespace: kube-system
My work network seems to drop the tunnel after a few minutes.

Making a simple keepalive app to hit the site worked for me:
static void Main()
{
  while (true)
  {
    var request = (HttpWebRequest)WebRequest.Create("http://127.0.0.1:8001");

    using (var response = (HttpWebResponse) request.GetResponse())
    using (var stream = response.GetResponseStream())
    using (var reader = new StreamReader(stream))
       Console.WriteLine(reader.ReadToEnd());

    System.Threading.Thread.Sleep(29000);
  }
}

// Dotnet core publish an exe console app
// https://stackoverflow.com/a/44074296/26086
dotnet publish -c Release -r win10-x64
I linked the output of publish above to a ka alias, and instead of using kubectl I use k Cmder aliases
0.Reverse Proxy
We are going to use Nginx as a reverse proxy to:
- Allow multiple websites on this cluster
- Have a default backend
- Enforce https when calling a website
- Enforce www (ie https://hoverflylagoons.co.uk will go to https://www.hoverflylagoons.co.uk)
All code is in k8ssamples. Repo is currently private. Please get in contact with me if you want access.
Update 5th July 2018 After upgrading my cluster and getting the error:
It seems the cluster it is running with Authorization enabled (like RBAC) and there is no permissions for the ingress controller. Please check the configuration
Following the instructions
kubectl apply -f https://raw.githubusercontent.com/kubernetes/ingress-nginx/master/deploy/mandatory.yaml

kubectl apply -f https://raw.githubusercontent.com/kubernetes/ingress-nginx/master/deploy/provider/cloud-generic.yaml
And I don’t use any of the below:
# namespace.yaml
apiVersion: v1
kind: Namespace
metadata:
  name: ingress-nginx
Useful to put these following helper parts in their own namespace. Once these are setup they are rarely touched again - we can get on with deploying our own apps.
# configmap.yaml
kind: ConfigMap
apiVersion: v1
metadata:
  name: nginx-configuration
  namespace: ingress-nginx
  labels:
    app: ingress-nginx
---
kind: ConfigMap
apiVersion: v1
metadata:
  name: tcp-services
  namespace: ingress-nginx
---
kind: ConfigMap
apiVersion: v1
metadata:
  name: udp-services
  namespace: ingress-nginx
then
# default-backend.yaml
apiVersion: extensions/v1beta1
kind: Deployment
metadata:
  name: default-http-backend
  labels:
    app: default-http-backend
  namespace: ingress-nginx
spec:
  replicas: 1
  selector:
    matchLabels:
      app: default-http-backend
  template:
    metadata:
      labels:
        app: default-http-backend
    spec:
      terminationGracePeriodSeconds: 60
      containers:
      - name: default-http-backend
        # Any image is permissible as long as:
        # 1. It serves a 404 page at /
        # 2. It serves 200 on a /healthz endpoint
        image: gcr.io/google_containers/defaultbackend:1.4
        livenessProbe:
          httpGet:
            path: /healthz
            port: 8080
            scheme: HTTP
          initialDelaySeconds: 30
          timeoutSeconds: 5
        ports:
        - containerPort: 8080
        resources:
          limits:
            cpu: 10m
            memory: 20Mi
          requests:
            cpu: 10m
            memory: 20Mi
---
apiVersion: v1
kind: Service
metadata:
  name: default-http-backend
  namespace: ingress-nginx
  labels:
    app: default-http-backend
spec:
  ports:
  - port: 80
    targetPort: 8080
  selector:
    app: default-http-backend
So this has created a Service and a Deployment for the default-backend which will catch anything hitting this server which isn’t recognised by a host header eg www.hoverflylagoons.co.uk. It also acts as a healthcheck endpoint for K8s to see if this node is alive.
# ingress-nginx.yaml
apiVersion: extensions/v1beta1
kind: Deployment
metadata:
  name: nginx-ingress-controller
  namespace: ingress-nginx
spec:
  replicas: 1
  selector:
    matchLabels:
      app: ingress-nginx
  template:
    metadata:
      labels:
        app: ingress-nginx
      annotations:
        prometheus.io/port: '10254'
        prometheus.io/scrape: 'true'
    spec:
      containers:
        - name: nginx-ingress-controller
          image: quay.io/kubernetes-ingress-controller/nginx-ingress-controller:0.12.0
          args:
            - /nginx-ingress-controller
            - --default-backend-service=$(POD_NAMESPACE)/default-http-backend
            - --configmap=$(POD_NAMESPACE)/nginx-configuration
            - --tcp-services-configmap=$(POD_NAMESPACE)/tcp-services
            - --udp-services-configmap=$(POD_NAMESPACE)/udp-services
            - --annotations-prefix=nginx.ingress.kubernetes.io
            - --publish-service=$(POD_NAMESPACE)/ingress-nginx
          env:
            - name: POD_NAME
              valueFrom:
                fieldRef:
                  fieldPath: metadata.name
            - name: POD_NAMESPACE
              valueFrom:
                fieldRef:
                  fieldPath: metadata.namespace
          ports:
          - name: http
            containerPort: 80
          - name: https
            containerPort: 443
          livenessProbe:
            failureThreshold: 3
            httpGet:
              path: /healthz
              port: 10254
              scheme: HTTP
            initialDelaySeconds: 10
            periodSeconds: 10
            successThreshold: 1
            timeoutSeconds: 1
          readinessProbe:
            failureThreshold: 3
            httpGet:
              path: /healthz
              port: 10254
              scheme: HTTP
            periodSeconds: 10
            successThreshold: 1
            timeoutSeconds: 1
I am using the this version of the Nginx maintained by the Kubernetes community. There is anohter which is maintained by the nginx community.
# ingress-nginx-svc.yaml
kind: Service
apiVersion: v1
metadata:
  name: ingress-nginx
  namespace: ingress-nginx
  labels:
    app: ingress-nginx
spec:
  externalTrafficPolicy: Local
  type: LoadBalancer
  selector:
    app: ingress-nginx
  ports:
  - name: http
    port: 80
    targetPort: http
  - name: https
    port: 443
    targetPort: https
To run all these commands together:
k create -f namespace.yaml  -f configmap.yaml
k create -f default-backend.yaml
k create -f ingress-nginx.yaml -f ingress-nginx-svc.yaml
This takes some time for Azure to assign an external IP address to the ingress-nginx service. Around 3-5 minutes.
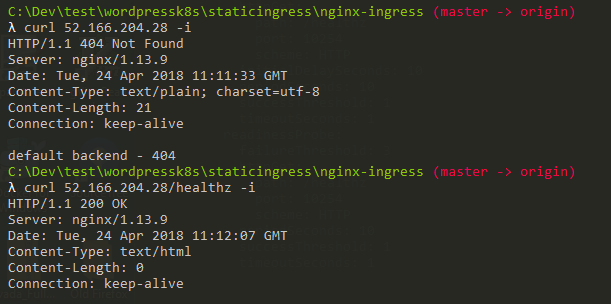
So we now how a default backend working for this cluster!
1.Single App Deploy
Lets do the simplest thing possible with a real domain that I own.
# app-ingress.yaml
apiVersion: extensions/v1beta1
kind: Ingress
metadata:
  name: app-ingress
  annotations:
    nginx.ingress.kubernetes.io/rewrite-target: /
spec:
  rules:
  - host: www.hoverflylagoons.co.uk
    http:
      paths:
      - backend:
          serviceName: appsvc1
          servicePort: 80
        path: /
The nginx-ingress-controller will pickup this Ingress and apply it.
# app-service.yaml
apiVersion: v1
kind: Service
metadata:
  name: appsvc1
spec:
  ports:
  - port: 80
    protocol: TCP
    targetPort: 80
  selector:
    app: app1
Setting up the service - the Ingress rule for www.hoverflylagoons.co.uk points to this service (appsvc1)
# app-deployment.yaml
apiVersion: extensions/v1beta1
kind: Deployment
metadata:
  name: app1
spec:
  replicas: 1
  template:
    metadata:
      labels:
        app: app1
    spec:
      containers:
      - name: app1
        image: dockersamples/static-site
        env:
        - name: AUTHOR
          value: app1
        ports:
        - containerPort: 80
Run these commands
k create -f app-ingress.yaml
k create -f app-service.yaml
k create -f app-deployment.yaml
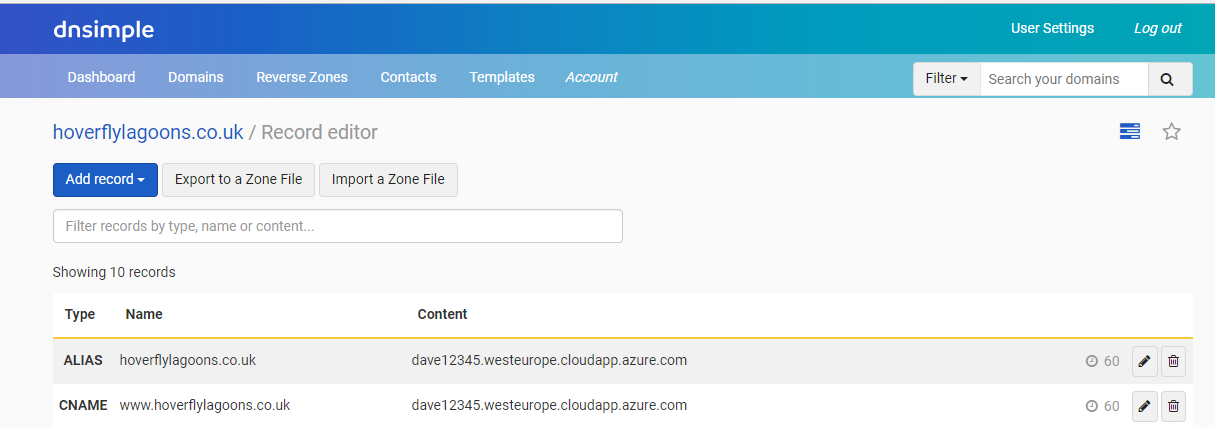
Then we need to point the domain to this IP address, or even better I like to choose a name like:
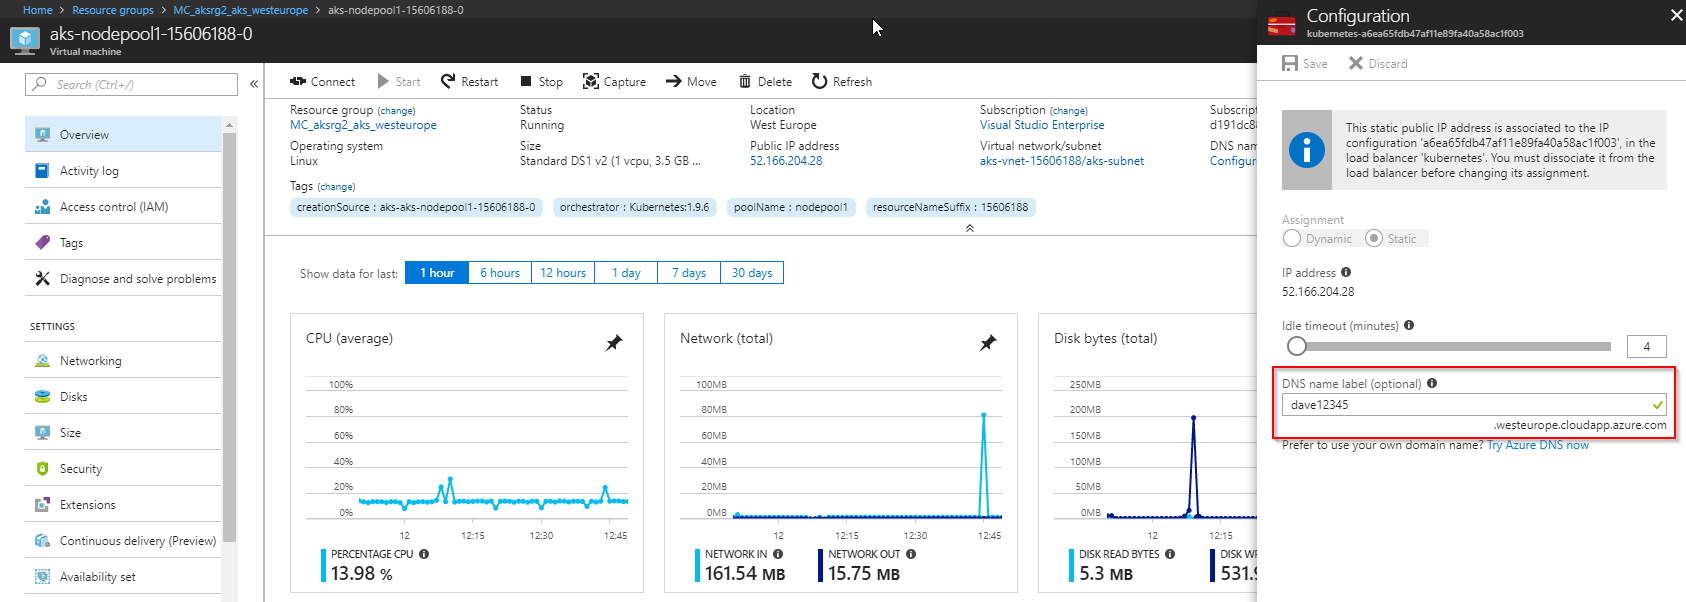
Then point my DNS records to this. Note - you need to click below in the whitespace below the red box to get the javascript to work, then the save button should appear if the name isn’t taken!
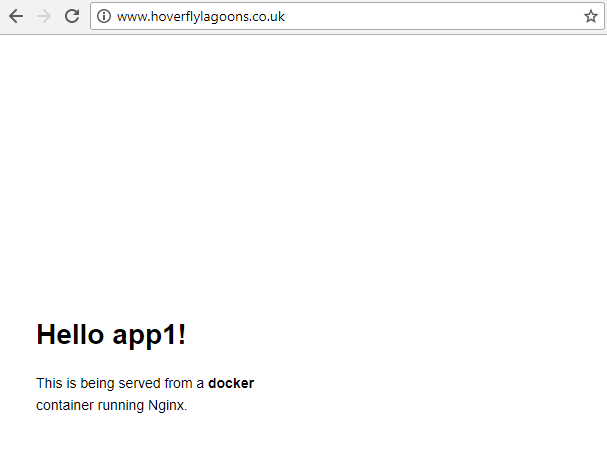
Success it is working!
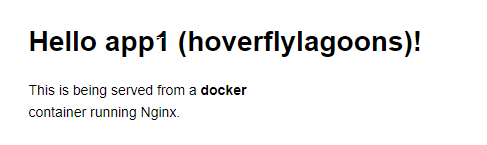
If we want to update the message, edit app-deployment and change:
value: app1
value: app1 (hoverflylagoons)

k apply -f app-deployment.yaml

# useful as it resets the time the deployment has been up and you can verify when the new one is there
k replace --force -f app-deployment.yaml
2.Multi Application Deploy
All source code in /2multiapp
k replace -f app-ingress.yaml

k delete -f app-service.yaml
k create -f app-service.yaml

k delete -f app-deployment.yaml
k create -f app-deployment.yaml

# alternatively delete all
k delete -f app-ingress.yaml -f app-service.yaml -f app-deployment.yaml

# create all
k create -f app-ingress.yaml -f app-service.yaml -f app-deployment.yaml
The ingress:
apiVersion: extensions/v1beta1
kind: Ingress
metadata:
  name: app-ingress
  annotations:
    nginx.ingress.kubernetes.io/rewrite-target: /
    #nginx.ingress.kubernetes.io/from-to-www-redirect: "true"
spec:
  rules:
  - host: www.hoverflylagoons.co.uk
    http:
      paths:
      - backend:
          serviceName: app1-svc
          servicePort: 80
        path: /
  - host: www.programgood.net
    http:
      paths:
      - backend:
          serviceName: app2-svc
          servicePort: 80
        path: /
3.Redirect to www
If we have a request on: http://hoverflylagoons.co.uk we want to redirect to http://www.hoverflylagoons.co.uk. Usually I prefer the reverse and have the root. However as long as there is consistency that is good.
Usually this would be handled by reverse proxy, however currently that that proxy is handling the redirect to HTTPS (next section) and at time of writing I couldn’t fine an elegant workaround, so with the beauty of K8s I created a new nginx container whose sole job is to handle the redirect to www.
The salient changes to code:
#app-ingress.yaml
  rules:
  - host: www.hoverflylagoons.co.uk
    http:
      paths:
      - backend:
          serviceName: app1-svc
          servicePort: 80
        path: /
  - host: hoverflylagoons.co.uk
    http:
      paths:
      - backend:
          serviceName: redirect
          servicePort: 80
        path: /

#app-deployment.yaml
kind: Deployment
metadata:
  name: redirect
spec:
  replicas: 1
  template:
    metadata:
      labels:
        app: redirect
    spec:
      containers:
      - name: redirect
        image: davemateer/redirectnginx
        ports:
        - containerPort: 80
So how to create the nginx container to handle the redirect ie davemateer/redirectnginx?
Dockerfile:
# Dockerfile
FROM nginx
COPY nginx.conf /etc/nginx
nginx.conf
events {
 worker_connections 1024;
}

http {
  server {
    listen 80;
    server_name hoverflylagoons.co.uk;
    return 301 http://www.hoverflylagoons.co.uk$request_uri;
  }

  server {
    listen 80;
    server_name programgood.net;
    return 301 http://www.programgood.net$request_uri;
  }
}
Push image and reload k8s:
docker login --username=davemateer

docker build -t davemateer/redirectnginx .
docker push davemateer/redirectnginx

k replace -f app-ingress.yaml

k delete -f app-service.yaml
k create -f app-service.yaml

k delete -f app-deployment.yaml
k create -f app-deployment.yaml

# delete and create
k delete -f app-ingress.yaml -f app-service.yaml -f app-deployment.yaml

k create -f app-ingress.yaml -f app-service.yaml -f app-deployment.yaml
Azure Container Registry
As we are heading towards enterprise deployments and I’d like to keep Dockerfiles private
# ACR
# docker login davem.azurecr.io -u davem -p TYPEITHERE
# docker build -t davem.azurecr.io/redirectnginx .
# docker push davem.azurecr.io/redirectnginx
FROM nginx
COPY nginx.conf /etc/nginx
Now we’ve got the container on the ACR we need to give K8s permission to read it (as it is private). Lets use a secret:
k create secret docker-registry davemazurecr --docker-server davem.azurecr.io --docker-email david.mateer@qnrl.com --docker-username=davem --docker-password 2ComXXXXXXXX8zgkP
And now the full deployment:
apiVersion: extensions/v1beta1
kind: Deployment
metadata:
  name: redirect
spec:
  replicas: 1
  template:
    metadata:
      labels:
        app: redirect
    spec:
      containers:
      - name: redirect
        #image: davemateer/redirectnginx
        image: davem.azurecr.io/redirectnginx
        ports:
        - containerPort: 80
      imagePullSecrets:
      - name: davemazurecr
For simplicity I’ve used a single service principal (admin). Here are some thoughts and links on how to make it more secure.
4.HTTPS Manual Certificate Install
All websites should use HTTPS now. DNSimple who I use, make it easy to request a LetsEncrypt cert manually, so I’ll show this first, and how to wire it up. Manually installing certs is still normal in my day job. I’ll show how to get K8s to auto install certs too.
Taken from dnsimple - “In order to install a certificate, you need 3 elements: the primary certificate, the certificate private key and the intermediate certificates.
Once you have these files, installing a certificate is just a matter of combining these files together and configuring your platform accordingly. Unfortunately, every web server and platform require a slighly different procedure to install a certificate.”
We are using nginx so need:
- .key - certificate private key
- .pem - primary and intermediate certificate bundle
k create secret tls hoverflylagoons-ssl --key www_hoverflylagoons_co_uk.key --cert www_hoverflylagoons_co_uk.pem
k create secret tls programgood-ssl --key www_programgood_net.key --cert www_programgood_net.pem
Now we have the secret stored in K8s, lets tell the reverse proxy about the certificate. The rp handles https (and actually communicates with the pod internally over http - again something to enforce at a later date)
# app-ingress.yaml (partial)
spec:
  tls:
  - hosts:
    - www.hoverflylagoons.co.uk
    secretName: hoverflylagoons-ssl
  rules:
  - host: www.hoverflylagoons.co.uk
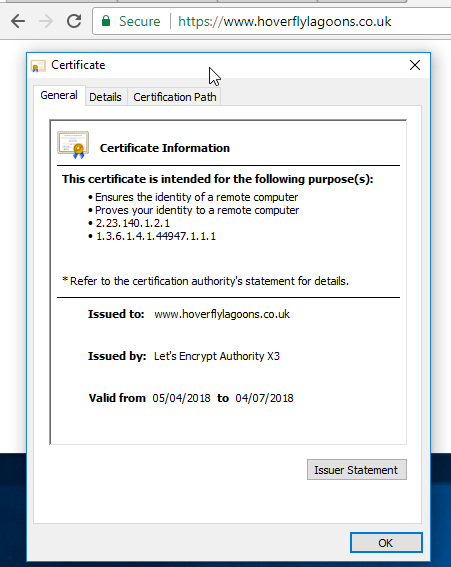
The certificate is valid and we have a green padlock. However is the certificate chain complete? Qualsy
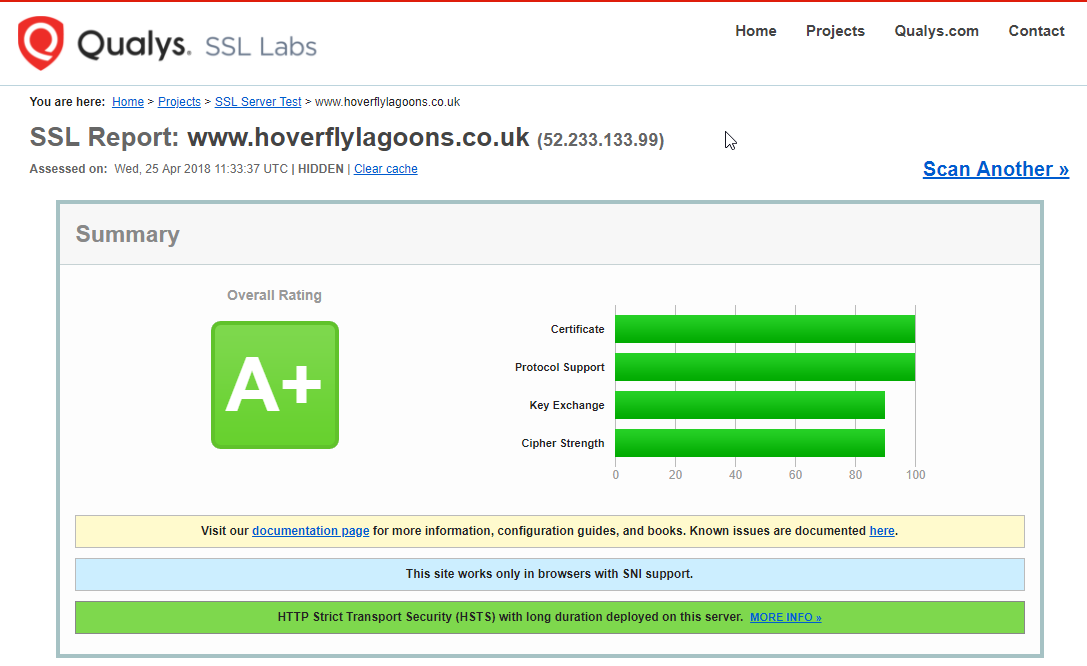
Certificate chain is good.
If you’ve bought the cert and only have a pfx file then: detail
** .key is the certificate private key
openssl pkcs12 -in bob.pfx -nocerts -nodes -out bob.key

** .pem contains the primary and intermediate certificate bundle
openssl pkcs12 -in bob.pfx -out bob.pem -nodes -nokeys

k create secret tls bob-ssl --key bob.key --cert bob.pem
Http and Https redirects
- 1.https://www.hoverflylagoons.co.uk - tls handled by rp. Traffic routed to app1-svc service
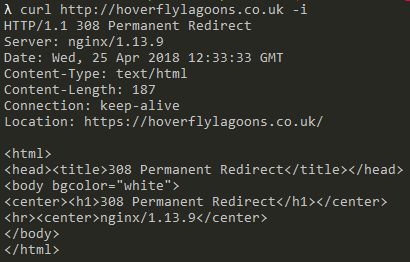
- 2.http://www.hoverflylagoons.co.uk - 308 permanent redirect to https://www.hoverflylagoons.co.uk handled by rp. This is default behaviour on the rp (ingress-nginx) see docs
# 1 and 2
curl https://www.hoverflylagoons.co.uk -i
curl http://www.hoverflylagoons.co.uk -i
nginx 1.13.9 is the rp version - we can verify here. We are using 0.12.0 of the nginx-ingress-controller.
We are using 1.13.12 in the redirect deployment (that redirects non-www traffic to www)
In order to stop having 2 redirects, lets update the nginx.conf to redirect http and https://non-www to https://www
events {
 worker_connections 1024;
}

http {
  server {
    listen 80;
    server_name hoverflylagoons.co.uk;
    return 301 https://www.hoverflylagoons.co.uk$request_uri;
  }

  server {
    listen 80;
    server_name programgood.net;
    return 301 https://www.programgood.net$request_uri;
  }
}
And lets update the image with a tag:
docker login --username=davemateer

docker build -t davemateer/redirectnginx:https .
docker push davemateer/redirectnginx:https

# 3
curl https://hoverflylagoons.co.uk -i
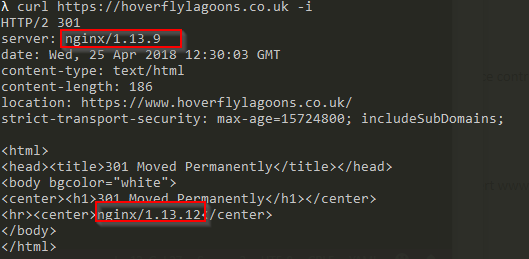
The rp is answering on https for hoverflylagoons.co.uk and passing traffic to the redirect nginx webserver version 1.13.12 (that we have a custom nginx.conf built on dockerhub for) then passing the 301 back through the rp (1.13.9)
#4
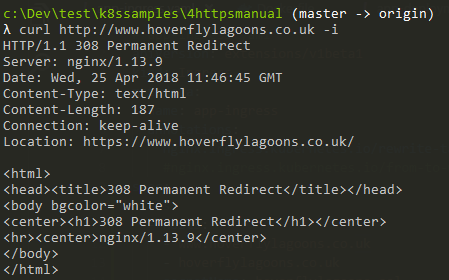
curl http://hoverflylagoons.co.uk -i
The rp is answering on http://hoverflylagoons.co.uk and is redirecting to https://hoverflylagoons.co.uk. This will then become #3 above.
A useful trick is to use the hosts file to redirect traffic for a specific site to a new IP address (for testing on a separate cluster). Be wary if you are on a domain joined machine (eg a work one) and want to test your companies website. I found the best way to test was a totally separate machine which wasn’t domain joined.
Multiple sites with tls
k delete -f app-ingress.yaml -f app-service.yaml -f app-deployment.yaml
k create -f app-ingress.yaml -f app-service.yaml -f app-deployment.yaml
Upload a new cert for programgood.net
k create secret tls programgood-ssl --key www_programgood_net.key --cert www_programgood_net.pem
Then added a new Ingress:
---
apiVersion: extensions/v1beta1
kind: Ingress
metadata:
  name: programgood-ingress
  annotations:
    nginx.ingress.kubernetes.io/rewrite-target: /
spec:
  tls:
  - hosts:
    - www.programgood.net
    - programgood.net
    secretName: programgood-ssl
  rules:
  - host: www.programgood.net
    http:
      paths:
      - backend:
          serviceName: app2-svc
          servicePort: 80
        path: /
  - host: programgood.net
    http:
      paths:
      - backend:
          serviceName: redirect-svc
          servicePort: 80
        path: /
then tested:
# 1 - should display page content
curl https://www.programgood.net -i

# 2 - should 308 redirect from rp (1.13.9) to https
curl http://www.programgood.net -i

# 3 - should 301 redirect from redirect (1.13.12) to https www
curl https://programgood.net -i

# 4 - should 308 redirect from rp (1.13.9) to https
curl http://programgood.net -i
Cert-Manager for automating LetsEncrypt
The older version of this is KUBE-LEGO as described in the AKS docs. See comments at the bottom. Hopefully they will have better guidance once Cert-Manager becomes more stable.
I haven’t put Cert-Manager nor KUBE-LEGO into production yet as I wanted to wait for more maturity from Cert-Manager. It was also really easy to manually upload the certs requested through DNSimple. I was caught out trying to do beta.hoverflylagoons.co.uk as DNSimple Pricing only gives root and www on the personal plan.
Cert-Manager and Docs
It needs helm and tiller to run (see below in this article). Current version is 2.9.1
helm init
helm repo update

helm install --name cert-manager --namespace kube-system stable/cert-manager
:: need to set rbac to false
helm install --name cert-manager --namespace kube-system stable/cert-manager --set rbac.create=false
Wordpress with Azure Hosted MySQL
Lets setup a blank install of Wordpress using hosted MySQL on Azure with persistence on an Azure disk (this works fine as we have 1 node)
Wordpress uses the MySQL database to store page content, and uses disk to store media and extra code (plugins)
Useful commands:
k delete -f app-ingress.yaml -f app-service.yaml -f app-deployment.yaml -f app-pvc.yaml
k create -f app-ingress.yaml -f app-service.yaml -f app-deployment.yaml -f app-pvc.yaml

az mysql db delete -g amysql -s davemysql -n wordpress -y
az mysql db create -g amysql -s davemysql -n wordpress

mysql --host davemysql.mysql.database.azure.com --user dave@davemysql -p
MySQL Database
Azure Database for MySQL is the Azure hosted MySQL which is now fully supported. As above it is easily scripted:
az group create -n amysql -l westeurope
az mysql server create -l westeurope -g amysql -n davemysql -u dave -p SecretYYY%%% --sku-name B_Gen5_1

az mysql db create -g amysql -s davemysql -n wordpress

az mysql server firewall-rule create --resource-group amysql --server davemysql --name "AllowAllWindowsAzureIps" --start-ip-address 0.0.0.0 --end-ip-address 0.0.0.0

az mysql server update --resource-group amysql --name davemysql --ssl-enforcement Disabled

k create secret generic mysql-pass --from-literal=password=SecretYYY%%%
In dev/prod I use: B_Gen5_1 or GP_Gen5_2
If you want to create a db.bat file use call to avoid the batch file exiting after each line eg:
call az group create -n amysql -l westeurope
call az mysql server create -l westeurope -g amysql -n davemysql -u dave -p SecretYYY%%% --sku-name B_Gen5_1
call az mysql db create -g amysql -s davemysql -n wordpress
So now we have a hosted database
I’ve turned off SSL enforcement and allowed all Azure IP’s access to this database. This should be turned on in the future.
Deployments
As before we need an Ingress:
# app-ingress.yaml
apiVersion: extensions/v1beta1
kind: Ingress
metadata:
  name: hoverfly-ingress
  annotations:
    nginx.ingress.kubernetes.io/rewrite-target: /
spec:
  rules:
  - host: www.hoverflylagoons.co.uk
    http:
      paths:
      - backend:
          serviceName: app1-svc
          servicePort: 80
        path: /
---
# app-service.yaml
apiVersion: v1
kind: Service
metadata:
  name: app1-svc
spec:
  ports:
  - port: 80
    protocol: TCP
    targetPort: 80
  selector:
    app: app1
And now for the Deployment and PersistentVolumeClaim: Configuration settings for WORDPRESS_DB_HOST etc.. can be found here
apiVersion: apps/v1 # for versions before 1.9.0 use apps/v1beta2
kind: Deployment
metadata:
  name: app1
spec:
  template:
    metadata:
      labels:
        app: app1
    spec:
      containers:
      - image: wordpress
        name: wordpress

        # from the udemy course
        # uncomment to fix perm issue, see also https://github.com/kubernetes/kubernetes/issues/2630
        #command: ['bash', '-c', 'chown www-data:www-data /var/www/html/wp-content/uploads && docker-entrypoint.sh apache2-foreground']
        env:
        - name: WORDPRESS_DB_HOST
          value: davemysql.mysql.database.azure.com
        - name: WORDPRESS_DB_PASSWORD
          valueFrom:
            secretKeyRef:
              name: mysql-pass
              key: password
        - name: WORDPRESS_DB_USER
          value: dave@davemysql
        ports:
        - containerPort: 80
          name: wordpress
        volumeMounts:
        - name: wordpress-persistent-storage
          mountPath: /var/www/html
      volumes:
      - name: wordpress-persistent-storage
        persistentVolumeClaim:
          claimName: wp-uploads-claim
---
apiVersion: v1
kind: PersistentVolumeClaim
metadata:
  name: wp-uploads-claim
  annotations:
    volume.beta.kubernetes.io/storage-class: managed-premium
  labels:
    app: wordpress
spec:
  accessModes:
    - ReadWriteOnce
  resources:
    requests:
      storage: 20Gi
As we are using 1 node only, we can use an attached disk to this node for the persisted volume. However there is a limit to the number of attached volumes
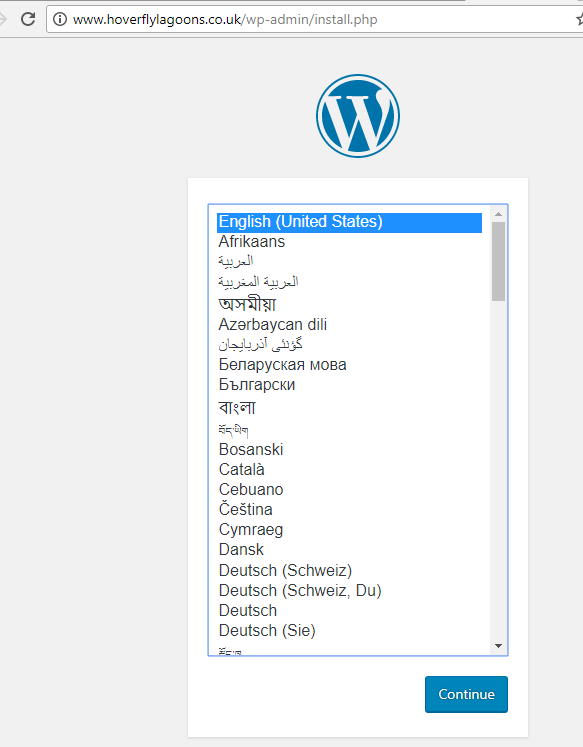
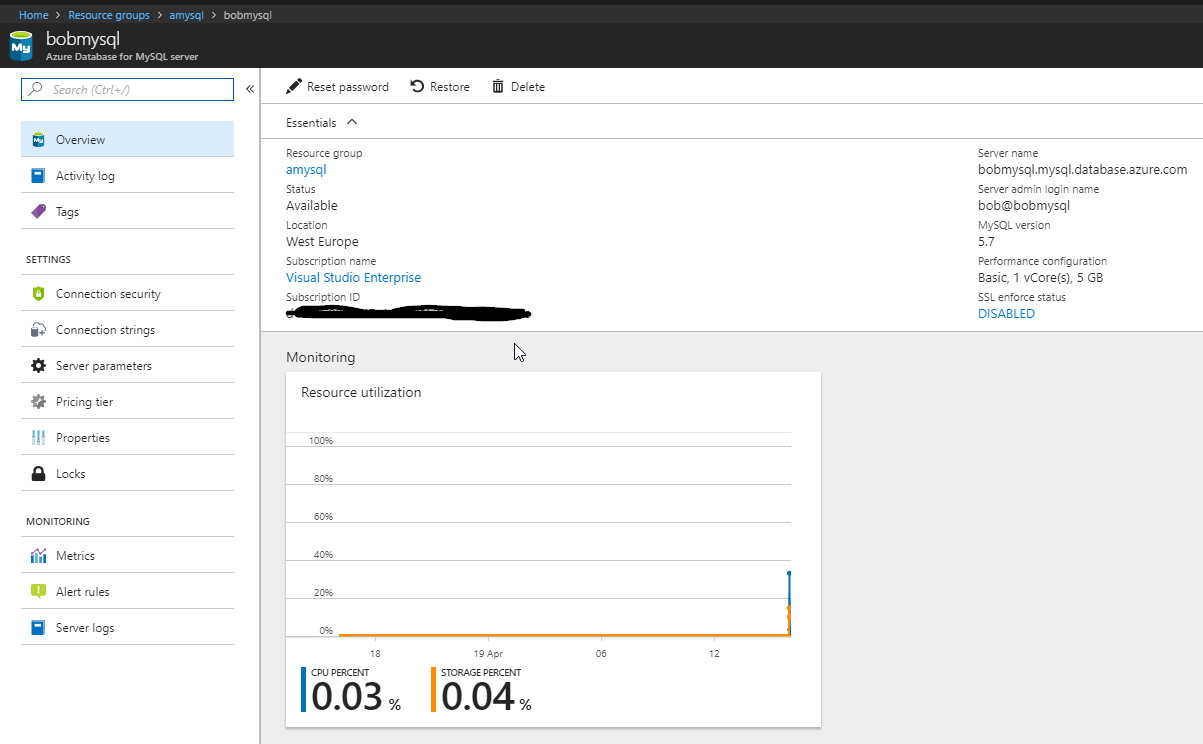
It worked. I had to set the dns name in the Azure portal to something that my dns is pointed to (a CNAME for the www). In this case I’ve used dave12345.westeurope.cloudapp.azure.com
The next step is to import whatever site into this test site (for performance checking etc). I use All-in-One WP Migration
Persistence
I wrote a separate article on this detailing how to go forward with different types of persistence.
Summary of where we are
We can install Wordpress and persist page content to MySQL. We can persist media and plugins to the PersistentVolumeClaim (in this case an Azure attached disk)
-
Does the website survive a Pod delete (and then k8s recreates)? Yes
-
Does the website survive a Node restart? Yes (and the PVC came up fine)
-
Patching of worker Nodes - this is done nightly by Azure. Details
az aks upgrade -g aksrg -n aks -k 1.9.6
This is the base of a solid Wordpress install on AKS.
Further information
Here are some further links and information I found useful.
Helm charts
Helm is a package manager for K8s. Can the official Wordpress Helm Chart help?
How to install helm: Download the Windows binary 2.9.0 at time of writing and put it in c:\sharedTools - this directory is in my Path.
patch one liner do on kubectl installed on WSL install helm after the helm init. 5th May 2018 had to do this to get 1.9.6 working on Azure.
helm init

# run patch on wsl
kubectl -n kube-system patch deployment tiller-deploy -p '{"spec": {"template": {"spec": {"automountServiceAccountToken": true}}}}'

helm repo update

helm install --name wordpress stable/wordpress
helm install --set serviceType=NodePort --name wordpress stable/wordpress

# random password for username: user
echo Password: $(kubectl get secret --namespace default wordpress-wordpress -o jsonpath="{.data.wordpress-password}" | base64 --decode)

helm ls

helm delete wordpress

helm list

helm ls --all cert-manager

helm delete cert-manager
helm del --purge cert-manager

helm install --name testwordpress stable/wordpress
helm delete testwordpress
- Azure Wordpress Helm Chart
-
Wordpress Helm Chart
- Bitnami Wordpress Image
- Bitnami MariaDB Image
- default implementation needed a 2 core VM
-
Bitnami Wordpress Image - 1m+ pulls
- minideb image minimalist debian
- PHP7.0.30 (Wordpress recommends 7.2+)
- Apache2.4.33
- Wordpress Image - 10m+ pulls
The Bitnami Wordpress Image is interesting as it comes ‘pre installed’ with a default user, and some common plugins.
There is an Azure version of the chart which uses Open Service Broker for Azure to provision an Azure Database for MySQL.
helm install --name wordpress azure/wordpress
Healthchecks
Beware that in high load situations health checks can cause the system to fail. I use Apache Benchmarks to simulate high traffic to see what happens, and if that is what is intended.
ab -n 1000 -c 100 http://www.hoverflylagoons.co.uk/
On a low powered database, this will get DB Connection Errors very quickly Turning on file caching helps a lot (WP Super Cache). 54-56s to run the above (with requests and limits set as below). 64s when I took off memory and cpu limit. 59 when took off initial resource size. These results are not logical, however data was coming over my 130Mbit line at around 100MBits.
Increasing the size of the worker VM in this case didn’t help.
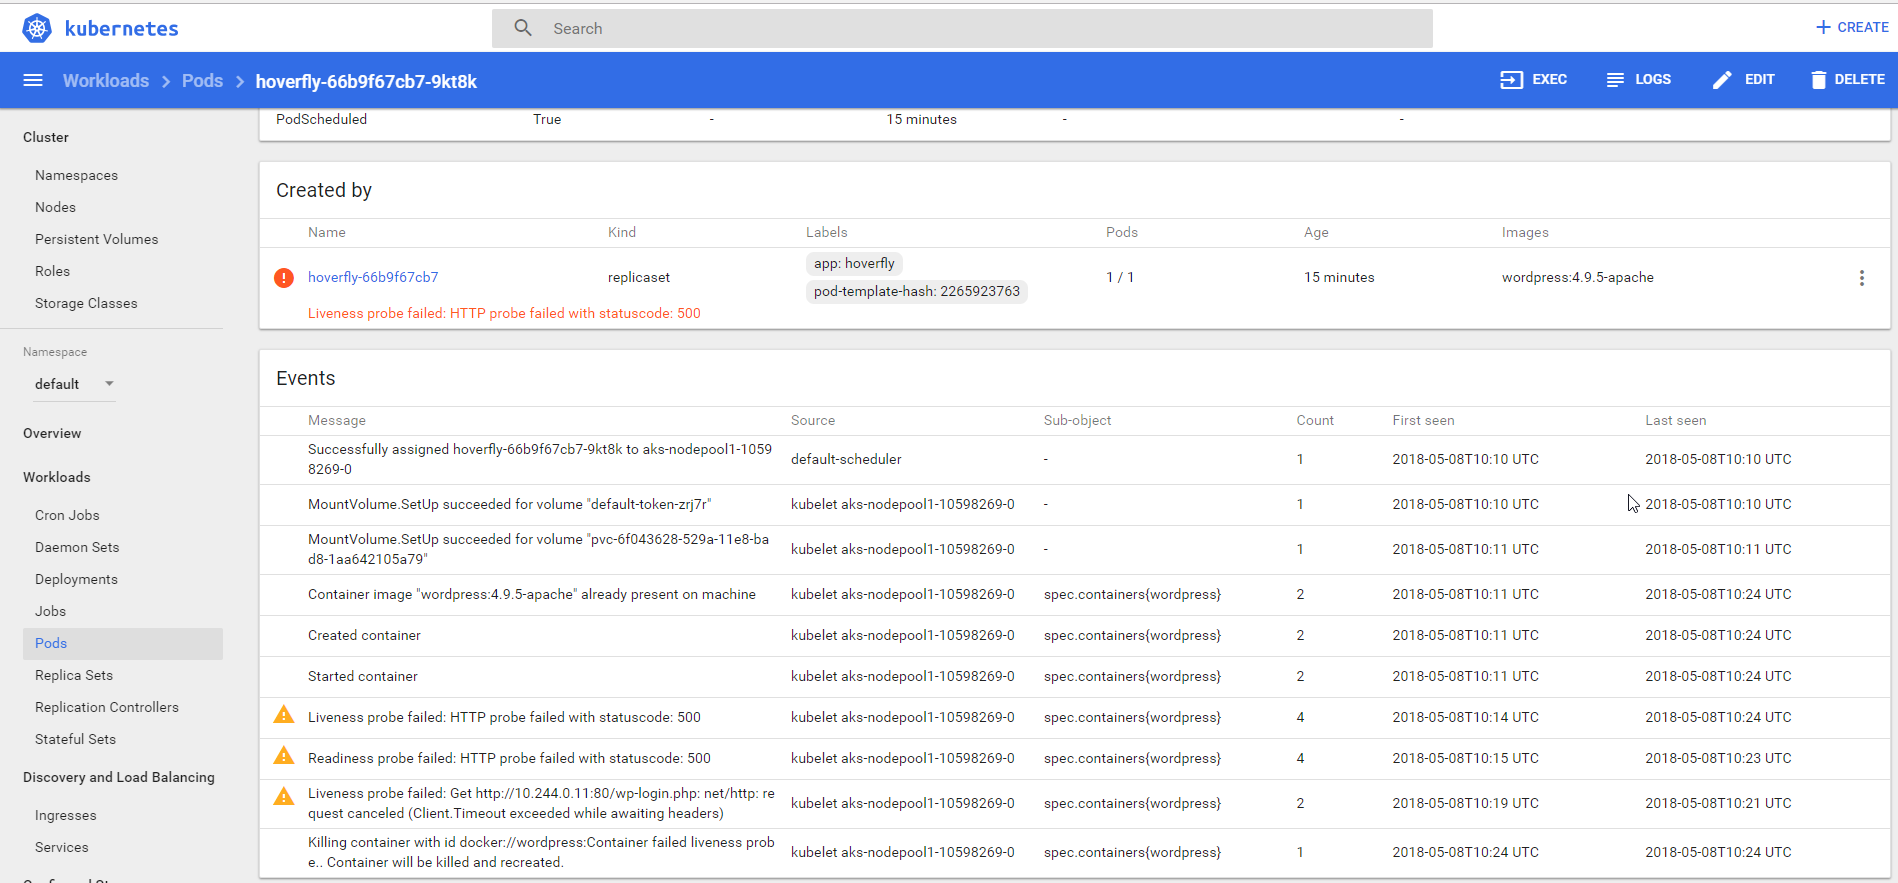
Under a sustained load, the container can’t handle the number of connections (the db is failing) so the probes are failing. After 10minutes the container is restarted. The specific settings are shown below.
Requests and Limits
An example of using requests (min) and limits (max) compute power on a deployment. Sometimes it is good to set the request and the limit to the same value
Liveness probe: when to restart a container (this is what I always use) Readiness probe: when a container is ready to start accepting traffic (generally don’t use this for WP containers)
apiVersion: apps/v1 # for versions before 1.9.0 use apps/v1beta2
kind: Deployment
metadata:
  name: hoverfly
spec:
  replicas: 1
  selector:
    matchLabels:
      app: hoverfly
  strategy:
    type: Recreate
  template:
    metadata:
      labels:
        app: hoverfly
    spec:
      containers:
      - image: wordpress:4.9.5-apache
        name: wordpress
        env:
        - name: WORDPRESS_DB_HOST
          value: davemysql.mysql.database.azure.com
        - name: WORDPRESS_DB_PASSWORD
          valueFrom:
            secretKeyRef:
              name: mysql-pass
              key: password
        - name: WORDPRESS_DB_USER
          value: dave@davemysql
        ports:
        - containerPort: 80
          name: wordpress
        # https://kubernetes.io/docs/concepts/configuration/manage-compute-resources-container/
        resources:
          requests:
            memory: 128Mi
            cpu: 300m
          limits:
            memory: 512Mi
            cpu: 800m
        livenessProbe:
          httpGet:
            path: /wp-login.php
            port: 80
          initialDelaySeconds: 120
          timeoutSeconds: 60
          periodSeconds: 120
          successThreshold: 1
          failureThreshold: 6
        #readinessProbe:
        #  httpGet:
        #    path: /wp-login.php
        #    port: 80
        #      #port: https
              #scheme: HTTPS
        # initialDelaySeconds: 30
        #  timeoutSeconds: 60
        #  periodSeconds: 120
        #  successThreshold: 1
        #  failureThreshold: 6
        volumeMounts:
        - name: wordpress-persistent-storage
          mountPath: /var/www/html
      volumes:
      - name: wordpress-persistent-storage
        persistentVolumeClaim:
          claimName: wp-uploads-claim
Custom Wordpress image
The goal here is to have a custom base image to develop and test against. An easy way to do this is use the standard image:
image: wordpress:4.9.5-apache
then restore all settings over it when it has come up using: All in one WP Migration
The database should be fine as it is Azure backed
The filesystem should be fine as it is Azure backed.
Testing
I found that Chrome’s caching could be intrusive, so purging was the answer.
# delete chrome's cache (be wary of page cache and DNS cache)
chrome://settings/?search=clear